Pin It button on image hover

Thursday, 30 July 2015

It's Christmas! (by Lesley)

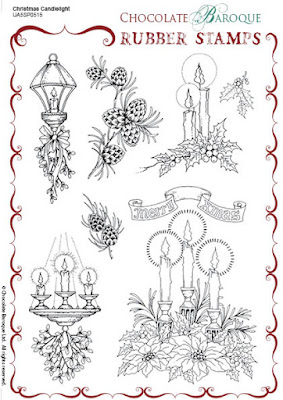
No don't worry, you haven't woken up in another world, it is still only the end of July but for us here at Chocolate Baroque Christmas has arrived. And by that I mean I am thrilled to bits to be launching the first of our Christmas stamps for this year.
This is also my first official Christmas release as owner of Chocolate Baroque so I'm doubly excited and I hope you are going to be as delighted with these new stamps as I am; I have to say Sue has really done us proud.  So without further ado here we go.

To begin with we have two A5 sets, Christmas Candlelight


followed by Sparkling Trees


and of course both are available as a money saving multi-buy


We have a wonderful mix of traditional and contemporary here, so whatever style you prefer I am sure there is something here to help make your Christmas projects special.

In addition to these sets, we are also releasing five individual cling mounted rubber stamps that are truly beautiful.

First we have Serena, Bearing Gifts and In Her Arms


and finally Rejoice! and Welcome Home.


If you would really like to treat yourself these are available as a brilliant money saving multi-buy
There are so many possibilities with these and, of course, they complement many of our other Christmas designs. I haven't had time to play with them much myself yet, but as a colourist I can't wait to try these images with my pencils and paints.

However, there are a few ladies who have been flexing their crafting muscles and over the course of the next month there will be some fabulous projects and ideas from our Design Team, so please keep tuned. In fact if you are not yet a follower please click on the 'Follow this Blog' link located in the right hand column and then you will never miss another inspirational post.

Is it too soon to say 'Merry Christmas'?


Wednesday, 29 July 2015

A Spot of Colour (by Lesley)

We all struggle with our mojo being stolen or wandering off at inopportune moments, mine often goes walkabout when it is the most inconvenient!  So what do you do to try and find the muse, to motivate your creative side?

Well I try and sit down for a little while and look at magazines, at my previous designs or on the Internet at Pinterest or even fashion and art sites.  What I am really trying to do are find things that stimulate the imagination. It could be a style or shape that catches my eye but I do admit that more than likely it will a colour, or combination of colours, that sets the creative cogs whirring.

And this was one of the reasons we started the Challenge Blog. Colour is a fabulous stimulus for many people and we hope that we have managed to inspire your mojo over the last year by giving you colour combinations that you may not have ever dreamt of trying.

So as we are still in our Birthday month over on the Challenge Blog I want to let you know that we have added a new page. This has all the colour swatches that have been used for each Challenge during the last year and would be a fabulous starting point to visit, or even re-visit, when you find your mojo has gone awandering. You can click on each swatch and you will be able to look around at both the Design Team samples as well as all the entries related to that particular challenge.

We will continue to add to this page and I hope that when your muse takes a day off you take a delve into our colour archives and find something that will entice her back. Why not pop over there today and be inspired by a beautiful project from Asha using the current colour combination.

Tuesday, 28 July 2015

Framed Bird (by Asha)

Good morning, friends! Just one more card from me featuring stamps from this month's release. The bird is from the Free As A Bird A5 stamp sheet and the sentiment is from the A Little Bird Told Me A5 stamp sheet. I coloured the bird with alcohol markers, fussy cut and adhered it to the embossed background. A little direct-to-paper action with Tea Dye Distress Ink accentuates the tree bark design.


As always, full details of the project and products used are available on my blog.

Thanks for stopping by and please stop by again soon for more fabulous ideas from the rest of the Design Team.

Beijinhos,
Asha

Monday, 27 July 2015

Kaleidoscope Bird (posted by Judith)

Hello everyone, I have a final project to show you this month using the Birds of Paradise multibuy stamp set.

I have recently taken up crocheting, and love the brightly coloured blankets with the variation of patterned motifs spreading across from one side to the other. My background uses one of the little motifs from the stamp sets, and a range of ink colours to replicate this idea. I have added the Damask Panel to rest the bird and cage on, also coloured with the same inks.

Finally, I have added a sentiment taken from the stamp set to complete the card.
 

This layout would look great in black and white, or metallics as well, to create a more masculine card. Thanks for stopping by, Judith xx

Sunday, 26 July 2015

Two for one (by Lesley)

I love turning office stationery products into craft items and today I am using good old fashioned blotting paper to create this card. Bit of a long post but I hope you enjoy the technique.


Take a piece of blotting paper approximately 30 x 9cm, mist thoroughly with plain water and then spritz with spray inks of your choice. I used Dylusions Ink Sprays in Squeezed Orange, Lemon Zest, Bubblegum Pink and Cherry Pie. Pick up the paper and allow that colours to run into each other. Soak up the excess moisture with kitchen roll and then dry gently with a heat gun. Keep turn the blotting paper over as it will curl as it dries.
Once dry you will have the bright side on which the inks were sprayed and the reverse will be a paler version. Fold a piece of white card measuring 14.5 x 21 cm in half to make a tall thin card. Draw a curve across the top of the card and then cut out. (You can use a cup, mug or other circular object you have as a template). Using wet adhesive attach the blotting paper, pale side uppermost, to the card. Allow to dry.

Ink up the bird image from A Little Bird Told Me using Versafine Onyx Black and stamp on to the front of the card. Ink up the leaves only on the large bird image from As Free as a Bird (use a baby wipe to remove any ink that may have strayed on to other parts of the image) and stamp across the top of the card. Set aside to dry.

Take the remaining piece of blotting paper and ink the bird again, but this time just the body and stamp on to the bright side. Cut out and set aside. Ink up the leaves again and stamp onto the bright side of the blotting paper, repeat. Cut out the leaves plus the berries and leaf.  Attach the body of the bird over the stamped image on the card. Add the leaves and berries to the branch as shown and finish with a sentiment from the Amazing Birthday clear set.

By using the front and reverse of the same piece of blotting paper you can be sure that all the colours tone in together. And there is nothing to say you couldn't use the bright version for the background and stamp the bird and leaves onto the paler side.

Hope this inspires you to try using blotting paper as part of your crafty creations. Experiment with it and see what else you can do; it makes great paper flowers by the way!

Thank you for for stopping by and please call in again to see more ideas from the Design team.


Saturday, 25 July 2015

Elegant black & white and colorful tropical (by Miranda)


Hi there,

Today my last two creations made with the birds of Paradise. All along I had the idea to create something simple only using black, white and a hint of gold. Just a simple but elegant card.
I had this black die cut frame in my stash and decided that it was perfect for this card. I had the feather dies also for quit a while and this was a good time to use them!
I have stamped the bird from ' as free as a bird' with Versafine black and added some accents with a gold ink. I have stamped the tail of the bird onto the die cut flower and coloured with the gold.
On the frame I have added some gold pearl pen accents.

Here you can see the gold ink a little better........


And now onto more colorful tropical spheres.............. quite different...isn't it?

I have used the same die cut feathers and flower. I have stamped the bird from the ' as free as bird' sheet with Archival Olive onto a distress ink background and coloured it with color pencils. I have stamped one of the fragments from the Rustic fragments on the flower and draw the same pattern as on the stamped image on the die cut leaves. I think the flowers look a bit like strawberries!


some gold accents on the tail with ink.......


Thanks for your visit and you know....I always enjoy to read your comments!
Hope to have inspired you with these lovely birdies!

Till next time,


Thursday, 23 July 2015

A Little Bird Told Me - Card by Florence

Good Morning everyone


I am sure by now, after seeing all of the wonderful makes by the team, you will agree just how  fabulously versatile the two new rubber stamps sets are.


Today I would like to share with you a card made using the new "A Little Bird Told Me" stamp set.
I have gone for a rustic feel with this card but with a little alternation it could easily be made into a Christmas Card.  Maybe giving the bird a red breast and color the background in festive colors.  Maybe a little glitter or similar to give a hint of snow. 


To make this card
Stamp the bird and mask it off.
Put some ink onto an acrylic block or plastic file folder and spritz with water.
Distress Ink or Spray Ink is perfect for this technique.
Swish a piece of white card around in the diluted ink.
Repeat if necessary, drying the ink between applications.
Leaving the mask on the bird, stamp the trees in the background.
Remove the mask and color the bird.
Tip:  If the mask has gone outside of the bird image and has left white areas, take a damp brush and blend the background ink a little to fill them in.
Optional: Apply a coat of spray fixative to fix the ink.
Make up the card as seen.

Thank you for looking.

Happy Stamping
Florence x

Wednesday, 22 July 2015

Thank you!

Hello everyone, firstly, I would like to say a big thank you to you all for the well wishes and support for the challenge blog as we reached our milestone first Birthday last week. It was lovely to read your messages both here and on the challenge blog, and to know that you have been enjoying the experience as much as we have. We could not keep going without you all, and it has been such a pleasure to see your creativity with each new colour challenge. We are looking forward to the next year and seeing what you create with the next batch of swatches that we have for you. There are some lovely combinations in store, and hopefully they will help you step outside your comfort zone and try new colours, perhaps for the first time.

We still have several weeks of our Anniversary month left on the Challenge Blog, so do please keep popping over to see what is going on; take a look at the Design Team inspiration, see who has won the challenge, and pick up a free digital download to use in your crafting projects. Leave us a comment if you have the time, as we love to hear from you.

This week we are going back in time to look at Challenge Six from December of last year. We had an awful lot of variety in styles and themes in this particular month. This selection is an example of how varied the projects can be for our challenge entries.

Felicie has created a beautiful floral card, full of vibrant colour:
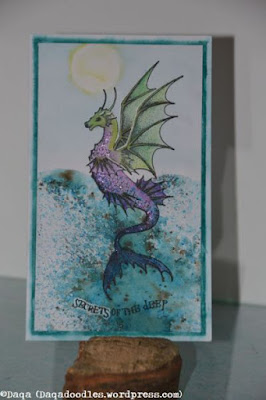
Debbie has created a watery backdrop for her dragon:

Sheila's card is very elegant, and the lilac ribbon and gems are lovely finishing touches:

Penny's fish tank is a very clever idea, the funky fish look right at home:
Kate's Pretty Bird card makes great use of one of the digital downloads and is coloured beautifully:

Thank you ladies for supporting our challenge with your fabulous projects. It has been great to see these once more.

We hope that you will be inspired to join in one of our challenges after seeing this visit to one of our older challenges. There is a monthly prize of £15.00 to be won and all details of the challenge can be found on the 'How it Works' page of the challenge blog. If you click on this link, it will take you to our current challenge where you can enter straight away.

Lesley will be back next week with another look at the Challenge Blog so do pop back to see what she has to share with you.


Tuesday, 21 July 2015

Fly Free my pretty bird (by Debbie)

 
Good morning.
Two offerings from me today, the card is the first project I made with the stamps.
Well, actually the second. I started using the bird cages and wanted to create a display of the bird cages hanging and stamped around twenty onto card masking them as I went along. Although the idea in my head was good I could only see them cluttered when I stood away from them. It didn't go any further than the bin.


I stamped and masked the three cages and coloured with alcohol pens. I used one of the swirly bird tails to add a little detail down the right side with Antique Linen distress ink. The edges were distressed with a sharp blade and Antique Linen . The sentiment was added and I masked onto my favourite pale turquoise card.


I really enjoyed making this tag as it just flowed without a lot of thought. I stayed with two colours, Peacock Feathers distress ink and French Ultramarine archival ink. I wanted to give this bird some sparkle so I reached for the glitters and acetate. The bird was stamped onto the acetate with Stazon black and when dry I used a glue pen to add the glitter to it. The glue was drawn on in sections so I could differ the colours.
Thanks for visiting
Debbie

Monday, 20 July 2015

Birds of Paradise (by Julie)


Hello, hope you are loving the bird theme for this month. I think they make fabulous designs for any occasion which makes them so versatile. For my first card I have taken the bird cage from A Little Bird Told Me and the bird stamp is from As Free As A Bird. The leaves stamped around the bird panel are from Seasonal Fragments

The bird and leaves have been coloured with coloured pencils and I have added white highlights with a marker pen and Crystal Stickles. To create the cage, I inked up the stamp with Onyx Black Versafine and then spread over Molding Paste and set a side for at least 12 hours to dry. Once dry I very carefully peeled the paste from the stamp and coloured with a yellow alcohol pen. For the background I spritzed water onto water-colour card and then dropped on some pale blue, liquid water-colour and dried with a heat tool. I then applied Fossilized Amber and Fired Brick Distress ink with a wet wipe and when it was dry I added some Crystal Stickles.


As you can see my second card is in a similar style to my first and they were both created in a similar way. The only differences are that on the background, instead of dabbing the Distress ink, I took a wet wipe and swirled the Pickled Raspberry Distress ink.
For the birdcage I cut and stamped the image 5 times, then using one of the cages as the base I folded the remaining 4 cages in half and glued them together. Before gluing them to the base cage I ran a length of thread, from the top of the cage to the bottom and attached jump rings to each end so that the chain and beaded head pins could be attached.
I attached the cage chain to an eyelet that I had set in a die cut border and used silicone glue to glue everything to the base card.

Thanks for stopping by and please come again soon xx

Sunday, 19 July 2015

Take three crafters...(by Lesley)

Today's post is another collaboration, this time from Judith, Debbie and I.

A few weeks ago we managed to all get together and decided it would be fun for us to start a project and then swap over.

This first canvas was started by Debbie who stuck small pieces of Melange Tissue and flowers from a serviette to a canvas panel with Glue 'n' Seal. Next she mixed some gesso with Peacock Feathers Distress Paint to make a tint and brushed it randomly around the canvas. After leaving it to dry Judith took it home to add her flair to it. 

Using the cherry blossom image from the Tranquility set she stamped it several times and then coloured the images with a combination of pencils and watercolours. The bird, from A Little Bird Told Me was stamped on 160gsm white cardstock and then coloured with pencils. Finally she added 'perchance to dream' from the See Beauty clear stamp set.


The second canvas was started by Judith who used Postale tissue and flowers from a different serviette. She used the same tint combination of gesso and Peacock Feathers Distress Paint and then handed it over to Debbie. To harmonise with the flower images from the serviette Debbie coloured a piece of 160gsm cardstock with Squeezed Lemonade Distress ink and then punched out a whole bunch of petals. She stamped the leaves from the Sunny Sunflowers set and the bird from A Little Bird Told Me onto cardstock and coloured with pencils.

Using 3d gel she then attached the leaves and petals, arranging them to simulate the serviette flowers and finally added the bird.
So what hand did I have in all of this? Well I was going to add a stamped quote or phrase to Debbie's canvas, but I felt that it would detract from her beautiful flower head. So my contribution is to write up this post , the title of which post should be 'take two crafters and a writer'.  What I can do is to say a huge thank you to both ladies for designing such stunning pieces of artwork, I think anyone would be proud to hang these on their wall. And if ever a collaboration project is suggested again  I don't think I will get off so lightly next time do you?

Thanks for joining us today, please visit again tomorrow to see another wonderful creation from one of our talented design team.

Saturday, 18 July 2015

Golden Bird (posted by Judith)

Hello everyone, my project today is a step outside my usual colour palette, but I wanted to create a vibrant tropical feel with the lovely Birds of Paradise Multibuy stamps that are currently on offer this month.  I spritzed a piece of smooth watercolour paper with some Dylusion sprays to create a background, and then used a stencil to add some depth. I used Distress Inks to add some colour over the stencil.

I used a little flower spray from the Wisteria Lane stamp set to create some branches to hang the bird cage from. I stamped the image randomly around the top edges of the background, using Archival Ink. I stamped and embossed the birdcage using gold embossing powder, ensuring that the background was completely dry.

I stamped the bird onto the background, and then again onto a spare piece of card. I coloured the second image with Polychromos pencils and cut it out before adhering it to the background. I added a sentiment from the Card Sentiments clear stamp set. I matted the background onto a piece of dark green card to complete my project.

Thanks for stopping by, Judith xx

Friday, 17 July 2015

Blue bird on a Damask background (by Miranda)


Hi there,

This is my 2nd take with the new beautiful birds from ' a little bird told me'. Just love them as I love birds in general! They have a special meaning in my life.........I've used the lovely Dusky Damask stamp sheet for the background.

I have worked on canvas paper and used some fluid inks like Ecoline, like to work with them very much. I am getting very messy but it's nice to let the inks flow and create beautiful patterns. On the left bottom corner I pulled out the ink by spraying my clean stamp with water and hold it onto the paper from a while. When you lift the stamp and blot the paper with a kitchen towel the magic happens......
At the right upper corner I have stamped with the white Ecoline, you could also use the white Distress paint or Dylusions paint.


Also made a technique tile and used the triple embossing technique. You can also die cut a shape you like from grunge board or chipboard. 
First I have blended the tile using Distress ink Peacock feathers. Than I've partially stamped the Dusky Damask fragment on the tile using Chipped Saffire. Than you press the tile into your Versamark pad and emboss it with a clear embossing powder. Repeat the last action 2 times. Ink up your stamp with Versamark and when the 3rd layer is still hot you press your stamp into it, leave for a few seconds and than carefully remove your stamp. Add some perfect pearl powder into the impression.


Hope to have inspired you with this one!
Thanks for visiting and always enjoy to read your comments,
till next time,


Thursday, 16 July 2015

Have you heard about our Year of Stamping?

Every month since January we have been launching a new stamp as part of our 'A Year of Stamping with Chocolate Baroque' (AYOS) but this is the first time we have introduced it on our Design Team Blog.

If you have not heard of our AYOS then I would suggest you click on the link at the end of this post to read all about this exclusive project club.

Our newest recruit to the Club is an array of beautifully detailed fishes and is available in two sizes, Super and Standard or, of course, you could purchase them as a multi-buy.

If you purchase any of our Year of Stamping stamps you will receive a link to an on-line magazine which is full of step by step projects rom the Design Team, including Glenda and myself, plus a technique article and exclusive offers. And if you order any of the previous month's stamps you can get the back issue of the magazine too. Here is a sneaky peak at some of the contents of this month's magazine.
So why not pop over to the website and check out our wonderful Year of Stamping stamps, you could start building your collection today. 

To find out all the details of this inspiring stamping club, please click here.


Wednesday, 15 July 2015

Our Challenge Blog is one today!

Well what can I say, our wonderful Challenge Blog has reached the grand old age of one! I cannot believe that it has been running for a year, and what a stunning and colourful year it has been.


Week after week you have stunned us with glorious artwork and amazing creations. Your incorporation of the colours for each month have been outstanding and it has been a joy for us to see all your wonderful entries. The Challenge Blog works because of you and we have been delighted with your contributions over the last twelve months.

As a special thank you we are celebrating our birthday with a few surprises. For more information on the first of these, and to take a look at the brand new Challenge, please visit the blog by clicking here.

So after a quick chorus of 'Happy Birthday' may I just conclude by saying three cheers to you our blog readers, followers and contributors. You help make this a success and we hope you will follow us into our second year with your hands covered in ink and paint and your head full of brilliant new ways to use our stamps. We look forward to seeing you there.


Monday, 13 July 2015

As Free As A Bird and A Little Bird Told Me - Cards and a 10 minute tag By Florence

Good Morning everyone

Thank you for stopping by.

I hope you have had a lovely weekend.

A big warm welcome if this is your first visit to the Chocolate Baroque blog.

Today I would like to share with you two cards and a very quick tag made using the new "As Free As A Bird" and "A Little Bird Told Me" rubber stamps Sets.


My second card is very similar in design as the first.


To make these cards

Apply some Distress Ink to white card stock using a foam sponge and then lightly spritz with water and let dry.
Stamp the floral branches and color.
Stamp the bird and the bird cages, color the images and cut them out.
Make up the cards as seen using foam pads or silicon to attach the bird and the cages.

The Floral Branches are a stamp from the Clear Set "Lily Pad".

My last project for today is a really quick tag.


To make this tag

Apply some Distress Ink to the tag using a foam sponge.
Lightly spritz with water and dry.
Take a circle stencil and apply some Distress Ink using a foam sponge.
Move the stencil to another position on the tag and apply more Distress Ink.
Stamp the bird cages and add a hint of color.
Stamp the tail feathers of one of the birds to add a flourish pattern.
Stamp the sentiments and mat and layer it.


Do check the older posts to see the amazing projects made by the team.

Happy Stamping

Florence x