Pin It button on image hover

Monday, 31 July 2017

Four Seasons in one post by Zoe

Good morning Lovelies! Can you believe it's July tomorrow? Wow the years going fast!

So I'm back for my third and final post for the month this time I'm sharing my Seasonal Ladies projects that were featured recently on Hochanda.

My first project is a Greyboard tag which I used chalk paints with Crackle medium, simple heat embossed image, added some white Frantage, a diecut and glittered snowflake and few pearly dots.

 
5x7 Canvas board, painted very randomly with chalk paints, the image was stamped onto tissue and coloured using pencils, adhered with gel medium, I stamped and coloured several times onto card and fussy cut the flowers and butterflies to decoupage and add more interest.

 
Greyboard Tag with white reverse side, I used the white side, picking up Distress Oxides off a craft mat that had been spritzed with water, I stemmed the Spring image onto the tag and also plain card, I coloured the image with watercolour markers and added some flicks of black ink onto the tag before cutting out the lady and the flowers to decoupage.

 
Watercolour card which I heat embossed in white, I wet it down with clean water and just dropped watercolour inks into the image to create a rather random effect.

 
Linen texture card, simple stamping and coloured with pencils, I decoupaged the flowers and butterfly.
 
I hope you like my creations here, thank you for visiting and gave a great day xx Zoe xx 

Sunday, 30 July 2017

Awesome, Creative, Amazing (by Brenda)


Morning Peeps, just popping in with my final few shares made with the stamps Lesley showcased on Hochanda recently.

If I had to choose a favourite from the lovely Seasonal Ladies I think it would be Autumn Medley  featured on the card above, mainly because I just love working with Autumnal colours. My starting point was to stamp the image with Versamark and emboss with detail copper before colouring in with Distress Inks. Using a mask and texture paste I added some branches across the top and when dry replaced the mask and rubbed over some Distress Inks and glue here and there and some Gilding Flakes although that doesn't really show up in my photo I'm afraid. Finally I stamped three words from the Amazing Mackintosh Words stamp set, cut them out and added to the finished piece.


Here I stamped the image from Mackintosh Beauty stamp set three times and coloured in with Distress Ink, matted and layered with coordinating card and stamped a sentiment from Mackintosh Sentiments set.


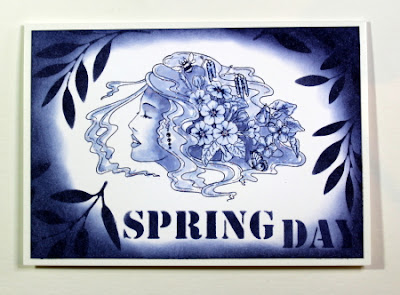
The background of my next card is Distress Inks with a spritz of mica spray which helps the colours blend into each other. The lovely Spring Awakening image is stamped with Versafine black and heat embossed with detail clear and pencils used to colour the flowers in her hair. Using the new masks which compliment the Seasonal Ladies I inked some leaves, the sun and word.    


My final share used an image from Mackintosh Beauty, stamped with Versafine black and heat embossed with detail clear onto a piece of card created with the shaving foam technique.........I tend to have a session with different colours so I have a stock of them ready to stamp onto. I coloured the image with pencils, matted her into the base card, tied some ribbon and stamped and cut out a rose from the same set to place in the centre.

As always my thanks for you visit today.


Saturday, 29 July 2017

Spring Awakening (by Marga)

Hello everyone.


What is more relaxing than colouring, I think nothing.
This one I coloured with Distress Inks.

I used the stamps : Spring Awakening, Amazing Mackintosh words.

Hugs 
Marga

Friday, 28 July 2017

From Summer To Winter (by Julie)

Hello, lovely to see you. I can't believe that we are nearly at the end of July so I thought I had better get my Summer Solstice card in quick as before we know it the Winter Dawn Lady in my second card will be the order of the day...


For my first card I stamped and then masked the Summer Fayre lady. Next I took the Seasonal Journey stencil and applied teal and orange dye ink through the Summer Solstice words and added white, paint pen, highlights. 
The shimmering sun has been stencilled with the Seasonal Elements using a sponge and yellow acrylic paint. Once dry I went over the entire background with Old Paper Distress ink and added more white, paint pen, highlights.
Once I removed the mask from the lady I coloured with pencils and then edged the card with Evergreen Bough Distress paint.


This beautiful Winter Dawn lady was stamped onto Kraft card with a blue Versafine ink and then coloured with Polychromos pencils. I cut the card to size and edged with Picket Fence Distress paint and Crystal Stickles. The base card was stamped with the snow flake stamp from Sparkling Trees, before applying the blue card-stock and the stamped Winter lady. The card was finished off with dabs of Crystal Stickles and die cut snowflakes.

Many thanks for taking a peek. Please call back very soon for more Design Team inspiration.

Julie xx

Wednesday, 26 July 2017

Elegant Peacock Mask (by Penny)

Today sees the final project from our Guest Design Team member, Penny Butler, for this month. She has created a fabulous Venetian style mask in a bold peacock theme.

Penny writes:

Hi everyone, I hope this finds you all well. I have a fun project today for you as my third Guest Designer post here this month.

I have used stamps from the Tangled Peacock and Peacock Parade stamp sets, gold gilding paint, Versafine Ink, gold embossing powder, black artist's pen, Distress Ink, gold acrylic paint, and gems from my stash.

On some white card, I stamped two tails and the body of a peacock, and embossed them in gold. I then cut the images out and painted them. I painted the mask with gold gilding paint, and when dry, I used a couple of worker stamps to decorate it. I then used the black marker pen to accentuate the eye holes. I added some gems from my stash to accent the tails, and added some more to the mask. I attached the tails to either side of the mask, and the peacock body to the centre above the nose. I also added a couple of tiny gems to the corners of the eyes, and finished the project by adding some ribbon to tie the mask on with.

A beautiful fun project for parties, home decor, or a keepsake.


Thank you Penny for such an inspirational way to use these stamps. Penny will be back to share more projects on the blog with us in a few months' time. You can see her work featured regularly in some of our compilation posts each month here on the blog, and she also contributes to the TV shows on Hochanda. Penny's blog can be found here.

Thanks for stopping by,


Tuesday, 25 July 2017

Happy summer (from France by Dominike)

Hello
It is a sunny summer in France. Time spending with my grandson is a wonderful time.
I made cards with colors and one Chocolate Baroque rubber stamp. I like playing with the same subject for different projects.


Bonjour
Il fait très beau en France et passer du temps avec mon petit-fils est un moment merveilleux.
J'ai fait quelques cartes avec un seul tampon CB. J'aime beaucoup ce jeu. J'espère que vous aussi.
A bientôt.

I hope you like this.
Kind regards from the sea.

Monday, 24 July 2017

Best Wishes (By Magda)

Hello Ladies, this time  it was quite difficult to choose only some of  the beautiful Mackintosh collection sets for my card.

Step by Step :

1. Stamp twice one near the other the stamp from the set Mackintosh Beauty using Versafine small 
    Inkpad Onyx Black on a white card
2. Colour only the background portion of the stamps dabbing with a Watercolor BrushDistress Ink 
    Pad Tumbled Glass to a create a transparency window glass
3. Stamp again the stamp of point 1. on another white piece of cardstock
4. Colour this time only the flower and the leaf with watercolor pencils
5. Colour between the leaf and the flower with Distress Ink Pad, as done at point 2.
6. Cut as decoupage the contour of the flower glue it with Ranger Triangular Collage Glue Stick
    between the two white flowers of the card
7. Stamp with  Versafine small Inkpad Onyx Black the sentiment of the set Mackintosh Sentiments
    and decorate the bottom of the card.


I hope my project has made you curious to learn more about Charles Rennie Mackintosh (1868-1928) and the Mackintosh Style.
Magda

Sunday, 23 July 2017

Winter Shaker Card (by Anne)

Good morning. Today I am sharing another of my recent show samples using one of the lovely seasonal ladies – Winter Dawn. I just had to go over the top with sparkle and bling for this one – tee hee.

This one does make a nice Christmas card (sorry to use the ‘C’ word) - but it could just as equally make a nice winter birthday card too.

Materials:

How to make it:


  1. Stamp the image with Versamark and emboss with the silver powder. Colour with pencils and use fine tipped black pen to darken eyes. Use the white pen to enhance highlights. Add glitter glue to snowflakes. You could stop at this stage and simply mat and layer onto the card front.
  2. Cut a frame from holographic card. Using texture paste add the lettering through the stencil. Quickly coat with loose glitter. When dry enhance the lettering by drawing on a drop shadow with black pen.
  3. Trim the acetate to fit behind the frame. Add snowflakes using Kristall and applying through the stencil. When dry glue to the back of the frame with strong tape. Apply the framed window to the card with 3D foam tape ensuring that there are no gaps. Before sticking down add a pile of crystal glitter to the middle of the card.
  4. Finish with die cut snowflakes.

Summer Day and Winter Solstice (posted by Claire)

Good morning, I hope you're all having a lovely weekend. I love all of the gorgeous seasonal ladies and it was a real treat to find that Lesley had produced some lovely stencils to go with them. I've used both the stamps and stencils for my projects today.


To make Summer Day I began by stamping Summer Fayre on to kraft card and colouring her with Lyra pencils. I dry brushed around the image with white gesso and also applied gesso to a piece of corrugated card. Once the gesso was dry I applied different shades of green acrylic paint through the Useful Leaves stencil to create the background, this is definitely a useful stencil but so pretty too. I added the lettering using the Seasonal Journey stencil and a little red acrylic paint. To finish the wall hanging I added some ribbon, gingham trim and little paper poppy.


I've used a much darker more dramatic colour palette to create Winter Solstice. I began by stamping 
Winter Dawn onto white car and coloured her with Graph'It Markers. I outlined the image with a black marker annd then applied black gesso all round and then added some colour using Twinkling H2O paint in blued and purples. I stamped the image again on acetate using versmark in and embossed with a sparkly white powder. I cut the snowflakes out and layered them up over the image. I added a little glue and glitter too give some more dimension. I added some stencilling around the image using the Seasonal Elements stencil and glassy gel medium, sprinkling with more glitter while the medium was still wet. The colours of the paint have bled through this while it was drying, a happy accident as I love the effect!  I applied clear versamark ink through the stencil to create the wording and embossed with white sparkly powder. I added a little scrap of ribbon and a snowflake embellishment to finish off.

Thanks so much for visiting today, hope to see you again soon
Claire xx

Saturday, 22 July 2017

Beauty Blooms With Grace (by Asha)

Hello again, friends. I come bearing an Art Journal featuring stamps from two utterly gorgeous sheets: Mackintosh Beauty and Mackintosh Windows.

I created the floral arrangements in the corners by cutting up the various images from both sets and adhering them together to form a bouquet. I framed the page with a lace stamp from the Texture Fragments sheet, stamped with light grey ink.

The background is a blend of soft shades of pale pink and lavender acrylic paints.


As always, I have details of the tools and products used on my blog. Thank you for stopping by and drop in soon for more designs by the team.

Beijinhos,
Asha

Friday, 21 July 2017

seasonal ladies

 I have three of my sample cards for last month's tv shows to show you today. It was hard to have favourite ladies, but I think these two stamps are well in the running!
For both cards the summer fayre stamp was stmaped using black versafine ink and coloured with watercolour pencils, masked with masking fluid, and brusho backgrounds added.
For the first card I partially diecut the lady out, leaving the butterfly and poppies outside the die. The base card was coloured with distress oxide inks, leaves added using the useful leaves stencil and overstamped with the large crackle stamp. The poppies in the foreground are from the floral notes plate, stamped onto leftover paper coloured with brushos and fussy cut out.


The base card was done in the same way for the second version, but the lady was cut down to a rectangle and matted onto gold card. I  sprinkled red brusho over the green background to try to create a poppy field effect, but it didn't quite work....


For the autumn medley stamp I tried to create a wood effect with the brushos, using my version of a  technique found on Youtube. I started with a piece of white card, sprinkled brown and red powder at the top, and used a damp sponge to drag the colour down the page. The colours are more blended together than the original, which used acrylic paints to blend the powders, but i was quite pleased with the result. back ground mounted onto black and gold, then onto white base card blank.
The lady was stamped with black versafine ink,  coloured with pencils and fussy cut out. I stamped the hair part again several times onto a spare piece of card coloured with orange, yellow and brown brushos, and fussy cut out the best leaves and decoupaged them onto the original.


Wednesday, 19 July 2017

Blue Poppies (by Penny)

Hello everyone, here is the second post this month from Penny Butler. She has made a pretty card incorporating some stunning blue poppies.

Penny writes:

Hello again, I hope everyone is well and still enjoying our Summer. Today I have a lovely 'worker' card for you, my second post here as Guest Designer this month.

I have used the Poppy Meadow and Words of Inspiration stamp sets, Kraft paper, black card, Distress Crayons, Onyx Black Versafine Ink, metallic colouring pencils, and bits and bobs from my stash.

I scribbled the crayons onto the Kraft paper and blended them with a little water. I added Distress Ink around the edges, matted the background onto black card, and attached it onto a white base card. On another piece of black card, I stamped and embossed a poppy. I coloured it in with pencils, then cut around it leaving a small border. I attached it with dimensional glue. I then stamped and embossed a sentiment in black onto a piece of Kraft paper, die cut it into a tag, and added ribon. I added the same ribbon, some lace and a button to the card with some adhesive tape, then added the tag. I finished the design with some Stickles glitter glue.


Penny will be back with her final project of the month next week,


Tuesday, 18 July 2017

Flowers in Her Hair (by Judith)

Hello everyone, I have a colourful project to share with you today, featuring the Summer Fayre stamp that was part of the recent TV shows on Hochanda.

I have stamped the image onto a square topper, and then masked the image. I coloured the background with Distress Ink, and then loosely coloured the image with water based markers, sometimes using a water brush to dilute the colours.

I created a larger background using matching colours of  Distress Ink, and spritzed the background with water. Once the background was dry, I stamped an image from the Poppy Edges stamp set, to frame the central image, using Distress Ink. I added a large red bow before I assembled the card, choosing a toning olive green card to finish.

I hope you like her pink hair and green eyeshadow. She reminds me of a festival goer, with her bright accessories!

Thanks for stopping by, Judith xx


Monday, 17 July 2017

Summer by Zoe

Good morning Lovelies, I'm back with my second post this month and today I'm sharing 2 projects, one is the Summer lady the other is one from the Mackintosh set, both were featured recently on Hochanda.

The tag is a Greyboard Tag which is white on one side, I stamped the lady first and masked her face with Drawing Gum before using Distress Oxides (wrinkle free distress technique) I used Distress inks through the stencils then coloured my image with Distress inks and waterbrush, some gold glitter glue in the flower centres, some silver Gilding wax around the edge and Voila!

 
Stamped and embossed in white onto watercolour card, I wet the card down and just washed over with watercolour colour inks for the background, I used watercolour markers onto a tile in a couple of shades of red and just picked it up on a wet brush and dipped into the roses, I used a fine line marker to create the edge.


Thank you so much for visiting, I hope you like my creations, have a great day xx Zoe xx 

Sunday, 16 July 2017

Poppies in her hair (by Brenda)


Good morning Peeps, I am back with some more shares using the Mackintosh and Seasonal Lady stamps that featured on Lesley's June shows on Hochanda.

Kraft card is something I am always buying but rarely use so I though I would try and remedy that and quite like how well it works with white and red, a combo that I will be trying again. Using the new masks which match the Seasonal Ladies I used the leaves from one of them and white Dylusions, masking section of the cardstock as I went along so the spray could be directed through the mask. Then using red Distress Ink I sponged the word repeatedly at different angles.

The lovely Summer Fayre image was stamped with Versamark and heat embossed with detail white powder and coloured in the flowers and Butterfly with the same red Distress Ink. I stamped the Butterfly again and cut out and also one of the flowers, coloured both with the same ink, cut out and decoupaged.


Taking the stem Rose from Machintosh Beauty stamp set I repeat stamped with Black Archival to create a circle and coloured in with sparkle pens. The sentiment is from Amazing Mackintosh Words, stamped with the same black ink and cut out using dies and matted into the centre of the Roses.


The background of this card is Distress Inks and repeat stamped with flowers from Mackintosh Windows and Mackintosh Beauty. A strip of vellum placed across the middle and an image from Mackintosh Windows stamped with Versafine Black and heat embossed with detail clear powder, cut out, coloured with Distress Inks and placed over the vellum.


My final card has the lovely Winter Dawn which I stamped with Versamark and heat embossed with detail silver, cut out with an oval die and went round the edges with a thick silver pen before mounting onto a base stamped with the same ink and powder and Large Crackle Background stamp. A silver bow to finish.

Saturday, 15 July 2017

Fifteen Minute Cards

Hello everyone, welcome to our monthly post packed full of projects that are quick to make, yet stylish and full of the wow factor, because they are made with Chocolate Baroque stamps. We try to show you lots of tips and inspiration in these bumper monthly posts, and help you to find ways of creating cards that do not need to take ages to put together. You can visit each Design Team member's blog for further details by clicking on their names, and also see lots more of their creative ideas when you visit their individual blogs.


Zoe's cards are a riot of colour, and would definitely brighten anyone's day. For the first two cards, she has used embossing onto watercolour card as a resist, and added watercolour inks.


Her third card is a very simple card using heart shaped die cuts. She has used some texture stamps to add pattern to the shapes, and a pop of vibrant colour:

Rachel has created a pretty Spring themed card using kraft card as the base, stamping and embossing with white embossing powder. She has added some of our newest stencils to her card.

Her following projects incorporate the lovely Mackintosh Windows stamp set, and she has chosen a warm palette of reds and pinks to complete both cards. She coloured both images with water based markers, then masked the images and spritzed the backgrounds with spray inks.


Magda has created two pretty cards for us this month. For her first card, she has used the fabulous fish, and added the Large Crackle Background behind. The sentiment makes the card a perfect 'anytime' card to send, and would suit all ages.


Her second card with its positive message, and dreamy background, could be useful for so many purposes:

For her first card this month, Vronnie has stamped the large image from the Patchwork Butterfly stamp set, which she masked, and then stamped the images from Butterfly Blush randomly over the background. She added Brushos and spritzed with water, before removing the mask, and adding a light touch of colour to the large butterfly.

She has created two cards using the lovely Winter Dawn image. The first card was created by stamping the image onto grey card and colouring it with pencils, adding accents with a white marker and some gems.
The second, she masked the image, and added a Brusho background:

Brenda has been busy creating some fabulous projects this month. Her first two projects were created by stamping the images with black ink, and embossing them with clear embossing powder. She coloured the images with pencil, and added liquid pearls to the flower centres.


For her next card, she stamped and embossed the image once more, but coloured the image with sparkle pens.

To create the following card, she stamped and embossed the image using copper embossing powder and Versamark Ink. She used the same to add the word stencil. The background was created with Distress Inks, and also the leafy stencilling.

For her next card, she created a background using acrylic paints, and then stamped and embossed the image using Versafine Onyx Black Ink and clear embossing powder. She used bleach to take away the colour from the hair. A few die cut snowflakes completed the card:

For her final card, she spritzed a piece of linen and then stamped the image with Versafine Ink and embossed with clear embossing powder.

Anne has created a beautiful set of cards using all four images from the Seasonal Lady Collection. She has stuck to a blue theme, and the cards are really fabulous. She stamped the images with Chipped Sapphire Distress Ink, and added stencilling and shading around the edges. She used a water brush to pull colour from the image, picking up extra ink from her craft mat if needed. She added a touch of glitter glue in the hair, flowers and snowflakes.


Her final card was created using the Mackintosh stamp sets and fine patterned card. She stamped and embossed the images, and coloured them with water based inks and sparkle pens before cutting them out.

I have made two very quick cards for you this month, the first simply using Distress Stains splatted onto the background. The sentiment was perfect for this card:

For the second card, I added water to the watercolour card, to ensure that the edge of the colour was uneven, and used the same four colours as I had used on my previous card. I added an image from the Just Butterflies stamp set, and a sentiment from the Amazing Mackintosh Words stamp set:

Marga finishes our blog post this month. She has created a beautiful card using the Winter Dawn image, stamped and embossed onto black card this time:

Her second card had been coloured with pencils for a stunning effect:


We hope that you have enjoyed what we have to share with you this month. We will be back next month with more quick projects, but in the meantime, do keep visiting the blog for a daily dose of inspiration from our regular Design Team posts.

Thanks for stopping by,