Pin It button on image hover

Thursday, 31 May 2018

The Rose Tree (By Marga)

Hello everyone, Marga here again.


Today I want to show you a card made with Distress Ink for the background, and also the colouring. The background stamp I stamped two times with ink and two times with only water on the stamp, the stamp is taking the ink from the paper. You must not make the stamp too wet.

I used for this card: The Rose Tree and Honey Bee stamp sets.


Big Hugs Marga


Wednesday, 30 May 2018

Butterfly Essence (by Julie)

Hello, today my card is made with the rather lovely Essence of Nature


I started by inking up the butterfly tree with Sepia Versafine and stamping onto the card blank. I also stamped the tree onto spare stamping card 3 more times as the butterflies need to be cut out and decoupaged onto the main image. Before cutting out the butterflies I coloured them all with Distress inks but was not too fussy about keeping within the edges as they were all going to be cut out. The background has been coloured with pale blue and brown dye inks applied with some cut and dry foam. 
I cut some copy paper an inch smaller than my card blank to act as a mask so that I could stamp the decorative leaf around the edge to form a neat border.
The card was finished off with the sentiment stamped onto spare stamping card, coloured with Distress inks and then adhered to the design with foam pads.

Thanks for stopping by and please call back for daily Design Team inspiration

Julie xx 

Monday, 28 May 2018

Pastel Tulips (by Pat)

Hello everyone, today sees our final blog post from Guest Design Team member Pat, for this month. She has created a pretty pastel card, using lovely delicate shades for your inspiration.

Pat writes:

Hi everybody,

This is my last card for now, and unlike my other two cards which were quite inky, I have opted for a much more clean and simple style this time. I have used my pencils to colour and grey pearlescent cardfor the background, together with the Spring Bird Tulip set of stamps and a couple of dies. I used one of the other Spring Bird sets for my last card. There are some very pretty tulips around at the moment which prompted me to use these lovely stamps this time.

I started by die cutting the pieced rectangle using the grey card, and then cut the ornate oval mat from that.

I stamped the flowers onto a piece of white stamping card using grey permanent ink, and coloured them using three pinks and a purple for the flowers, then two greens and some yellow and brown for the leaves and stems. I then fussy cut and shaped them a little before adhering them using glue gel to give some dimension.

I stamped the sentiment, again using the grey permanent ink, and then heat embossed it with clear gloss embossing powder which gives it a darker finish.

After placing the rectangle onto the white card I inset the oval back within it.


I have really enjoyed sharing my three cards with you throughout the month, and I look forward to returning later in the year.

Best Wishes,

Pat.


Sunday, 27 May 2018

Tags Collection - by Magda

Hello dear friends,
I don't know what do you think, but for me a tag is a concentration of ideas, feelings, techniques, colours and layers of products.
For this Tag Collection I used the following items, that you can find at Chocolate Baroque:

- Fragrant Honeysuckle for the images
- Essence of Nature for the sentiments
- Different stencils
- Distress Ink Pad
- Versafine in different colours
- White Gesso
- Modeling Pastes
- Busho
- Tags size 8"


I hope that in each tag you could find something interesting.
Magda

Saturday, 26 May 2018

Surreal Dreamy Tree Landscapes (by Anne)

Good morning. Today I am sharing a couple of projects using the Rose Tree and Essence of Nature stamp sets.

My first is a surreal dreamlike scene using the pretty rose tree as the main focal point.


Materials:
  • Rose Tree and Essence of Nature stamp sets
  • 19.5cm X 14.5cm card blank, black card, white card (for backing), acetate (recycled packaging) and waste copy paper (to create masks)
  • Clear double sided sticky sheet
  • StazOn Inkpad (Jet Black)
  • Alcohol ink pens and opaque white marker
  • Bulb spritzer attachment to spray ink pen (similar to Ranger Distress Marker Spritzer)
  • Nail varnish remover
  • Glitters (green, gold and crystal)
  • Viva Décor Kristall Gel (Holographic)
  • Hexagon dies (Tonic)
How it was done:
  1. The scene was stamped onto the acetate using StazOn ink.
  2. Colouring was added to the reverse using alcohol ink pens. Strips of copy paper were used as a mask and alcohol ink spritzed using a bulb attachment for pens. Basically air is blown across the pen tip by squeezing the bulb, creating a spray. Some colour was dabbed away from the sky area using nail varnish remover.
  3. Double sided sticky sheet was then placed on the back and coloured glitters were dropped onto the scene, burnishing into the sticky sheet using a finger.
  4. A die was then used to cut out a hexagon shape from the centre of the scene. A little Kristall Gel was applied to the background panel for added texture and sparkle.
  5. White card was trimmed and glued to the back to make the images stand out. These were then backed with black card to create a border around the background and hexagon cut shape. White faux stitching was added to frame the images.

My second project uses the lovely butterfly tree as the main focus to create another dreamy scene.


Materials:
  • Essence of Nature stamp set
  • 15cm square card blank, cartridge paper, metallic satin card (blue/silver), pink vellum
  • Versamark Inkpad and pen
  • Embossing powders (aqua sparkle and detail white)
  • Ink spritzers (pink and green) and sparkle brush pens (deep pink and clear)
  • Stickles glitter glue (Diamond) and PVA pearls (pink)
  • Large decorative square die (Tonic)
How it was done:
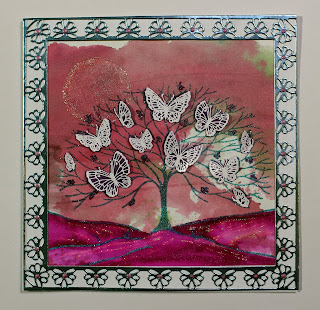
  1. The background was created using ink spritzers. The image was stamped with Versamark, embossed with sparkly powder and coloured with sparkle pens. The embossing pen was used to draw in extra hills extending the scene and anchoring the tree.
  2. The image was stamped again onto the vellum, embossed with white powder. The butterflies were cut out, shaped and glued onto the tree.
  3. The image was then framed with the decorative die cut and finished with glitter glue and PVA pearls.
Happy stamping, Anne xxx.

Friday, 25 May 2018

Decorative Lamp (by Gerrina)

Today sees the final post this month from our Guest Design Team member Gerrina. She has created a beautiful piece of home decor to inspire you.

Gerrina writes:

So glad that it is my time for a Guest Designer post at Chocolate Baroque! Today is the last time this month. In one of our rooms we have a lamp in which you can slide a strip of paper and by doing that change the look of the lamp. We were bored with the look it has for a while. So after some deliberation, we decided that we wanted to have flowers and butterflies, so the choice to use Chocolate Baroque stamps was an easy one; they have so many beautiful and different flower and butterfly stamps...
It is a project that will take several hours of your time; just stamping all of the images takes a long time, and colouring even more!
I chose to work with a favourite technique of mine; Distress Ink and a waterbrush.

This is how the lamp now looks:


This is how the lamp looked before:

My project before it was put on the lamp:

Some details:


Used Materials:

Stamps: Fantasy Meadow, Harebell Butterfly, Floral Notes
Ink: Versafine Onyx Black and Distress Inks as per the photograph below:

Other: Lamp, large piece of paper, (I used 71cms x 31cms) on which you can watercolour, waterbrush.

Instructions:

Cut the paper to the size that you need. Start by stamping the biggest stamps in black ink and distribute them on the lower half of the paper. Next stamp the medium sized stamps, and finally, the smallest stamps. Make sure that you fill the lower half of the paper, and stamp some of the flowers not totally on the paper to let it look like they are going off the paper. Stamp some butterflies on the upper half of the paper, to tie the whole thing together. Watercolour everything by using different layers and drying in between to get shades/shadows. Let it dry completely and put the strip of paper in the lamp.

I had so much fun working on this and now we can enjoy this flower radiance even on the depressing Winter days....So glad that the rest of the family are happy with it as well!

Creatieve groetjes,

Gerrina
(Gerrinascreatievewereld.blogspot.com)

Gerrina will be back with some more fabulous inspiration later in the year.


Wednesday, 23 May 2018

natural colours? by Veronica


 For my last post this month I am back (mostly) to my favourite brusho powders - I just love the vibrant colours and the randomness of the results!
The large honeysuckle stamp was ideal, I stamped and embossed with white EP before sprinkling the red, yellow and green powders roughly where I would like them to stay, then spritzing fairly heavily with water. The EP resists the water, and also traps some of the colour into the image.
Sentiment from Mackintosh words stamped in black versafine, image trimmed down to fit onto a square white card blank with a deep red mat.


This one is far more muted, just a very light dusting of yellow powder to create a background. Image stamped with black versafine and coloured with watercolour pencils - have to admit I can't remember which set the sentiment came from!


For my final samples this month I have used the lovely big tree stamp from essence of nature.
The first one is very restrained, not a speck of brusho in sight!
I used a square white card blank as the base, and stamped the tree stamp all over  to create the background. I used hickory smoke distress ink and held  the stamp in my hand so that only part of the image stamped at a time.

 The focal image was stamped onto black card with versamark ink and I used a rather ancient bonding powder (which thankfully still worked) before using the gold and coppery mix of gilding flakes. For some reason i never got on with stamping using glue when i had the gilding flakes with everything craze years ago, but the bonding powders worked every time...


My final card was back to brusho for the foacl image. Stamped onto white card using black versafine ink and clear embossed before using yellow, red and blue powders to create the sky.


I started with a square back base card , and added the background card at an angle. This was a square of white card stamped with the trees in hickory smoke distress ink and sponged round the edges.
I trimmed the brusho image down, added a black mat and glued onto the background.

Thanks for looking, and many thanks to Judith for doing my last post for me when i had internet problems - a relief to be back, you don't realise how much you need it until you haven't got it!

Tuesday, 22 May 2018

Wishes and Honey by Penny

Morning everyone, I hope you are all well and enjoying the lovely weather we have had lately.  It is my pleasure to bring you a couple of projects today, a couple of cards from the 'Bee' shows on tv last month.  

Make a Wish


For this card I have used stamps from the Rose Tree and Honey Bee sets, Distress Inks, silver sparkle embossing powder, Versamark ink.  On a piece of white card I blended the Distress inks to create a background, I stamped several small floral images randomly over the card plus a small bee, using the same inks.  I then stamped and embossed the Dandylion image a few times and added the seed heads  as if they were floating away on the breeze.


I took a white base card and stamped a floral image and the seed heads around the edges using one of the Distress Inks then matted and layered the focal panel onto it.  I blended the ink around the outer edges, then stamped a sentiment from the Words to Dazzle and Sparkle set.  I die cut the sentiment, added ink around the edges and attached it to the card.


Honeycombe

This time I have used stamps from the Honey Bee and Baroque Meadow sets; Distress Ink, Versamark ink, white embossing powder, white gesso, pearlscent paints, a stencil and a die from my stash.  


On a piece of Kraft card I stamped the Honeycombe image and embossed it in white.  A little way below I added white gesso through a honeycombe stencil.  I trimmed away the bottom edge of the Kraft card to accentuate the honeycombe pattern.  I painted the bees then matted the panel onto yellow card.


On a white base card I stamped the grasses in yellow Distress Ink along both side edges then attached the focal panel.  I took a spare piece of Kraft card and stamped one of the bee images onto it then embossed it in whiteas before.  I coloured and cut out the bee then added it to the card.  I used another piece of Kraft card and a die from my stash to create a large bee embellishment and added it to the card.  I then stamped and embossed the words onto Kraft card and cut it into a panel before attaching it to the card with 3D foam.  To complete the project I added a couple of metal embellishments that compliment the honeycombe patterns on the card.


Thank you for popping in today and joining me, I hope you have enjoyed these projects.  Take care and happy crafting till next time,


                                                             Penny

Monday, 21 May 2018

Spring Bird (by Pat)

Hello everyone, Pat is sharing her second post of the month, a lovely card incorporating one of our Spring Bird stamp sets. 

Pat writes:

Hi everyone.

This is my second card this month and as Spring is now well and truly here I decided to use one of the Spring Bird sets, Spring Bird Crocus, which includes this sweet little bird with a nest full of eggs and fresh green leaves on the branches which really sums up this time of year. I also used two of the leaf stamps from the Autumn Poppy set.

I started the scene using my gelli plate and six different Distress Inks; two blues, two yellow tones and two greens. I covered the plate placing the inks roughly where I wanted them, and spritzed with water, before laying a piece of Velvet card over and getting this nice loose watercolour background. This card is lovely and smooth and takes the water really well. I then stamped the bird, nest and leaves making a frame around the edges, and coloured them using the same colour palette as for the background, apart from a couple of orange toned inks on the bird's head. I then added the sentiment towards the centre using the two blue inks.

I finished by cutting the piece back a little, and mounted it onto white and then blue card before adding this to the 6" square white card.


Thank you for joining me today, and I'll see you again next week.

Best Wishes,

Pat.

Sunday, 20 May 2018

Back to Nature (by Judith)

Hello everyone, I am sharing a few more cards showcasing the beautiful stamps that were featured on last months Hochanda TV shows. You may have caught some of these cards on the shows.

For my first card, I have used one of the very versatile whiteboard shapes made by Tando, exclusively for Chocolate Baroque. These shapes are great, already being white, as they can be inked up straight away without needing any preparation. I added a bit of soft colour in tones of orange and green, and did the same to a piece of drawing cartridge that was going to become the card background. Using a honeycomb stencil, I added some colour using Distress Ink, repeating this on the background. I stamped a bee on the heart, using Versafine Onyx Black Ink, and masked the image, before stamping a foliage image from the Essence of Nature stamp plate. I coloured the bee with pencils, and added a sentiment to the heart.

To complete the background, I stamped the honeycomb image from the Honey Bee stamp set, again colouring the bees with pencils. I added stickles to the bees' wings. To complete the card, I added some green ribbon and green card as a matting layer.

For my next card, I chose an old book page and stamped the pretty foxglove image on to the paper. I added two bees, and coloured the images with pencils. I added some shading around the edge of the page, and then stamped a pretty fern image from the Wild Meadow stamp set around the edge, using two coordinating colours. I used the same foxglove and bee images to stamp over some kraft card to complete a background for the book page focal image. I selected some deep plum card to mat the layers.

My final card was a fairly quick card showcasing the fabulous Textured Art card that is available on the website. I coloured the card very quickly by placing Distress Ink on my craft mat, spritzing it with water, and laying the card on top. I stamped the lovely butterfly tree from the Essence of Nature stamp set, and added the small tree either side, to create the appearance of a little woodland. I added some colour under the trees to 'ground' them, and painted the butterflies.  Adding the main sentiment was all that was needed to complete the card.

Thanks for stopping by, Judith xx

Saturday, 19 May 2018

Four Floral Cards (by Zoe)

Good morning Lovelies, I'm back for my final post this month featuring the beautiful Nature inspired stamps that were featured and demoed by Lesley and Judith on Hochanda last month.

My first card I used a Gel print I had in my stash, I heat embossed the flower and coloured using Sparkle brush pens.


So these are becoming somewhat of a trademark of mine, coloured with pencils.

Black magic technique, if you are unfamiliar with that technique it's heat embossed with white, the image is coloured in using a white pen, then coloured in, I used pencils.


My final project is another Gel print from my stash, simply heat embossed, a few dots with white pen for highlights and some ink splatters.

Thank you so much for your kind comments, have a wonderful day xx Zoe xx

Friday, 18 May 2018

Pan Pastel Postbox (by Gerrina)

Hello everyone, today Gerrina is sharing the second of her posts for this month. She has created a pretty mixed media piece to inspire you.

Gerrina writes:

My second Guest Designer post at Chocolate Baroque! Three times this month you can see here at Chocolate Baroque, and also on my blog some of my creations... this time here is the second one:
Something practical to use and be inspired by every time I see it; a postbox made into an inspirational box to keep some of my hobby stash in:


Used Materials:

Stamps: Mackintosh Beauty, Mackintosh Windows, Sketchy Doodle Landscape and Sketchy Doodle Flowers
Inkpads: Versamark, Versafine Onyx Black, Distress Ink: Wilted Violet, Picked Raspberry, Barn Door, Wild Honey, Rusty Hinge, and Tattered Rose.
Other: Postbox, Pan Pastels in several colours, fixative and watercolour paper


Instructions:

Fold the box open/flat. Put a layer of gesso over the total surface and let dry. Stamp all of the images on the box with Versamark. Colour them with Pan Pastels and make a background with Pan Pastels. Fix the Pan Pastels with fixative and let dry. Stamp the 'beauty' image again with the black ink on a piece of stamping paper and colour her with a water brush and Distress Ink. Cut her out, and glue her to the box. Fold the box back up so that you can use it to put hobby materials in it.

Creatieve groetjes,

Gerrina
(Gerrinascreatievewereld.blogspot.com)


Gerrina will be back with her final project of the month next week.