Hello everyone, it is time for our monthy offering from the Design Team of quick and inspirational ideas that take fifteen minutes or less to create. We aim to show you a range of projects that will let you see how easily you can make something using the range of beautiful Chocolate Baroque stamps, taking just a few minutes. We hope that if you are a new stamper, just starting out on your crafting adventure, or even someone with more experience, you will find something in these monthly blog posts to interest you. The cards and other projects that we share could be suitable for craft fairs and charity sales, Wedding Invitations, or other batch makes, like Christmas cards, depending on the image that you use. Chocolate Baroque's Angel policy allows you to make as many cards as you like, as long as the images are hand stamped.
So please enjoy what we have to share with you this month, grab a cuppa, and take a look at our projects.
Marga has created two beautiful cards on a circular theme. She has created gelli plate backgrounds for both. On her first card, she has stamped with Versafine Ink and added details with a white gel pen:
On her second card, she has stamped with Distress Ink. The layouts are very similar on both cards, but the small changes make the cards look very different. You could make a big batch of these very quickly and keep them for when you need them.
Rachel has made us some fabulous Eastern themed cards this month. She has created backgrounds using Distress Ink, and simply stamped over the top using black ink, very quick cards to make.
Again, by varying the colours of your backgrounds, you can achieve some very different looks.
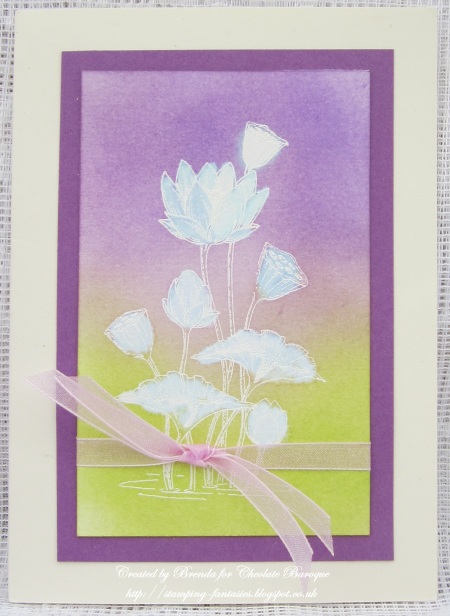
Brenda is up next, with a variety of cards and techniques. She shows how you can use white embossing in several ways with her first few cards, and hopefully, this will give you lots of ideas to use what you have in your stash.
For her first card, she has stamped the images and embossed with white embossing. She has then created the background using Brushos and water, the final effect really has a wow factor, but is so quick and easy.
For her second set of cards, she used Distress Inks to create the backgrounds, then once they were dry, stamped and embossed the images with white embossing powder, and added the sentiments with black ink.
For the following card, she again used Distress Inks for the background and stamped and embossed the image with white embossing powder. On this occasion, she bleached out the colour within the image.
The following pretty card was created by inking through a stencil onto a book page with Distress Ink, to add the dots. She then stamped the image and added the sentiment using black ink.
Her final card was created by making a background by adding Distress Inks and water to an acrylic block with gridlines. She then stamped the butterflies over the top of the background using Versafine Onyx Black Ink.
Doreen has created a simple, but very elegant card using one of the beautiful buddha images for us. She has stamped and embossed the image, adding some colouring, before adding a coordinating matting layer of card.
We have some projects from
Anne to share next. She has made a gorgeous card and matching gift bag. You can often find dies or ready made bags to decorate, or look for templates that you could download from Pinterest or other websites. Anne has used smooth white card, and stamped with a dark blue Versafine Ink. She has coloured the images with blue sparkle pens and blended the colouring with a clear sparkle pen. The card background was edged with a blue alcohol marker for definition. She has added little pearls and a ribbon to finish.
For her next card, Anne used a background from her stash that had been created by spritzing ink onto the surface and adding salt to create a lovely textured pattern. Once dry, the salt is brushed away. She stamped and embossed the images using Versamark and white embossing powder, before edging the background with Versamark and silver embossing powder.
For her final card, Anne created a washed background using yellow and orange watercolour ink. She stamped and embossed the images and sentiment using gold embossing powder. She used water to create a moon, and detail to the sky, also taking colour from the flowers, blotting everything with some paper towel to remove the colour. She coloured the flowers with alcohol markers and added some shimmer with sparkle pens. She added an edging of sparkly gold embossing to the background.
Penny has created a delightful bookmark using a scrap of card for us. She likes to keep her scraps, which a lot of us do, and they are a useful resource for cards in a hurry. She has stamped the image oto a piece of Kraft card using Sepia Versafine Ink. She coloured the image with pencils, and edged the panel with Distress Ink. She added some lace and a button threaded with fibre for a vintage feel. The panel was matted onto some coloured card with a point at one end. She punched a hole in the card and added some pretty fibres.
Penny has also created two cards for us, the first, was created by stamping images onto black card using Versamark and clear powder. She coloured the images with metallic pencils, and cut each image out so that it was on its own little square. She edged the squares with a gold marker pen, and matted them onto black squares so that they looked like photographs. She created a larger background by stamping a treeline and set of clouds from the
Landscape Edges stamp set along the top and bottom of some white card. She attached her 'photos' and added a sentiment.
Her second card was created by stamping several images from
Sunburst Scenes and
Country Views to create a scene. She decided to limit her colour palette to red, black and white. She used Distress Ink to stamp and watercolour the scene, and a black fineliner pen to connect the images and to create some hills. She stamped the wall image around the edge of a white card blank and watercoloured this. She added silver marker around the focal panel, matted it onto black card, and attached it to the base card.
Julie has created a very pretty card using a floral image from the
Tranquility stamp set. She has added a hand drawn frame around the images, and added some soft colouring.
We have two Nature themed cards from
Carole next. The first is using one of our tree sets, and the pink and grey colour combination is fabulous. Do not be afraid to choose unusual colours to make your cards, go with your favourites, or something that you have seen that has inspired you.
Carole's next card incorporates a lovely flower spray that could be used for so many occasions. The toning ribbon finishes the card off perfectly.
Magda has created her first card by using Distress Crayons for the background, and then stamping over the top using black ink. The vibrant background was very quick to create, and the bold orange contrast gives the card a very zingy feel.
Her second card is more muted in colour, she has inked the stamp with Distress Ink, and spritzed it with water before stamping, to create a watercoloured effect. Magda says that this was a five minute card, very quick indeed!
Her final project is a set of little napkin rings, a lovely idea. She has used the water lily image from the
Serenity stamp set, colouring the images with watercolour pencils.
Some projects from
Vronnie next, her first card is using up a scrap of background created with Brushos. She has simply stamped the image using black ink, but it looks so effective on the beautiful background.
For her next card, she has stamped the main image with Distress Ink, and drawn some of the colour out with a water brush. She has added some stencilling and colouring with pencils.
Vronnie's final card is a great example of using up your scraps. She has used four squares of left over Brusho creations, and stuck them onto a card blank. She has then stamped the sentiment onto another piece of card, which she has edged with black and matted onto white card, before adding to the centre of the card. This is such an eye-catching, vibrant card, and was just from her left overs!
We hope that you have enjoyed our projects this month, and will try out some of the ideas shown within the blog post. Don't forget, keep those scrap pieces of card left from your projects, you never know when they will come in handy!
We will be back next month with another jam packed blog post for you, but in the meantime, do keep visiting the blog for a daily dose of inspiration from our regular Design Team posts. Thanks for stopping by,


Thank you to the DT for the amazing samples. It would definitely take me more than 15 minutes to re-create something similar but I have lots of ideas now.
ReplyDeleteX Chris
Lovely array of cards who could not be inspired xx
ReplyDeleteWhat a fabulous selection of quick creations Judith, just so inspiring! x
ReplyDeleteWOW a cornucopia of lusciousness! Fabulous inspiration from the DT. Thank you!
ReplyDeleteHugs
Linda xxx
Absolutely beautiful selection of cards today, lots of fabulous designs,and wonderful inspiration, Kate x x
ReplyDeleteA lot of fabulous ideas, great inspirations as always!
ReplyDeleteAs always there's a host of wonderful ideas, such great eye-candy ;) Thanks everyone.
ReplyDeleteSo many beautiful cards and great inspiration.
ReplyDelete