
Awesome Orchids clear stamp sheet, Poppy Meadow stamp set, Pretty Birdcage stamp set, Spring is in the air stamp set.

The products I used are: Distress Paint Antique Linen, Distress Stain Spiced Marmelade and Distress Spray Stain Cracked Pistacchio. For the golden text I used a mask and some metallic gold embossing paste.
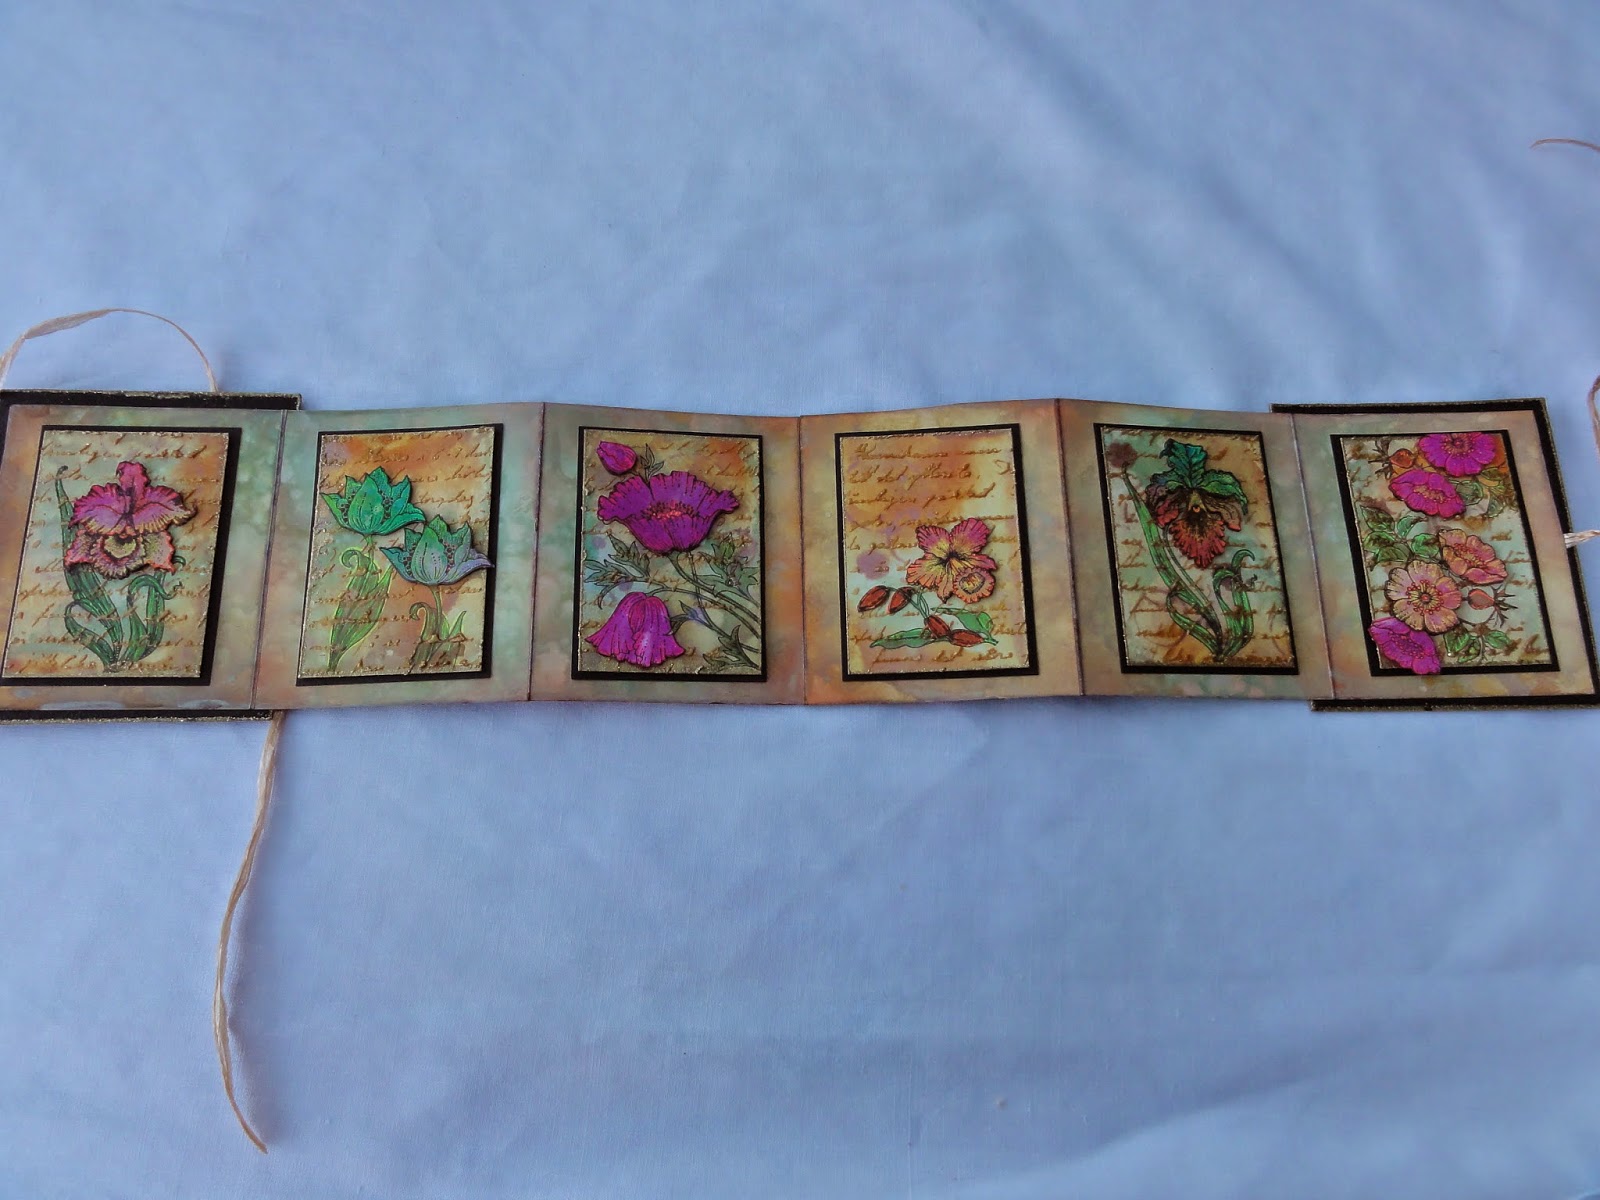
The flowers are cut out of a paper that I coloured with Dylusions and metallic spray. I made this paper a long time ago, and so I cannot remember the colours. I added some accents with yellow, orange, rose and green gelly pens.


White paper (10.5cms x 30cms) x4
Golden embossing powder, Versamark and heat tool
Black card stock 6 x (8.9cms x 6.4 cms) for the ATCs
Black acrylic paint
Instructions:
I started with my backgrounds; I put some Distress Paint on my craft sheet and with my Distress Spray Stain I sprayed some green on the paint. I added some orange Distress Stain further down, and I sprayed some water all over it. I took my white paper and went through the paint and the stains, covering my white paper. I sprayed some water over the whole paper while drying it with my heat tool. When everything was dry, I did it again to have more variation on my background.
I did the same with my second paper, so that my colours where almost the same, then I cut out 6 pieces of 8.5cms x 6cms, these pieces became my coloured parts of the ATCs. The two other papers (10.5cms x 30cms) I coloured on both sides in the same way.
Now the ATCs: I first stamped my flowers with black Versafine ink on the ATCs and added some colours. I used a stencil and with some embossing paste I gave some structure to the ATCs. I took the paper that I had coloured with Dylusions and metallic spray and stamped the flowers on the areas where I liked the colours the most. I cut the flowers out and placed them onto the ATCs with some 3D foam.
With some golden embossing powder I made a small border around the ATCs, then I took my gelly pens and added some nice accents here and there. Then I glued the ATCs on the black cardstock with some double sided tape.
Then I started with my book (9cms x10.5cms) x6. I took the two other pieces of coloured paper (green and oranges) and scored at 9cms, 18cms, and 27cms, I did this on both papers. I then glued them together to make a long strip, with one of the left over 3cms, placing it behind the other panel so that the front looked neat. I cut away the second 3cms strip. I took some orange Distress Ink and went around all of the edges, so that everything blended together.
For the covers I took some cardboard (10cms x 11.5cms) x2 and painted them with black acrylic paint. I dried them with my heat tool. I also put some embossing powder on the edges. I placed a ribbon in the middle of my last page on the outside of the book. Both sides of the ribbon were the same length. I did this also at the other end of the book. I placed the book in the middle of the cover, and then added the other cover on the other side of the book. To decorate the front of my book, I made another card (8.5cms x10cms) and placed it on my front cover.
I hope you enjoy making this project, it was a lot of work, but worth the end result.
Have a nice stamping time,
Maria
Great project Maria sith a wonderfull result. A real Maria beauty, with your vibrant colors!
ReplyDeleteVery pretty Maria.
ReplyDeleteLove it! Thanks for the directions :)
ReplyDeleteWhat a great ATC book Maria, thank you for sharing the instructions
ReplyDeleteJackie x
Wat een super mooi boekje! Gaaf om al die bloemen-ATC's bij elkaar in een boekje te zien! Helemaal mooi! Groetjes, Gerrina
ReplyDeleteWhat a stunning project. I read through the directions (thank you for including them) and think it's doable. I'm anxious to try my hand at a single ATC.
ReplyDeleteThe dimension created by the script with the embossing paste & echoed by the gold edging of the panels is very eye-catching. Your range of colours for the actual ATCs complement the backgrounds beautifully with your Dylusions inked flowers adding real vibrancy but within the same colour palette. Your use of the black to add contrast is perfect. Thank you for such a detailed description too.
ReplyDeletePaula (PEP)
An absolute gorgeous work of art . And the instructions were so good . Thanks so much ,I so enjoy your work
ReplyDeleteAbsolutely stunning - I adore this - gorgeous work as always - thanks for the inspiration! Hugs rachel x
ReplyDeleteGorgeous Mara! I love these rich and vibrant colours which complement one another perfectly and using all these different stamps, lots of dimension too. Thank you for the in depth explanation. x
ReplyDeleteStunning project Maria. Thanks for sharing how you made this. The gold script looks amazing. Love the vibrant colors of the flowers. Each piece is a mini work of art...fabulous.
ReplyDeleteHugs Flo xx
Wow, these wonderful stamped flowers really pop, your mini-book is like a jewel for them! This is an exquisite project, as you said well worth the time to create it!! Fabulous Maria!!! Hugs, Coco x
ReplyDeleteWow this is stunning, well worth all the hard work. I love your vibrant colours, very pretty.
ReplyDelete