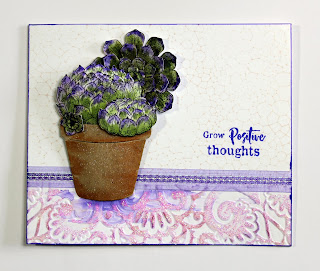
My first sample was created using a 5 X 4.5 inch card blank. The lower third of the card blank was embossed using a lacy textured embossing folder. The background was stamped using the Square Bubbles stamp and Distress Ink (Tattered Rose). Distress Ink, purple dye based ink and pink glitter glue were applied over the embossed section to colour and highlight.
The sentiment was stamped from the Blossom and Grow stamp set using purple dye based ink. The card was edged using purple alcohol marker to frame and a ribbon glued down to create a base for the flower pot.
I used a flower pot die to cut the pot from Kraft card. A little colouring was added using watercolour and clear sparkle pens before shaping and gluing to the card front with 3D glue gel.
Cacti from the Scrumptious Succulents set were stamped onto smooth stamping card using Versafine (Onyx Black). Images were then coloured with watercolour pens, dragging out colour and blending using a damp brush, then cut out. The large ‘face on’ cactus image was stamped several times, cut out, shaped and layered up. Elements were shaped using a ball tool and foam mat then glued down with 3D glue gel.
For my second sample I used the gorgeous Captivating Cacti
stamp and a sentiment from Blossom and Grow.
I prepared a decorative card blank from a 6 X 6 inch Kraft
card blank, extending the edges by adding die cut borders from white pearl card. Finished by adding faux stitching with
a fine tipped pen (opaque white) and PVA pearls.
Images were stamped onto textured watercolour card using Versafine
(Onyx Black). Watercolour and sparkle pens were used
for colouring. Colouring was extended at the base to give the cactus grounding.
A little gold sparkle pen was flicked across the image for
added texture. I didn’t intend to do this initially but I had to cover up an
accidental splodge! I liked the result, so a ‘happy accident’ as they say – tee
hee. The card was edged with dark brown marker to frame before gluing to the
card front.


Wow, such fabulous cards!! Love how you arranged the beautiful coloured stamps with the embossing and the borders! They made the images pop so well!
ReplyDeleteThese are stunning, they look so realistic.
ReplyDeleteHugs
Linda xxx
Beautifully designed and coloured cards Anne,Kate x x
ReplyDeleteWhat wonderful colouring - so realistic.
ReplyDelete