Thank you for joining me today. Today's project is a bit different to my usual style and approach, but I wanted to show you some ways to use the Slim Word Strip stamps.
You are going to need:
I originally developed the right hand side before adding the left, and then worked up both sides simultaneously; this time, however, I will break it down for you.
Left hand side page
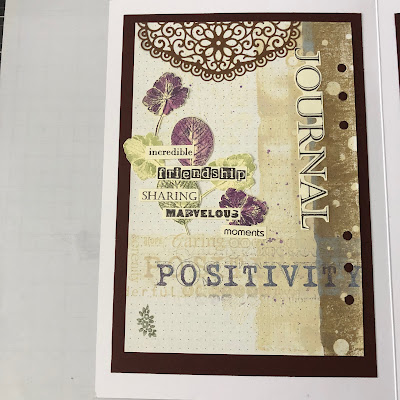
Work directly onto a sheet of dot grid paper. Start by applying a very light stencil background using Antique Linen Distress Ink. Ink up the Word Strip Background from Set 2 in Frayed Burlap and stamp down the right hand edge over the holes of your page. Re-ink with Antique Linen Distress Oxide (or use the background from Set 1 like I did) and stamp adjacent to this; without reinking stamp across your page at roughly ⅔ down.
Ink up the Positivity Strip from Set 2 in Antique Linen Oxide and stamp over the paler horizontal strip. Don't worry about masking the strip before stamping. Ink the Positivity word using a smaller ink pad in a grey archival ink and stamp.
Die cut one of the doily dies from chocolate card and adhere to the top left of the page.
Onto cream card stamp the From Nature 2 rounded leaves and scallop leaves, as well as all of the word strip stamps. Dab the leaves with a little ink using a wet paint brush for a quick watercolour effect. Fussy cut the leaves and also cut apart the words from the strips (see my Top Tip later in the article). Adhere these onto the page starting with a leaf cluster first, before adding the appropriate words over the top. I love building sentiments using the words, and I can't wait for more of these stamps to be released. I also fussy cut around the larger "JOURNAL" word with a slight offset.
Finish the layout with one of the tiny floral stamps from Orchard Design-a-Tree in chocolate archival ink.
Right hand page
So, with this page, I stencilled to the lower right corner using Frayed Burlap and top right with Antique Linen Oxide. It is worth testing out the Ink and the Oxide versions of colours onto another piece of dot grid paper to chose your ink.
Making the "polaroid" style frame
Start by die cutting your doily die which you are going to embellish the frame with from chocolate card. Don't throw away your waste just yet though as we need it. Cut a piece of plum cardstock measuring your desired frame outer size (roughly 3x3½"). Trace the edge of your waste where you want the bottom of your aperture to be. Mark a frame around the sides and top as shown below.
Fussy cut out the aperture using tweezer scissors, a scalpel/craft knife or a ScanNCut. Erase any pencil lines and adhere your doily piece to complete the frame. Trim any die cut hanging off the edge and set to one side,
The leaves
Stamp the leaves onto cream card and vellum using the same watercolour technique on the card leaves only. Wetting vellum is a tricky business and is not required where you want leaves to lay flat in a journal.
You can make leaf stems by stamping multiple leaves and then joining them with a matching fineliner. You want stems from both card and vellum, with single leaves from just card.
Set to one side to dry completely before fussy cutting.
Assembling the journalling page
Stamp the Nature strip to one side in Frayed Burlap or other brown ink. Softly stamp the leaves to the lower right quadrant of the page.
Die cut another doily from vellum and use all over adhesive to adhere (such as a Xyron machine or apply double-sided adhesive before cutting). Align this to the centre of the right hand edge.
Apply tape around the back of your frame around the outer edges only. Tuck in the leaf stems and adhere. You can also add a couple of the individual leaves, adhering the remaining leaves over the shadow stamped leaves below.
Add more journalling words over these bottom leaves.
Top Tip: Making the most of Word Strip stamps
So, with this project we are purposely stamping the strip stamps to cut apart. However, in other projects later in the month I will show you how to create backgrounds and feature strips with the stamps. However, with all of these techniques, we can minimise waste by cutting apart any offcuts of stamping. I gather my spare words into a plastic jar for use in later layouts, journalling and card designs. They really speed up the process of card making, and have inspired me to treat other sentiment stamps in the same way so we can create new sentiments that fit our projects. Keep an eye out on my live streams for this jar in use.
You could also use a cheap divided container so you can separate by colour or sentiments. I top up each time I use a word strip so there should always be some words in there.


No comments:
Post a Comment
Thanks so much for leaving a comment - it brings a little ray of sunshine into our day when we know our work is appreciated!