For the white base card, it was die cut with a square die and the flower stem was coloured with blue and green watercolour pens then breathed onto the stamp to activate the ink. A second square slightly smaller was cut from blue card and fixed into position. The Brick Wall stamp was stamped with Versamark ink and embossed with black powder. The colouring is done using alcohol pens and watercolour pencils. I only added a little colour to the brickwork as subtle shading because I wanted them to look as though it has been white washed. The stamped piece of card was added behind the frame and the sentiment was fixed to the top corner.
Tuesday, 12 January 2016
Italian Brick Wall (by Debbie)
For the white base card, it was die cut with a square die and the flower stem was coloured with blue and green watercolour pens then breathed onto the stamp to activate the ink. A second square slightly smaller was cut from blue card and fixed into position. The Brick Wall stamp was stamped with Versamark ink and embossed with black powder. The colouring is done using alcohol pens and watercolour pencils. I only added a little colour to the brickwork as subtle shading because I wanted them to look as though it has been white washed. The stamped piece of card was added behind the frame and the sentiment was fixed to the top corner.
Monday, 11 January 2016
Steampunk Butterfly (by Julie)
Saturday, 9 January 2016
Steampunk Travel Turbine (by Anne)
- Steampunk Travel stamp set
- Recycled paperback book (440 pages, 220 page folds) – 17.5 X 11cm size
- White stamping card, Kraft card and black card
- Inkpads: Memento (Tuxedo Black), Ranger Archival (Coffee)
- Gilding wax and metallic pen (gold)
- Alcohol ink pens (purples, lilac, dark reds and blues)
- Dies and embossing folders to suit the Steampunk theme
- Air dry paper clay and silicone moulds
- Adhesive and 3D glue gel
Summary of how it was made: · I created the book fold to make a shape resembling a turbine – suitable for the theme. First I used simple folding to create an upside down vase shape. I then added further folds and some cutting until I was happy with my ‘industrial’ shape. I glued a barbeque stick through the centre to provide a scaffold to build upon on the top. · I added a die cut lattice across the top which divided it into 2 halves. This provided and area to attach embellishments but also made it easier to design something that looks good from all angles. I didn’t want ugly backs of cut out stamped images to be obvious. · Flowers and leaves were cut from black card, embossed to give texture, and rubbed over with gilding wax to make them look metallic. I also made lots of little embellishments using lightweight air dry paper clay and moulds. · Images were stamped onto white card with black ink, coloured with alcohol pens, and cut out.
Friday, 8 January 2016
An Old Postcard (by Asha)
To recreate this old postcard look, start by stamping the image on cream cardstock. I coloured it with alcohol markers, but pencils will work well too. Lastly, ink the edges with Distress Ink. To soften the wall I added stamped the falling ivy from the June Fairy DL sheet.
I've made a simple card but with this stamp you can do so much more. Come back soon and be prepared to be wowed by the rest of the team. As always you'll find more detail about this card on my blog.
Thanks for stopping by and have a beautiful day!
Beijinhos,
Asha
Thursday, 7 January 2016
Celebrate the New Year with New Stamps (by Lesley)
Wednesday, 6 January 2016
Chocolate Baroque Reader's Gallery- your turn in the spotlight!
Today, we are looking back on your crafting endeavours throughout the month of December, and what you created in Blogland, on the Ning Group, and on the Chocolate Baroque Facebook page. So take a look at a few samples of what we found on our recent trip around the Internet.
Marga created this beautiful Rose card in lovely soft colours:
and another using one of our newest background stamps:
Barbara created this beautiful butterfly frame, so pretty, and shows how the stamps can be used for home decor pieces:
Akkina created a colouful fantasy scene using bold colours behind gold embossing:
Liz Gittins created these fabulous colourful Stampbord pieces:
Spotted on the Ning group, a fabulous card using one of Lesley's downloads, made by Joan Carnell:
Ballie has created a beautiful romantic card, found on her blog:
We hope that you enjoy this month's selection of projects, and find lots of inspiration amongst the wonderful artwork. If you do not have a blog, or have access to the Facebook Group, we would be delighted if you would send good quality photographs of your artwork to Lesley to sales@chocolatebaroque.com and we can then upload them to the gallery for you. We would love to share more of your creative artwork with everyone, so please do not be shy!
Tuesday, 5 January 2016
Oranges and Lemons (by Judith)
I drew a square frame onto a piece of kraft card, roughly the size of the walled shutter stamp, and then stamped the orange tree from the Fantasy Woodland stamp set on either side, with the leaves from each tree creeping over the edge of the frame slightly. I created a mask for each tree, and then stamped the small brick texture stamp from the Abstract Fragments stamp set over the background. I then trimmed away inside the frame, cutting around the tree leaves where necessary.
I stamped the walled shutter image onto a spare piece of kraft card, and coloured the images with pencils. I added the foliage to the tree on the main image by colouring the stamp with a water based marker. I added some shading around the edge of the frame with Vintage Photo Distress Ink. I adhered the frame to a piece of dark olive card, and trimmed inside the frame, leaving a narrow border of olive green card showing. I then stuck the main image inside the frame. Finally, I added some Glossy Accents to the lemons on the tree.
Keep popping back to see more inspiration from my Design Team mates across the month, Judith xx
Monday, 4 January 2016
Steampunk travel (by Miranda)
Maybe you have already heard the news on my blog but I will quit doing DT work. I am a bit sad about it because my time with this DT was precious to me. We have and had(all the other DT girls which have been on board during the years) a lovely time together. Always encouraging each other and also in the private sphere.
But sometimes life demands taking action and doing necessary things.
So I won't disappear completely but at this time I don't know exactly where life is taking me.......
Anyway, I want to thank you also for your lovely comments and encouragement along the way! Stay creative and keep on loving Chocolate Baroque!
I will be finishing my promised blogposts for Chocolate Baroque and this time I have worked with the great Steampunk Travel sheet. It's in a multi-buy with the Steampunkery sheet.

Sunday, 3 January 2016
brick wall
I have shown a couple of samples from the last TV shows for you today - the first one uses the steampunk butterfly set with a background technique I learnt from Lesley using crackle medium and brusho powders, as well as Lesley's sticky label method.
The second sample uses one of the new garden stamps, which are only now on the website after being exclusive to the Craft Channel. Both of these are big stamps, and come with a mini stamp as well.
I chose to use the brickwall stamp, stamped in sepia versafine onto kraft card, the the bricks coloured with white and brown pencils. I added white and pale blue pencils to the shutters, and green to the leaves of the bush and the ground.
The mini stamp was used to create the background on the card blank.
More details on my blog if you would like to check it out
Thank you for looking, and don't forget to check everyday for some fab samples from the rest of the team - there are some real goodies coming up!
Veronica
Saturday, 2 January 2016
Brick wall (posted by Claire)
Friday, 1 January 2016
Blog Comment Winner for December
Once again we would like to thank you all for your visits here at the Design Team blog. We truly appreciate the time you take to let us know your thoughts about our designs.
Each comment in December was assigned a number and we used Random Org to draw a winner. Congratulations to CrafyJo you have won a £15.00 voucher to spend on Chocolate Baroque stamps! Please send a quick email here to confirm your email address and Lesley will send you your gift certificate.
Lesley will be giving a £15 gift voucher to another lucky winner drawn from January's comments. There's lots of inspiration to come from the Team throughout January. The more comments you leave the better your chances to win!
Thank you for your kind words and comments,
Good luck from the Design Team!
Arched Wall by Zoe
Good morning Lovelies and Happy New Year, I hope you all had a fab evening and aren't suffering too badly lol, we stayed in as we are past it lol, plus having a lively 11 month old foster baby to look after I don't think it would help having a hangover lol.
Today I'm sharing with you one of my samples that featured on The Craft Channel, it's one of the new fabulous stamps called "Arched Wall" very simple to create, I heat embossed using Versamark ink and Black embossing powder, using a circle die cut as a mask I inked all over using Distress inks, I removed the mask and then used the negative to ink the moon with Distress inks, and coloured the image using the distress inks and a waterbrush I used a water brush and soft dry cloth to Faux Bleach areas as highlights, I stamped the sentiment "Positive Pants" using Versafine ink.
Thank you so much for visiting today and please pop along each day to look at what my fabulously talented teamies created for you, have a wonderful day and a healthy 2016 xx Zoe xx
Thursday, 31 December 2015
Goodbye to 2015 (by Lesley)
Wednesday, 30 December 2015
Rolled PaperTrees (by Debbie)
Tuesday, 29 December 2015
Lattice Orchids (by Julie)
Monday, 28 December 2015
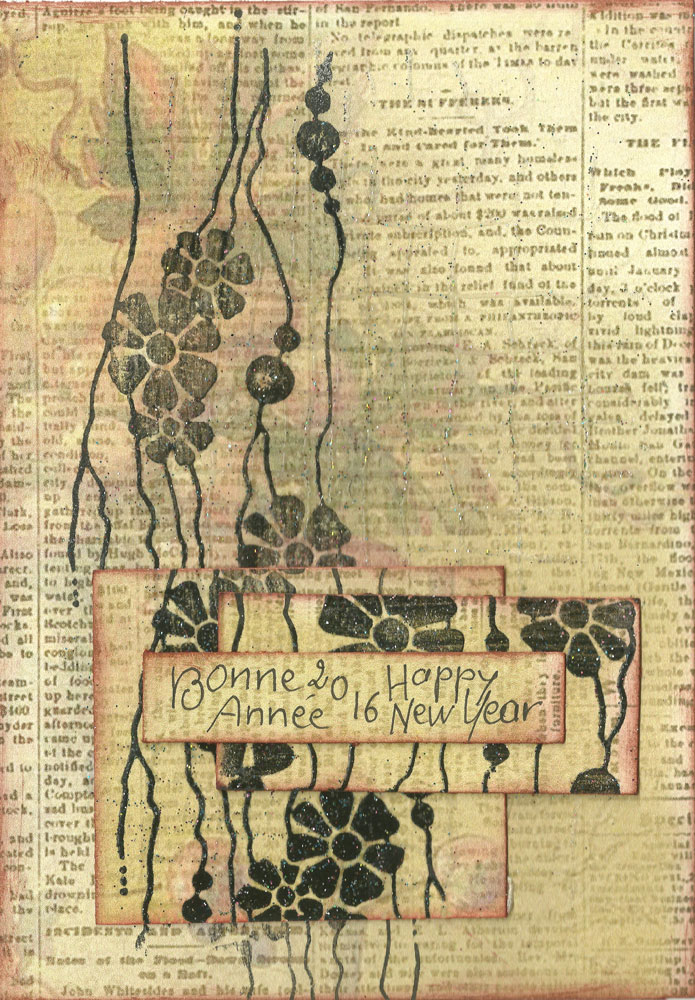
Bonne Année
I hope you all had a wonderful Christmas. It is my last post for this year and it is time to say Happy New Year
In French : Bonne Année.
So I send you all a lot of good vibrations. For this, I made two cards with the beautiful new Chocolate Baroque stamps "Baroque Orchids", "Studded Lattice" and "Floral weaves".
I used a CB digital paper printed on my computer and clear embossing powder on black ink.
Bonjour tout le monde.
J'espère que vous avez passé un joyeux Noël. C'est ma dernière publication pour cette année et il est temps de vous souhaiter une Bonne Année.
Alors je vous envoie plein de bonnes ondes. Pour cela je vous ai préparé deux cartes réalisées avec les magnifiques nouveaux tampons Chocolate Baroque.
Pour cette carte, j'ai utilisé un papier digital imprimé à partir de mon ordinateur. J'ai embossé le tampon avec la poudre transparente sur l'encre noire.
Sunday, 27 December 2015
Art Bag using the new background stamps (by Anne)
I have used recycled curtains to create myself a large Art Carry bag. I used all four of the lovely new background stamps to decorate my fabrics. Now I have a lovely new bag to carry my unframed paintings to exhibition. You could easily adapt the design idea to make a shopping or handbag, or to decorate a ready-made bag. Materials:
- Floral Weave, Open Weave, Studded Lattice and Baroque Orchids stamps
- Recycled blue cotton curtains with cream cotton lining
- Iron on paper backed fabric adhesive (Bondaweb)
- Sewing and machine embroidery threads
- Black iron fix textile paint
- Cut-N-Dry foam and palette knife
- Dies to cut flowers and leaves
How it was made:
- I first made a simple strong bag to fit my board mounted artwork pieces. Simply 2 rectangles sewn together with handles to fit over my shoulder. This is a very large bag so it is easy to decorate and sew on the applique pieces while made up. For smaller bags and shoppers it would be easier to decorate the panels before completing the construction.
- Ironed Bondaweb onto the back of the cream lining. Leaving the paper backing in place cut out flowers and leaves with the dies. Printed the text to create a template for cutting the lettering.
- Stamped all the cut shapes with textile paint using a random mix of all four stamps (see tip). Left overnight to dry and cure.
- Stamped the front of the bag with the Floral Weave stamp. Left overnight to dry then fixed the paints with an iron (this makes the paint permanent and washable).
- Peeled the backing paper off all the cut out shapes and ironed onto the bag. This secures the shapes and heat fixes paints.
- Finally I stitched around all the shapes using a straight stitch and free machine embroidery. This is where you drop the fabric feed dogs and freely move the fabric beneath the needle (like drawing with a sewing machine and thread).
Tip for stamping with paints: I used to use a standard sponge for applying acrylics or textile paint to my stamp. I would apply paint to a palette then pick up with a sponge, dabbing to remove excess paint before applying to my stamp. After a short while the paint would start to dry on the palette. The detail of the stamping was also gradually lost as clumps of paint built up in the stamp crevices after repeat application of paint. When this occurs you need to stop and clean up the stamp before continuing. I now use Cut-N-Dry foam and the results are so much better. I apply plenty of paint directly to the pad and work it well into the foam with a palette knife. The foam can now be used to apply paint to the stamp repeatedly without reloading. Placing the foam paint side down on a craft mat while not using also keeps the paint moist for ages. I find this method gives much sharper printing, uses a lot less paint and is easier to clean up when finished. Clean up well and do not leave paint to dry onto your stamp. I use a little soapy water and a soft tooth brush if needed.
Saturday, 26 December 2015
His and Hers Steampunk (by Asha)
The first card features the Open Weave cling stamp. I heat embossed it in white on a piece of vellum. To create the underwater scene I stamped, coloured, fussy cut and adhered elements form the Funky Fish A5 sheet.
The second card is a girly glitzy number featuring the Baroque Orchid cling stamp. This time I've heat embossed it with Verdegris embossing powder and inked the bckground with Seedless Preserves, Worn Lipstick and Picked Raspberry Distress Inks. The rose is from Steampunk Butterfly, coloured with alcohol markers. And to glam up the card I mounted the design panel on purple glitter foam.
Thanks for stopping by and don't forget to come back for more creative inspiration form the rest of the design team. Happy Holidays!
Beijinhos,
Asha
Friday, 25 December 2015
It's Christmas (by Lesley)
Enjoy this special day.
Thursday, 24 December 2015
Poinsettia Lattice (by Judith)
I have chosen to create a Christmas card for my final offering of the year, and hope that you will accept it as a card from me to you. I would like to thank you all for the lovely comments that you have left over the year on my posts.
I have used the Studded Lattice cling mounted stamp to create the background, and added some poinsettias from the Joyful Christmas stamp set.
Thanks for stopping by, Judith xx