Pin It button on image hover

Friday, 14 July 2017

Summer Fair (by Marga)

Hello here I'm again with the beautiful new stamp Summer Fair.


I love the beautiful new stamps with the lovely faces.
I coloured this card with my pencils. 

Stamp I used: Summer Fair

Hugs Marga

Thursday, 13 July 2017

Mackintosh Roses (by Julie)

Hello, Julie here and I have two Mackintosh style cards to show you, so I will start by showing this DL card.


I have used both Mackintosh Windows and Mackintosh Beauty . I started by taking the Mackintosh Windows set and inking up the decorative face stamp with black Archival ink and stamping onto glossy card. I coloured with alcohol pens and then cut it out. The base card was stamped with the border from Mackintosh Beauty using a purple dye based ink and coloured with pink and purple Pan Pastel. Next I threaded some beads onto elastic cord and secured by tying a knot at the bottom so that the beads do not fall off. You may want to add a blob of clear drying glue for extra security. I then attached to the back of the stamped image with 3d foam pads before applying to the base card. The card was finished off with a sentiment from Amazing Mackintosh Words.


My second card has been created with two stamps from Mackintosh Windows. I started the card by colouring some stamping card with Antique Linen and Old Paper Distress inks and then stamped the decorative rose in a circle. No measuring was used so you may want to start with a bigger piece of card and then cutting to size after you have stamped. I filled around the circle with the large rose and then coloured with brush markers. Acrylic paint pens were dotted around the outside and the card was finished off with sentiments from Amazing Mackintosh Words.

Thank you for taking a peek and please call back tomorrow for some more design team inspiration.

Julie xx

Wednesday, 12 July 2017

Mackintosh Lantern (by Penny)


Hello everyone, today sees the first of three posts this month from Penny Butler, one of our regular Guest Design Team members. Penny has designed a very pretty luminary for her first project this month.

Penny writes:

Hello everyone, I hope that you are all enjoying some sunshine. It is my pleasure to bring you three projects this month, and the first is one of my samples from the recent TV shows.

I have used the Mackintosh Windows stamp set, black card, parchment paper, alcohol pens, silver embossing powder, gilding wax, and an embossing folder from my stash. I embossed the black card in the folder, and added the gilding wax. I stamped and embossed the four window images onto the parchment paper and coloured them on the reverse. I cut the parchment into four panels, created a box from the black card, and cut apertures into each side, to make a lantern. I then attached the stamped panels to the inside of the lantern, created a small platform to fit inside the lantern, and added a battery operated tealight.


Thank you for a truly inspirational design Penny. We look forward to seeing another project from Penny next week,


Tuesday, 11 July 2017

Spring Love (by Magda)

I have been inspired by a "Spring Love Song" that I heard few days  ago and Chocolate Baroque has the right stamps for giving life to my project.

Step by Step :
1.  Stamp with Versafine Onyx Black the single stamp Spring Awakening  on a white cardstock card.
2.  Colour the figure with water colour pencils and blend with a Watercolour brush
3.  Stamp twice with Versafine Onyx Black  the heart from the set Music Fanfare and colour them as
     done at point 2.
4.  Blend lightly and randomly the background with Distress Ink Pad Worn Lipstick
5.  Stencil some small hearts around the figures  using Distress Ink Pad Antique Linen
6.  Stamp with Versafine Onyx Black the sentiment of set Mackintosh Sentiments

Your mat is now ready and you can assemble your card.


Thank you for passing by.
Magda 

Monday, 10 July 2017

Just about the little things (by Anne)


Good morning. Today I am sharing another of my show samples with the lovely Mackintosh stamps recently shown on Hochanda.

I used a stamping platform to help with placement of the stamps around the card border. This made it quick and easy but it is not essential. A craft mat and acrylic block with a grid will be helpful to get precise placement but it can be done ‘by eye’. Practice on a piece of cheap copy paper.
 
Materials:
 
How to make it:
  1. Mount the corner and border stamps onto a gridded acrylic block. Test their placement on a scrap piece of 8 X 8 copy paper. Stamp onto one corner and edge, turn the card 90 degrees and stamp again. Repeat to build the border. Heat emboss with clear powder. Colour with inks and sparkle pen. The embossing resists the ink so makes colouring fairly quick and easy.
  2. Stamp the lady onto stamping card. Heat emboss with clear powder. Cut out and colour with inks and sparkle pen. Don’t worry about cutting out the fiddly ‘land locked’ area under the bouquet. When mounted onto the uncoloured background panel it will blend in and not be noticeable.
  3. Stamp the panel and sentiment, cut out and mount onto black card, glue to the card front.
  4. Glue the lady to the card front with 3D glue gel or foam pads.

Sunday, 9 July 2017

Mackintosh Bookmarks (by Asha)

Good morning, friends. I have 2 easy bookmark projects to share with you, both featuring Chocolate Baroque's Mackintosh inspired designs.

For my first project, I started by inking a piece of watercolour paper with  Distress Inks: Salty Ocean and Chipped Sapphire for the top blue section; Mustard Seed for the yellow; Mowed Lawn and Pine Needles for the bottom green. Then I gave it a light misting of water, dabbed off the excess with a paper towel and dried it with a heat tool.

Then I stamped window panel from Mackintosh Windows with Versafine Onyx Black ink and heat embossed the sentiment from Amazing Mackintosh Words with WOW Gold Rich EP.

The second project features the water colouring technique. I started by heat embossing the window panel from Mackintosh Beauty with WOW Vanilla White EP. Then I did a little simple water colouring. When completely dry, I inked the edges with Cracked Pistachio and finished the project with a sentiment from Amazing Mackintosh Words stamped with Ranger Archival Plum ink.

As always, I have details of the tools and products used on my blog. Thank you for stopping by and drop in soon for more designs by the team ... and don't forget to watch our Lesley on the telly!

Beijinhos,
Asha

Saturday, 8 July 2017

dreaming beauty (by Veronica)


I love the Mackintosh stamps and sentiments, and had great fun playing with them, as did everyone else on the DT!
The lovely lady from Mackintosh beauty was stamped first using a blue inkpad, then masked with masking tissue. the background was created using the now-traditional torn paper for the landscape and a moon mask in the sky, with the castle from fantasy castles. The grasses are from the baroque meadow single stamp, and the trees use a stamp from silhouette  grasses. The lady was coloured with watercolour pencils.


My second card just used the lady on her own, again coloured with pencils, this time with a distress oxide inked background.The base card was randomly stamped with two of the single rose stamps using the same distress oxide inks.

Friday, 7 July 2017

Stamps and Texture Paste (posted by Claire)

Good morning everyone, I hope you're enjoying this months inspiration, I just love all four of the beautiful ladies in the Four Seasons collection and this project features the lovely Autumn Medley. I began by spreading a thick layer of texture paste over the stamp and leaving her for a couple of days to dry.

.

Once the texture paste was dry I carefully peeled it away from the stamp and triimmed the edges to neaten it up. Then I painted it with acrylic paints, I was really pleased with the effect they gave


I took an oval mdf shape and applied texture paste through a woodgrain stencil, adding a thick layer around the edge of the piece. Once that was dry I painted with acrylic paints in shades of brown and then attached the lady so that her hair wood blend into the wood. I added some flowers, leaves and raffia from my stash and used a little mdf sentiment from my stash to finish off.


I used the same technique for this project but used Winter Dawn


This time rather than paint her with acrylic paint I stuck her to the stencilled background and painted over with black gesso. I highlighted everything with silver gilding wax and then added some iridescent highlights with Twinkling H2O paints. I think her eyes look a bit scary lol


Thanks for visiting today don't forget to keep checking in as my teamies have got some wonderful projects to share !
Claire xx


Thursday, 6 July 2017

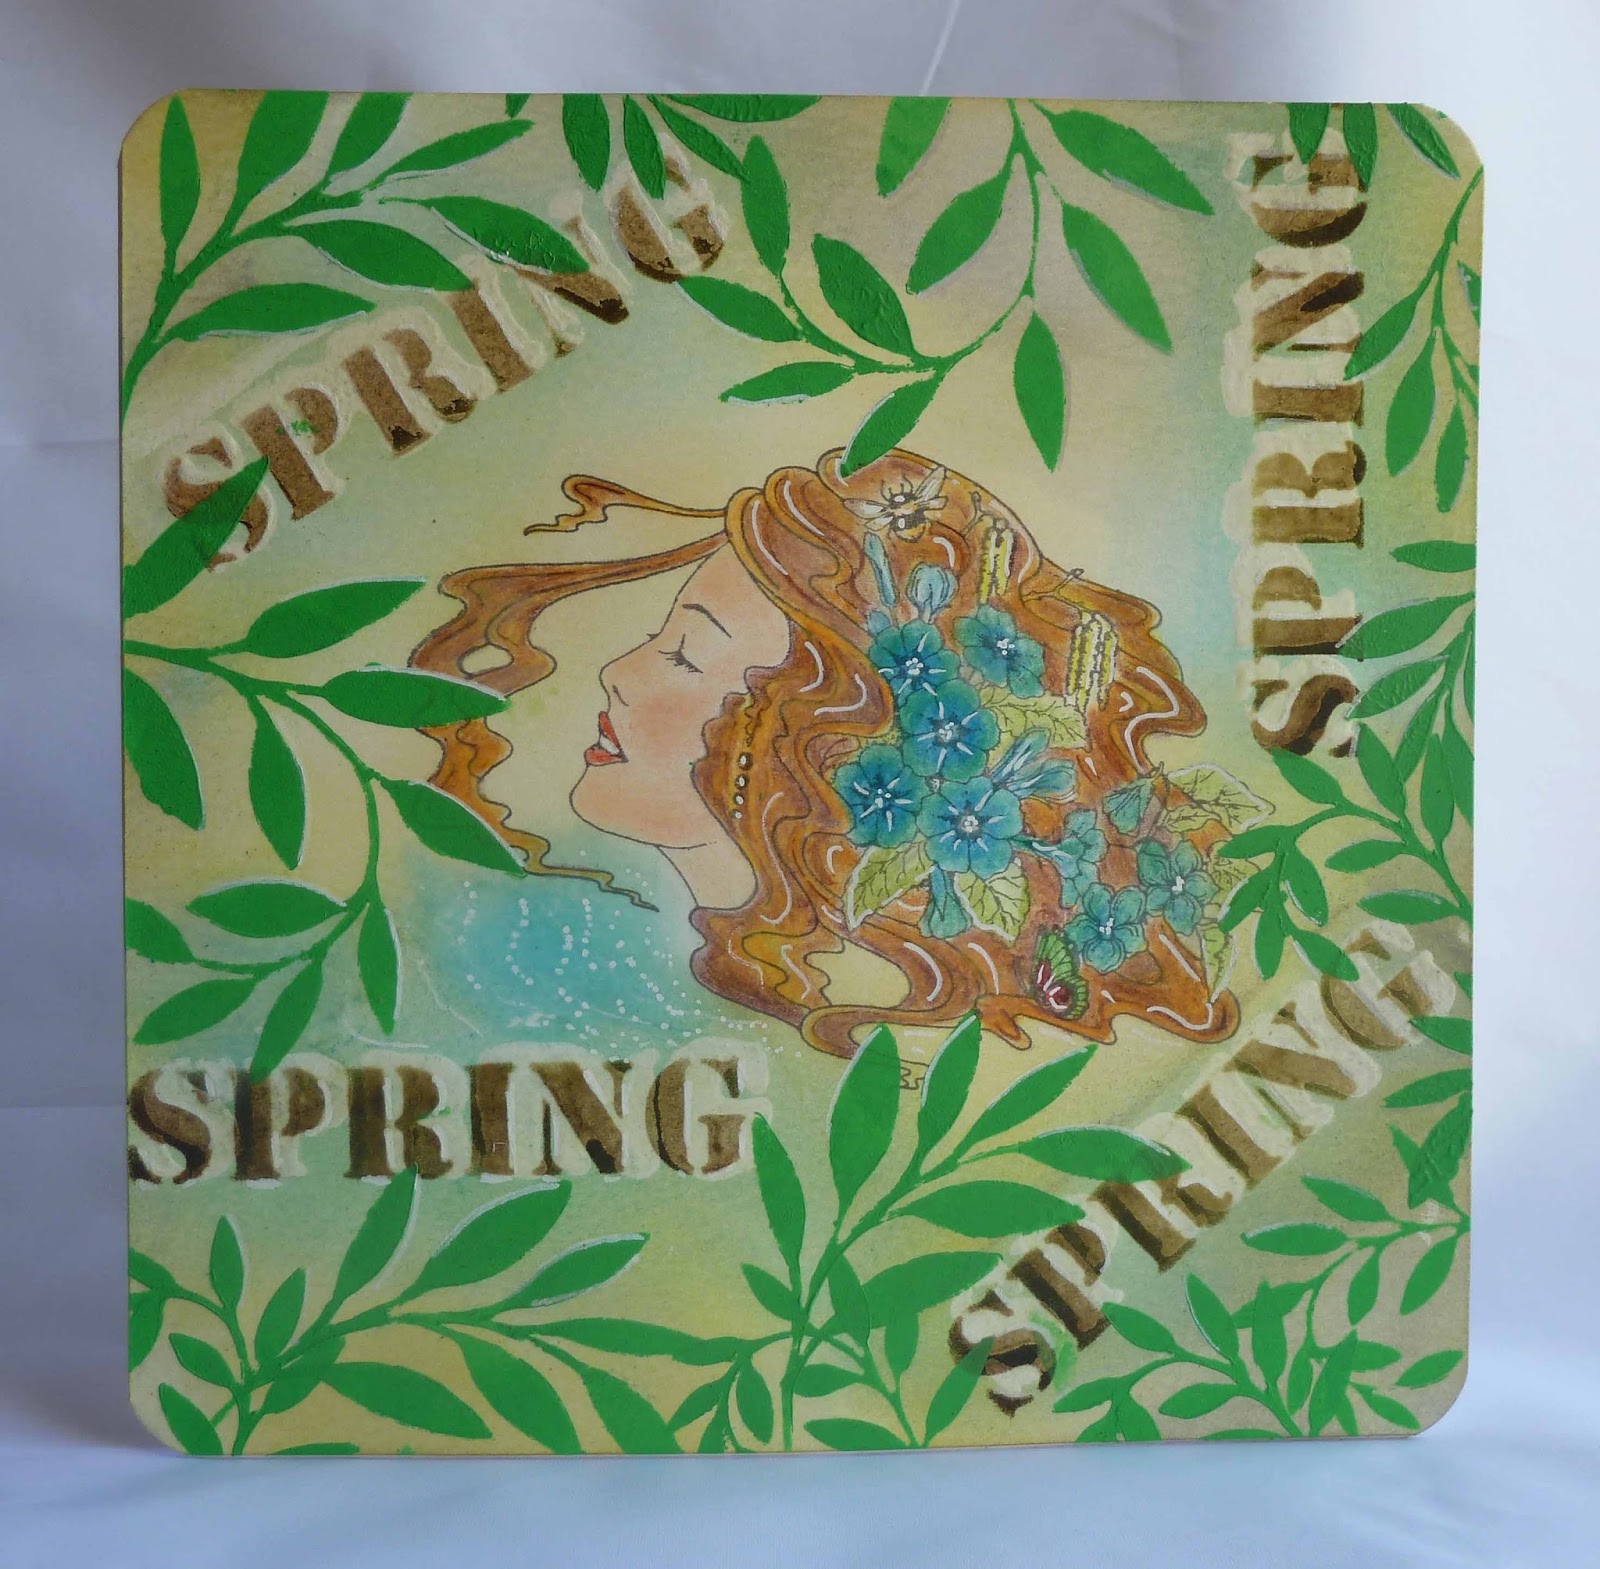
Spring (by Judith)

Hello everyone, I have a couple of projects to share with you today, showcasing some of the fabulous products featured on last month's second show on Hochanda.

For my first project, I used a piece of background watercolour paper from my stash, already coloured with Distress Inks, and added some stencilling, using the Useful Leaves Stencil and two different colours of green ink. I coloured some texture paste with green ink, and spread it through the Seasonal Journey Stencil, choosing the word 'Spring'. Once the paste was dry, I added some green gilding wax to darken the colour slightly, and add some shimmer.

I stamped two butterflies from the Just Butterflies stamp set onto acetate using Versafine Onyx Black Ink, and embossed them with clear embossing powder. I coloured the reverse of the images with alcohol markers,and cut the images out, before attaching them to the background. I chose a bright green card to mat the background.

For my second card, I stamped the lovely Spring Awakening image onto a piece of smooth watercolour paper, and masked the image. I coloured the background with Distress Inks, and added some stencilling with a honeycomb stencil in two opposite corners.

I drew through the twig section of the Seasonal Elements Stencil, using a water based marker, and then added some leaves, using a bright green marker. I used the same green to add the word Spring from the Seasonal Journey Stencil. I added some detail to the leaves with a darker green pencil.

I stamped a bee and butterfly from the Patchwotk Butterfly and The Rose Tree stamp sets onto acetate, embossing and colouring them exactly as I did in my first card. I removed the mask, and coloured the main image with pencils. I added some deeper shading around the edge of the card, and matted the background onto some purple card.

Thanks for stopping by, Judith xx

Wednesday, 5 July 2017

Winter by Zoe

Good morning Lovelies, here's my first post for this month featuring the fabulous Seasonal Ladies that were featured recently on Hochanda.

My first card I used a glossy card stock, scrumpled up some cling film and sprinkled a tiny amount of Brusho Crystals- (Sea green and Grey) onto the cling film I then spritzed with a silver mica spray ink, I then wrapped the cling film around the card and formed wrinkles once in place, I left it for no longer than 10 mins, it mustn't dry or it will tear the paper when removed, so once completely dry I just stamped the Winter Dawn lady in Black Archival Inkpad and added a few pearl drops to the snowflakes.

 
My second card I literally folded so Linen card in half, added Distress Oxide Inkpads to an acrylic block and spritzed with water, I swiped the block across the card, added a few splashes of water while drying with my heat tool, once completely dry I heat embossed the lady and sentiment in white, added sequins.

 
I stamped and heat embossed in white onto watercolour card, masked off her face using Drawing gum and lightly sprinkled with Brusho's, spritzed with water and mica powder to give a shimmer, once dry I used the stencil and Distress Inkpad for the word and texture Paste with the snowflakes, while the flakes were still wet I sprinkled with blue glass glitter.

 
I hope you like my creations, have a great day xx Zoe xx

Tuesday, 4 July 2017

Stained glass window (by Brenda)


Good morning, I hope you are all enjoying the Summer weather and as it's 4th July a Happy Independence Day to all our American friends.

This month myself and the Design Team are sharing some of our creations made for the June shows on Hochanda when Lesley shared the most beautiful Machintosh inspired stamp sets during the first batch of shows and on the second the lovely Seasonal Ladies, all of which were a joy to work with.

My card at the top uses two of the images from Mackintosh Window stamp set, stamped with Versafine Black and heat embossed with Detail Clear powder, coloured in using Distress Inks, added some Liquid Pearls to the flower centres and matted and layered onto a landscape card.


For this card I stamped three of the words from Amazing Mackintosh Words onto a square of white card and then flicked some watered down Distress Ink and then stamped the large swirl from Patchwork Butterfly set using Blue Versafine ink.

Next I stamped Large Crackle Background around the edges of a small chipboard frame using the same blue ink and lightly inked the edges. I made a template of the inside of the frame and drew around the shape on a craft mat, heated some clear and blue UTEE and poured onto the shape on my craft mat and quickly stamped the image from Mackintosh Windows using white ink. I cut away the excess from the edges whist still warm, fixed inside the frame and then onto my card and added some twine and flowers.


Here I used Brushos, stamped abound the edges using Distress Ink and two of the individual roses from Mackintosh Windows, a sentiment from Amazing Mackintosh Words and then the beautiful Spring Awakening image. I coloured the flowers in her hair with pencils and added some pearls to the centres.


The background for this card was made with watered down blue Distress Ink and mopped with a piece of kitchen towel to keep it as pastel as possible. Next Winter Dawn was stamped with Versamark and heat embossed with white detail clear powder and the colour bleached out before colouring with Distress Inks........a good tip when bleaching away colour is to allow the bleach to dry properly and leave for half an hour or so, otherwise added colour can fade.

Using the new stencils that match the Seasonal Ladies I added some snowflakes and the words using Distress inks.

Many thanks for popping in to have a peek today.


Monday, 3 July 2017

Birtday Wishes (Marga)

Hello Every one. Today it's my turn to show you a new card from me.


I used Distress ink to make this card. Also de background I have stamped with Distress ink. First I made the background and then I coloured the flower stamp in the same colours as the background. Because I used water with colouring the colours are a little bith lighter dan de background. 

I used: Mackintosch Beauty
Amazing Mackintosh Words

Big Hugs 
Marga

Blog Post Comment Winner June

Hello everyone, we hope you are doing well.

Once again we would like to thank you all for your visits here at the Design Team blog.  We truly appreciate the time you take to let us know your thoughts about our designs.  
Each comment in June was assigned a number and we used Random Org to draw a winner.  Congratulations to Sandra (Sandma's Handmade Cards)  you have won a £15.00 voucher to spend on Chocolate Baroque stamps!  Please send a quick email here to confirm your email address and Lesley will send you your gift certificate.
Lesley will be giving a £15 gift voucher to another lucky winner drawn from July's comments. The more comments you leave the better your chances to win!  
Thank you for your kind words and comments,
Good luck from the Design Team!


Sunday, 2 July 2017

Spring Awakening (by Julie)

Hello, thanks for stopping by. Today I have two cards to share with you that I made for Lesley's most recent Hochanda TV show. They both feature the rather lovely Spring Awakening  lady and I have shown two ways of using her. The first one is if you fancy using your colouring pencils and the second would suit you if you're not really in a colouring mood.


For my first card I started by inking up the Spring Awakening lady with grey archival ink and then stamping in the centre of the card base.  Hopefully you will have the new stencils that were launched on Hochanda as you will need the Seasonal Journey. I placed the stencil on the card and applied Gesso through SPRING, heat setting as I went so that I could get on and do the next bit of stencilling. Once the Gesso has dried place the SPRING back over the dried Gesso but slightly off set it and apply brown dye ink through the aperture. Once you have completed the 4 stencilled Spring words take the Useful Leaves stencil and apply green acrylic paint through the aperture. Before moving onto the next set of leaves dry with a heat gun.
Once the stencilling is complete colour the lady with coloured pencils and then sponge Squeezed Lemonade and Old Paper Distress inks over the background. I have finished of the card with white paint pen highlights and dabs of Crystal Stickles.


For my second card the lady was stamped onto Kraft card with black Versafine. I used Polychromus pencils to colour the main image. You don't have to go into too much detail with the colouring as the Kraft card is very forgiving. The background is stamped with Spring Foliage stamps and blue dye ink has been applied with a wet wipe. The card has been finished off with a few die cut flowers and a narrow frame cut from Kraft card was placed around the outside edge.

Thanks for looking and please call back for more Design Team inspiration.

Julie xx

Saturday, 1 July 2017

Mackintosh Lady (by Dominike)

Hello

I am preparing my holidays. I like sending news to my friends. So this year I wanted to decorate my envelopes. And what better than this marvellous stamp ?

I painted the envelopes with acrylic paints and stamped the lady with roses with versamark. Then I embossed with black powder and gold powder.

Bonjour

Je suis en train de préparer mes vacances. J'aime beaucoup envoyer des nouvelles à mes amies de mon lieu de villégiature. Cette année j'ai eu envie de décorer mes enveloppes. Et quoi de mieux que ce magnifique tampon ?

J'ai peint mes enveloppes à l'acrylique puis tamponné et embossé .


Have a good summer. 
Kind regards.

Bon été. A bientôt.

Friday, 30 June 2017

Butterfly Joy ( by Magda)

I did an interesting investigation and found a large use of butterflies throughout the centuries in Art, no matter in which culture, religion, in drawing or painting.
These little creatures are symbols of an immortal soul, a new start, a change, happiness and colourful joy.
Therefore sending a card with a butterfly fits anyone, man or woman, fits any occasion and means much more than the sentiment you put on the bottom of it.
Here is my card today and the Step by Step :

1. Colour your white card lightly with Distress Ink Pad Antique Linen
2. Stencil randomly part of the 6x6 Cell Theory Template with Distress Ink Pad Old Paper
3. Stamp with Versafine Onyx Black in second generation, the stamp from Silhouette Grasses 
    Rubber Stamp Sheet A5
4. Mask with Masking Tissue part of Katya Single Rubber Stamp A6 stamp it with Versafine
     Deep Lagoon and stencil "Joy" on the background and around Katya's neck.
5.  Ink with Versafine Deep Lagoon and Versafine Toffee the butterfly of Patchwork Butterfly and
     stamp it on Katya's head
6.  Ink with Versafine Deep Lagoon and Versafine Toffee the small butterfly of Just Butterflies Rubber 
     Stamp Sheet DL
7.  Stamp it with Versafine Deep Lagoon the sentiment of Words of Inspiration


I am sure that the beautiful butterflies stamps from Chocolate Baroque will give a unique and precious touch to your cards.  
Magda

Wednesday, 28 June 2017

Mermaid Queen Birthday Card (by Rachel)

Hello everyone, today sees the final visit this month from our regular Guest Design Team member Rachel Fisher. She has created a beautiful Birthday card for her Mum, using stamps with an underwater theme.

To make her card, Rachel stamped the main image from the Mermaid Queen stamp set, and masked the image. She then added images from the same set and the Seadragon stamp set to complete the scene. The background is coloured with Distress Inks, and she has painted the images using Distress Inks and a water brush.

Thank you Rachel for sharing your lovely card with us. 

Rachel will be back to inspire us with more projects in a few months' time. You can visit her blog to see more of her work. 

Thanks for stopping by,


Tuesday, 27 June 2017

Butterfly Fold Back (by Anne)

Good morning. Here is one of my samples for the butterfly stamp set shows featured on Hochanda recently.


Materials:
How to make it:
  1. Make a vertical score line half way across the card front and fold back.
  2. Open the card out flat and stamp the swirls around the edges with Versamark ink to frame. Use a gridded acrylic block to help align the stamp with the card edges. Also stamp the verse and small butterfly. Heat emboss with the pearl blue powder. Colour the butterfly with sparkle pen and add glitter glue dots for added sparkle.
  3. Stamp the large butterfly onto white card with Versafine. Using watercolour pens directly onto the stamp, colour the lightly spritz with water and overstamp onto the black image. This will give a watercolour effect. Add more colour with the sparkle pens. Cut out and glue to the edge of the card fold back. To make it neater you could paint the back of the white card with black acrylic.
  4. Finish with more stickles and add some Glossy Accents to some areas of the butterfly detail.

Monday, 26 June 2017

Mackintosh by Zoe

Good morning one and all, I hope you've enjoying the beautiful summer weather.
Did you manage to catch our fab Lesley on Hochanda? Well here are some of my samples from the Mackintosh inspired stamp show.


A Greyboard Tag I Gesso'd first and used Distress Oxides which were put onto craft mat, spritzed with water and picked up, tip; Oxides don't like Gesso, it took loads of layers and loads of drying, but I liked the effect eventually! I stamped the image twice turning the tag upside down to get this interesting circular shape and coloured using Distress inkpads, I added some Frantage and a Gilding wax to finish off.

 
Heat embossed onto watercolour card and masked the bride then washed over with watercolour inks, once dry I removed the Drawing Gum and coloured using the same inks, I stamped and embossed the image twice and fussy cut the flowers to decoupage. To make the "Wedding Card" 


Spray inks for background, heat embossed in black 3 times and coloured with Watercolour Markers, cut out and mounted onto black card.


I hope you like my cards? I had so much fun creating them, have a wonderful day xx Zoe xx 

Mackintosh pt 2 by Zoe

Good morning Lovelies and welcome to my second post this month featuring the wonderful Mackintosh inspired stamps that were on Hochanda recently.

My first was wrinkle free Distress technique on background and I used the rosebuds to tone on tone stamp for texture, the image was coloured using Inktense pencils.

 
This card I inked using the Ombré effect with 3 shades of pink, I used text and rosebuds to create texture, the image was coloured using Watercolour markers.


A Papermache box which I painted with Chalk paints, heat embossed the images and painted with chalk paints, to finish I used UTEE on the lid the get a tile effect.


I hope you like my creations, please pop back and check out all the fab projects. Have a great day xx Zoe xx