Hello everyone, earlier this month, Lesley introduced an exciting new range of stamps on Hochanda created by Kim Moody. These quirky designs drawn by Kim have been manufactured by Chocolate Baroque, so you know that they will be of great quality. Some of the Design Team from Chocolate Baroque were very lucky to work with Kim's designs for the show, and we thought that we would share our projects with you in a one off blog post. You can check out the Design Team members' blogs for more information. If you are interested in purchasing any of Kim's designs, check out the
Kim Moody section on the website.
Penny created a vibrant steampunk image using
La Maison, adding a couple of airships from our
Steampunkery and
Steampunk Travel stamp sets. She extended the wall, and masked all of the images and colourwashed the background with Distress Inks, also adding some grounding underneath the wall at the bottom of the panel. She removed the mask and painted the images with Distress Inks. She stamped a sentiment and distressed the edges before adding it to her project.
For her next project, she stamped
Head Office, coloured the image, adding sunrays behind with a stencil, and an image from the
Floral Edges stamp set at the front. The sentiment comes from the
Words of Inspiration stamp set.
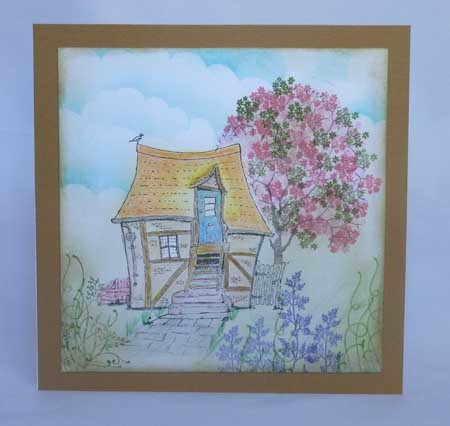
For her next card, she stamped
In an English Country Garden and masked the image. She added the wall and the little birds from the
Landscape Edges stamp set, she added trees, hand drawn hills, and then removed the mask and coloured the scene before adding a sentiment and fussy cut foliage and a butterfly.
For her final card, she stamped
Loft Conversion and masked it before extending the wall and masked that as well. She stamped the
Orchard Design a Tree before removing the masks. She watercoloured the picture and added glitter to represent snow. She matted the panel onto a white card blank, adding die cut snowflakes, and adding a sentiment.
For my first card,
I die cut an oval aperture from a piece of card, and stamped some of the flowers from the
Patchwork Landscape stamp set along the bottom of the card. I coloured these with watercolour pencils, and ran over them quickly with a water brush afterwards. I stamped
In an English Country Garden onto another piece of card, and coloured this with the same pencils, adding splotches of colour in the foreground to represent the flowers growing in the garden. I attached the image behind the oval before adhering the panel to a black mat layer and then to a card blank.
I stamped
Head Office and masked the image. I coloured the sky using a stencil and blue dye ink, then used a green Distress Ink for the grass. I used watercolour pencils to colour the image,and added some hand drawn birds.
I stamped
La Maison, and again masked the image before stamping
Glade Design a Tree. I added foliage using shades of green and orange in first and second generation stamping for added depth. I used Distress Inks to watercolour my image and background.
Julie has used
La Maison with a die cut New Home. She coloured the house with pencils as well as the sun rays. She drew in the pebbles alonng the path and continued the wall with a fine tipped pen.
She stamped
In an English Country Garden and coloured the image with pencils. She drew the clouds with a fine tipped pen and stamped the Holloyhock flower from the
Honey Bee stamp set.
She stamped
La Maison and coloured it with pencils. She then die cut a circle to act as a mask over the house. The background was stamped with images from
Wisteria Lane and coloured with Distress Inks and white paint pen highlights.
Loft Conversion was stamped and coloured with pencils. She then created a mask for the house and stamped
Spinney Design a Tree. The background was coloured with Distress Inks and some of the colour was lifted with a wet paintbrush to create the moon. The extra stamps are from the
Nature Swirls stamp set. She used Picket Fence Distress Ink to stamp the a corner stamp in the sky, then stamped a larger image in the foreground using Versafine Onyx Black, overstamping with Picket Fence Distress Ink. She completed the card with die cut bats.
Finally, she stamped
Loft Conversion and coloured the image with pencils. She masked the image and stamped
Spinney Design a Tree once again. Various shades of pink and green dye inks were used for the tree blossom. The sky was coloured with a cloud mask and Distress Ink. Swirls and foliage were added to the foreground.
Pat created her first card using
La Maison by stamping onto a piece of cork sheet and embossing with white embossing powder. She coloured the image with pencils. For the background she used a piece of patterned gold card and a piece of hessian. She pulled the threads to make a fringe. Some of the threads were twisted to form a cord and some more put together and knotted. She used a computer generated sentiment and cut it into a banner shape.
For her second card, she stamped the image in grey and heat embossed using clear embossing powder. She coloured the image using Distress Inks and a waterbrush. She added a background using more Distress Inks. She added a computer generated sentiment cut into strips.
Brenda used a wooden fairy door for her first project, colouring it, adding embellishments and images from some of our fairy collection of stamps. Behind the door, she added
La Maison coloured to match her overall colour scheme.
For her next card, she has chosen Autumnal tones for her colour palette. She has stamped
Head Office, adding one of our
Design a Tree images, and added foliage. She has created a Distress Ink background, creating a sun with masking.
Another design using
Head Office, with a soft green/brown colour scheme. Brenda has used a piece of corrugated card as her background layer, which gives a rustic feel to her project. The punched holes at the top with string through, make this an ideal masculine project. She has added stencilling to the background for extra texture and interest.
Her next project is a sepia coloured card. She has stamped
Loft Conversion using brown ink, using a circle mask behind to create a sun. She has added one of our bird images at the front and partially stamped it again, using just the foliage. She has used a sentiment from the
Artistic Affirmations stamp set.
This next project is so cute! It will be sure to bring back memories of childhood and make you smile when you read the words, I know it did me, anyway. This little canvas is full of detail and dimension. Brenda has stamped
Loft Conversion over a crackled, painted background, with a computer generated sentiment added. Die cut leaves and mushrooms finish the piece off perfectly.
A tryptich is next, featuring three of the houses, all with beautiful coloured backgrounds. The houses do not need much colour themselves, just a touch here or there. Brenda has added images from the
Design a Tree stamp sets and a sentiment to finish.
To create her next card, Brenda stamped
In an English Country Garden, masking an oval area, and inking within that area, using Distress Inks. After removing the mask, she stamped a sentiment, and matted the panel onto coloured card.
Her next project is a lovely home decor piece, she has added stencilling to the background and die cut letters.
Added texture using a brick stencil adds interest to her next project. She has used the
Design a Tree stamps in the background too, and the unusual colour combination of pink and yellow shows that you can use your imagination with these fabulous images, and use whatever colours you want to when creating your projects, they will look amazing.
Combining two of the houses, masking and adding some of our trees to make a scene is how Brenda chose to create her next card. She has added some pretty bunting as an embellishment.
For her next card, Brenda has created a monochrome card once more, stamping
Loft Conversion onto book paper. She has chosen to add a vibrant pop of colour using red in the foliage, fences and the door.
She has created a lovely scene for her next card, adding hand drawn hills, a tree from our
Design a Tree range of stamps and a rabbit from our Springtime range of stamps.
This next card has a real wow factor, using white embossing against a bold background makes the image really pop.
For her next card, she has used the sun ray stencil once more, and added extra foliage to complete the picture.
La Maison looks completely different on the following card, where she has used Summery colours and added a pretty bunting embellishment.
That brings our projects to a close. We hope that you have enjoyed our blog post and that we have inspired you with our various ways of using Kim's new stamps. If you make something, why not share your projects on our
Facebook page, we would all love to see what you make with them.
Thanks for stopping by,


Lovely, quirky houses and lovely samples.
ReplyDeleteGreat examples of what can be made with these quirky stamps, some fabulous backgrounds too x
ReplyDeleteThese are brilliant! Thank you to Lesly, Judith, and the team. xx
ReplyDeleteGreat samples. Love the quirky houses.
ReplyDeleteCarole
WOW these are all amazing! Thank you for the inspiration.
ReplyDeleteHugs
Linda xxx
Absolutely wonderful cards Judith, the stamps are fabulous, Kate x
ReplyDeleteA lot of beautiful inspirations, so different one by the others!
ReplyDeleteWonderful samples, with some great techniques and backgrounds too. I love these quirky house stamps!!
ReplyDeleteHugs, Coco x