
Hi
everyone. I am delighted to be a guest designer for you this month. My first
offerings are some Christmas makes. It's been a tough year for us all and this
Christmas is not really going to be usual. However, lets hope that time goes by
quickly and that we can look forward to better times ahead with our friends and
family in 2021. Lots of hugs, Anne.
CHRISTMAS LANTERN
My
first project is a pretty Christmas lantern. I mixed & matched lots of
stamps on this one but just had to include my absolute fave reindeer stamp.

Woohoo – all lit up.
This one is to be gifted to my 96 year old friend who I help care for. We are having Christmas together as I am in her support bubble. I think that she will love it.
Materials List
- MDF Lantern approx. 12.5cm wide and 20cm height (this one was from Mad Hatters but any similar could be used)
- Stamps from Chocolate Baroque: Winter Edges, Pears and Baubles, Robin the Spruce, Sparkling Trees, and New England Winter
- Stencil from Chocolate Baroque: Seasonal Journey
- Inkpads: Versamark and Versafine (Vintage Sepia)
- Sparkle pen (pale blue), Glaze gel pen (red)
- Watercolour pens: pale blue, green, sepia
- Stickles clear sparkly glitter glue (Icicle)
- White Gesso and acrylic paints (pale turquoise blue and white)
- Gold gilding wax and Galaxy flakes (chunky mica/glitter flakes)
- Clear sparkling glitter gel medium - Kristall Gel (Viva Décor)
- Embossing powders: detail white, white with silver glitter, and pale blue glitter
- Heat resistant acetate and smooth white stamping card
- Red liner tape (strong double sided tape)
- Wired Christmas ribbon
- String of small LED lights

Pretty
3D scene with house and trees.

A
close up – oh that reindeer!

Adding
the acetate baubles helps to blur and disguise the side edges of the card cut
outs creating the scene.
How it was made:
- The bare MDF lantern was coated with white Gesso (primer).
- When dry it was painted with acrylics. Gilding wax was added around the ledges.
- Versamark was applied through the stencil onto heat resistant acetate to create the Winter sentiment. It was heat embossed with sparkly white powder, cut out and attached to the lantern with strong tape.
- The snowflakes border was stamped and embossed with white glitter powder 4 times, cut out and taped to the top portion of the lantern arches. Two large baubles were also stamped, embossed and cut out.
- Extra snowflakes were stamped and embossed with white or blue glitter powders, along with a few twiggy branches, and cut out ready to use as embellishments.
- The main images; 2 large background trees, the building scene, smaller foreground tree and reindeer were stamped with Versafine and cut out. In addition pine cones were cut out from the stamped pine branch stamp.
- Images were coloured with watercolour, glitter and gel pens.
- Now for the messy bit – ha ha. The glitter gel was used to coat the base and spread on top of the ledges. Some was also applied behind the acetate to help glue it in place securely. I had this heavy bodied thick glitter gel in my stash for years. It really needed using up as it had started to set in the pot. Some of the half set chunks were stuck down into the wet gel for added dimension. For added sparkle I also dropped in some of the chunky mica flakes. You could substitute heavy bodied acrylic medium and add glitter for similar results.
- The stamped images were anchored into the wet gel to create the scene. I just had to add a little bit more sparkle over the images with clear glitter glue too.
- Once the glitter gel medium had dried I did a bit of dry brushing with white Gesso in some areas to add more snowy effects.
- The light string was then arranged to light up the background house and trees, and to light up the foreground tree. The wires were anchored with strong tape at the back of the images to help hold them in place. The switch was hidden behind the large background scene images.
- The acetate bauble images were added to the sides with red tape. This helped blur the view through the sides of the lantern where just side on edges of the card elements were visible. It may have been better to stamp the sides as one complete panel but I found that I needed easy access to the inside in order to arrange the stamps and lights.
ROBIN SCENE CARD
Every
year I end up leaving my Christmas cards until the last minute so I decided to
do a couple of projects that would be fairly quick and easy for batch making. I
always use my stamping press for batch making – it makes it so much easier to
line everything up and repeat stamp multiple times.

I
hope that you like this robin scene card.
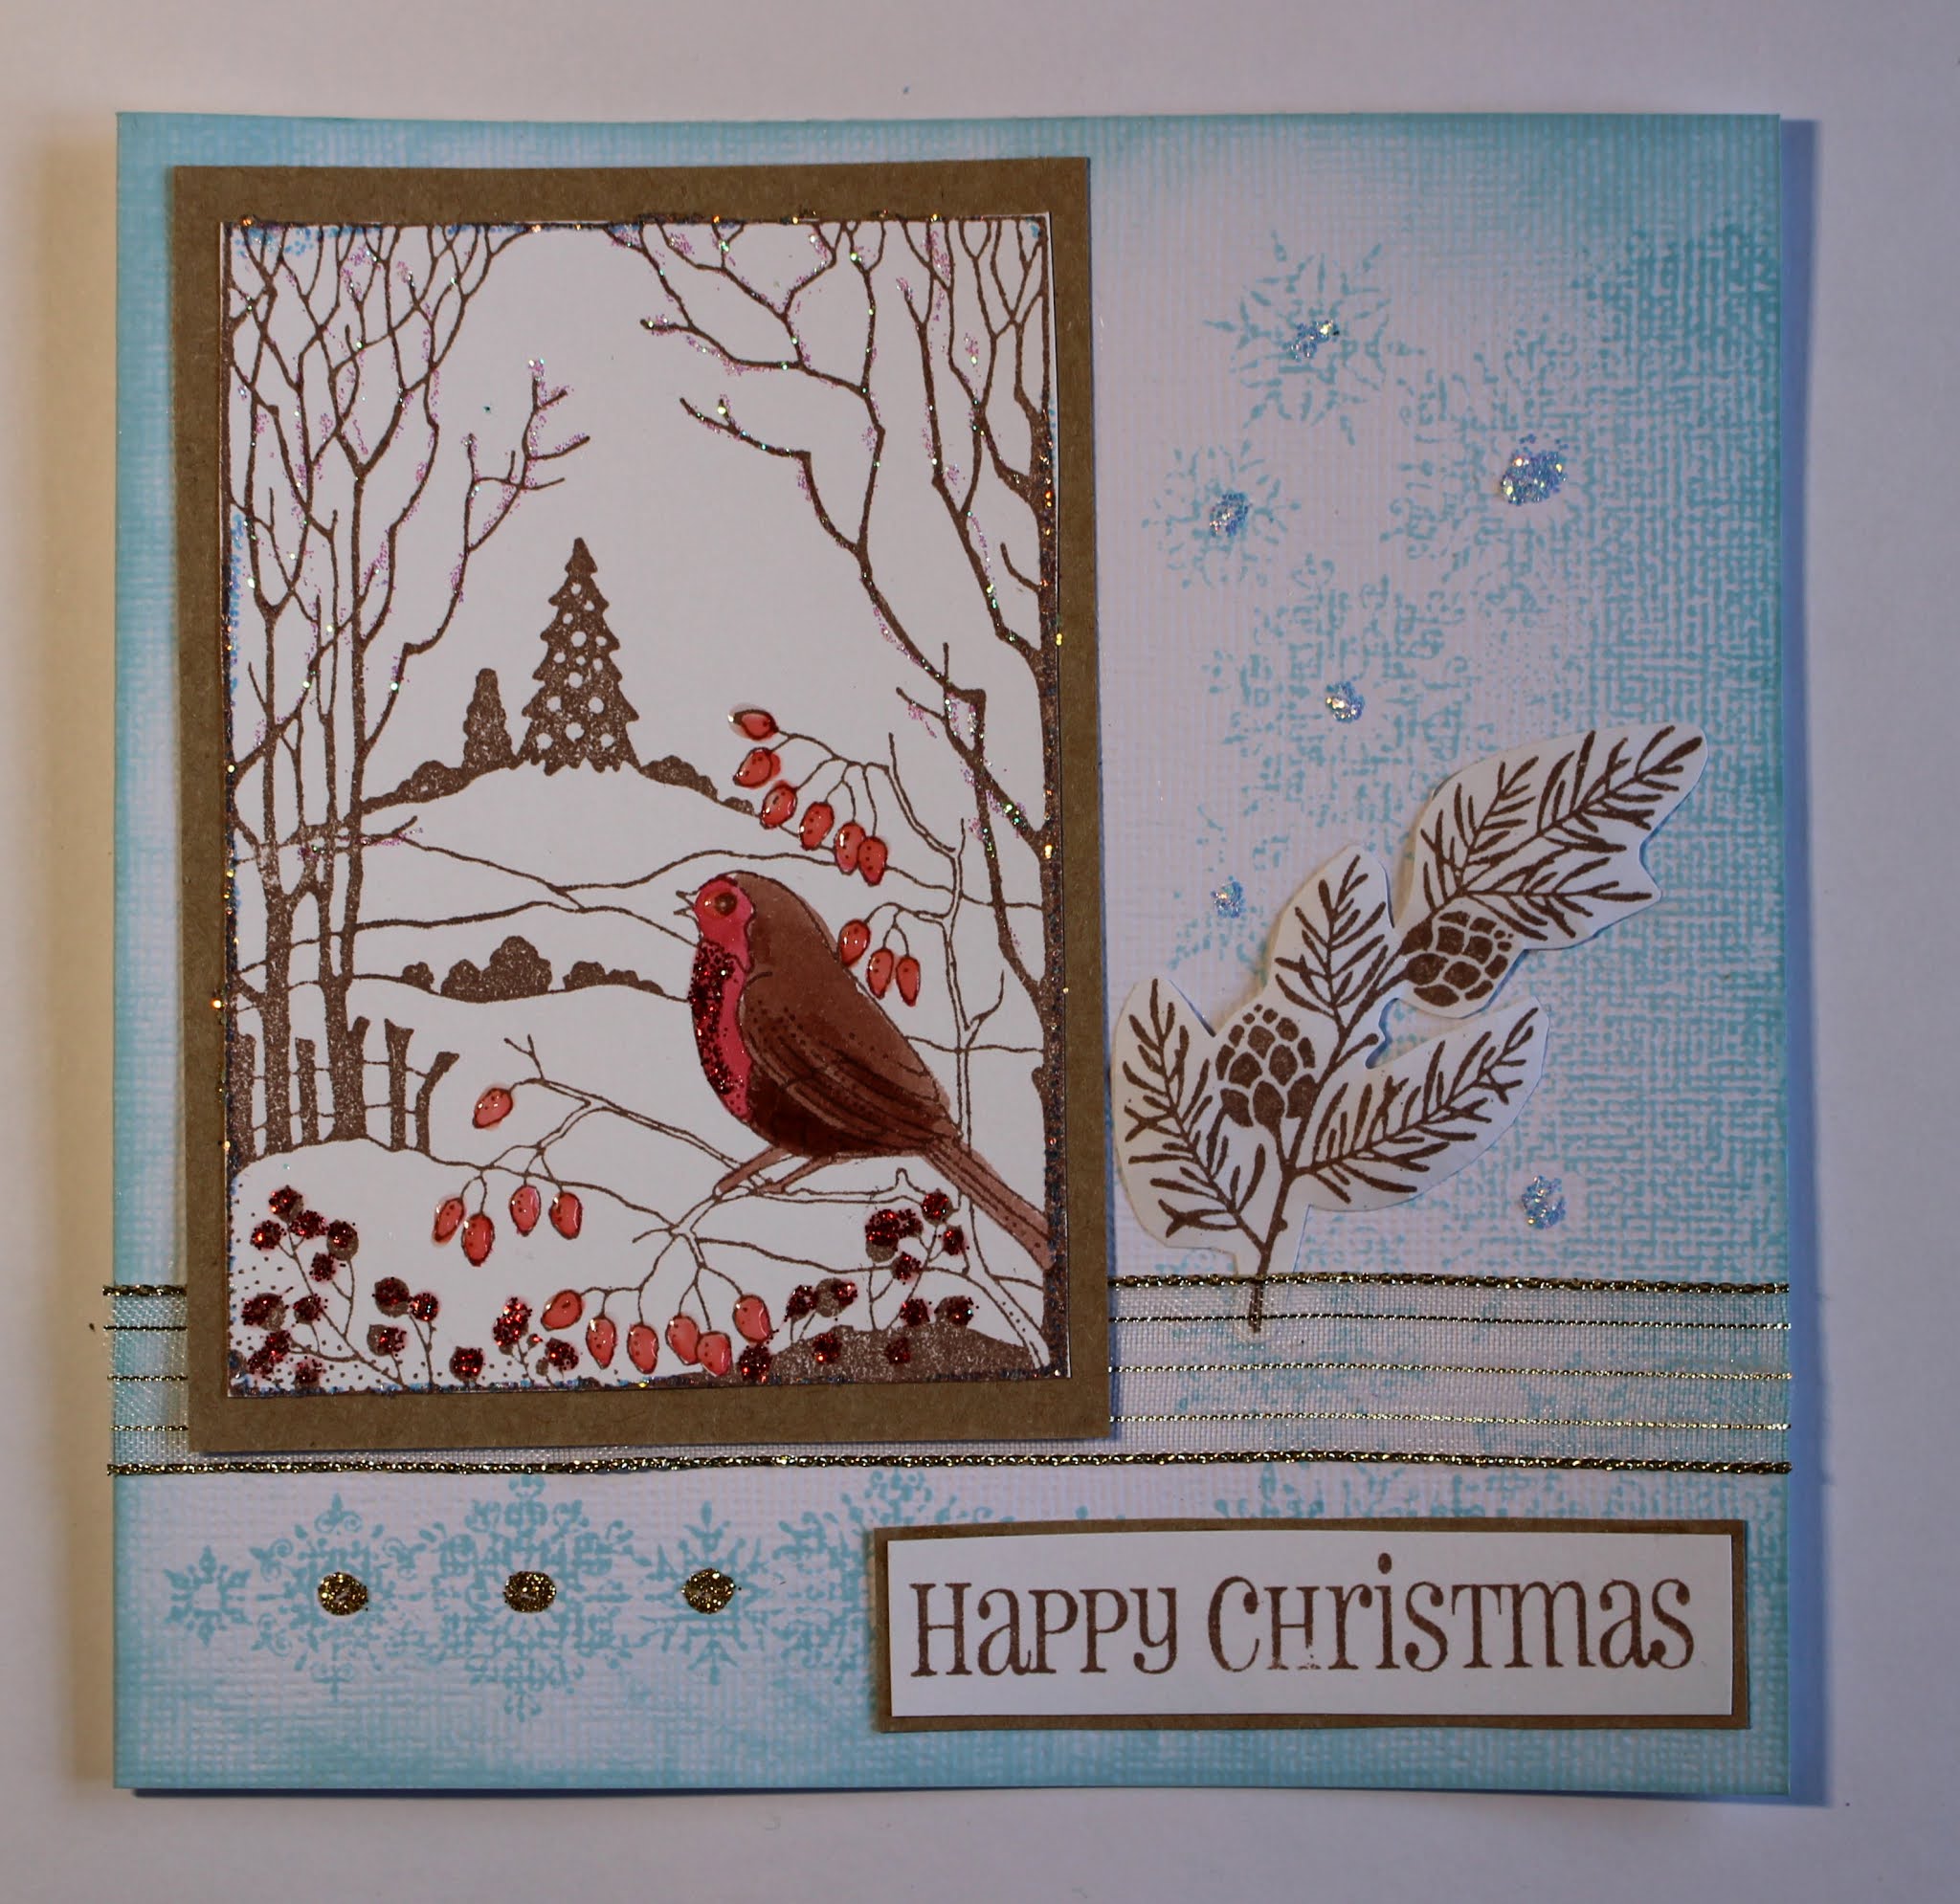
I
added extra inking around the outer edges of this one but decided that it
really didn’t need it so didn’t do it on the rest. I just had to get on with
that batch making! Ha ha.
Materials list
- 15cm square white linen textured card blanks
- Smooth white stamping card and Kraft card
- Stamps from Chocolate Baroque: Winter Edges, Pears and Baubles (sentiment), and Robin the Spruce
- Inkpads: Versafine (Vintage Sepia), Distress Ink (Tumbled Glass)
- Watercolour pens: red and brown
- Sparkly glitter glue (Stickles Icicle, red and gold) and Glossy Accents
- Sparkly organza ribbon

How it was done
- Images were stamped with Versafine and cut out.
- The main image was
coloured with watercolour pens and mounted onto Kraft card. Glossy Accents was
used to add shine to the Rosehips, and glitter glues added for sparkle.
- The snowflake borders were stamped directly onto the card blank with Distress Ink.
- The ribbon was glued down and the main topper added. The sentiment was also mounted onto Kraft card and glued in place. The branch was lightly shaped before gluing.
- Finished with more dots of glitter glue. Hey – you can never have too much bling – tee hee.
Note:
I kept these fairly flat for ease of posting. 3D foam could be used for more
depth if desired.
CHRISTMAS TREE SHAKER
CARDS

Who
doesn’t like a shaker card? Scenic panel stamps make them really quick and easy
for batch making. These were quite tricky to photo due to shiny acetate and all
that bling. Hopefully you can see enough detail of the lovely glittery snow
behind the acetate windows.
Materials list:
- Frosty Trees stamp set (Chocolate Baroque)
- 15 X 9cm white linen textured card blanks
- Heavy weight textured white card (for frames)
- Heat resistant acetate
- Versamark Inkpad
- Embossing powders: Detail white, white with silver glitter, metallic silver
- Glitter for inside shaker (I used Pinflair Ice Diamond – non static glass glitter)
- Stickles glitter glue (Icicle)
- Foam tape and red liner tape (strong double sided tape)
- Optional: Die to cut decorative aperture approx. 12 X 6cm (or cut a plain frame by hand). I used a die from Tonic (Kaleidoscope Box Panel set)
How it was done:
- Cut a frame to fit the card front and surround the stamped scene.
- Stamped the image onto acetate and heat embossed with choice of powder. Trimmed and attach behind the frame with strong tape.
- Next attached foam tape ensuring that no gaps were left (to contain the glitter).
- Laid card flat and placed
glitter in the middle before placing the framed acetate scene.
- Finished with dots of
glitter glue.
MORE CHRISTMAS TREE CARDS
Finally
I made another batch of quick and easy cards using the reverse scene image and
blue ink. I do love monochrome blue & white cards.

Materials list:
- 15cm square linen textured white card blanks
- Chocolate Baroque stamps: Frosty Trees, Winter Edges, and Pears & Baubles
- Versafine Inkpad (Majestic Blue)
- Dark blue alcohol ink pen
- Stickles glitter glue (Icicle)
- Foam tape
- Optional: Die to cut decorative panel approx. 12 X 6cm (or cut a plain one by hand). I used a die from Tonic (Kaleidoscope Box Panel set)
How it was done:
- Images were stamped with Versafine. Note: images on the textured card blanks will not be sharp. This is fine for the backgrounds.
- Scene panels were cut out and stuck down with foam tape for added dimension.
- Finished with glitter glue sparkles. Sorry but had to do it.
What fabulous creations Anne and they are all so beautifully designed and the wonderful lantern needs to be picked out because it looks so festive and pretty, and the different batch made designs with the robin, and the two different tree images, especially the wonderful shaker cards which are brilliant, but I do love the blue on white trees with a touch of sparkle. Thank you for the step by steps for each too. x
ReplyDeleteAh bless you x.
DeleteWow!! How many fabulous inspirations!! Love so much the cards, all so different and beautiful, but that lantern is just stunning, such amazing piece of Art!! Your friend surely will ADORE it!!
ReplyDeleteThank you. Yes my friend was delighted x,
DeleteWow, you've been a busy lady Anne! All stunning designs, I love your cards but the lantern is absolutely stunning and I'm sure that your friend will treasure it. I hope you both have a wonderful and peaceful Christmas x
ReplyDeleteThank you. Yes she loves it and it will be lit up when we have Christmas dinner together x.
DeleteAMazing selection of work. YOur friend will love the lantern, certainly a special gift and your cards are stunning. Wonderful work on them all.
ReplyDeleteFaith x
Ah thank you. Yes she loves the lantern. Nice to be able to do something special - especially this Christmas when she won't be able to have her usual big family Christmas x.
Delete