Pin It button on image hover

Thursday, 26 June 2014

Introducing the July stamps of the month (posted by Judith)

In Glenda's absence, while she is going through her house move, I would like to introduce the July stamps of the month to you. There are two A4 stamp sets called Harlequin Fragments and Tangled Fragments. These two new sets are a wonderful addition to the Fragment series; they are extremely versatile and, as you will see over the next month, they  work very well both alone and with many other Chocolate Baroque stamps.

First is Harlequin Fragments

and then we have Tangled Fragments, both are available at an introductory price. But if you want to save even more money then we have our usual multi-buy offer too.

All offers are available on the website until the end of July.

My sample uses a stamp from the Harlequin Fragments stamp set, which I have repeat stamped over a wrinkle free Distress background to create a watery feel. I have then stamped a bauble from the Artists Baubles unmounted stamp set onto a piece of scrap card, and coloured it in using Inktense pencils. I have added a sentiment from the Amazing Birthday stamp set.


Look out for some inspirational artwork from the Design Team coming very soon and don't forget to leave a comment to be in with a chance of winning our monthly prize. At the end of each month one lucky commentor will be randomly chosen to receive a gift certificate to spend on Chocolate Baroque stamps.

Judith

Wednesday, 25 June 2014

Guest Post - Key Cupboard by Lisa Winnard

This week's guest post is by Lisa Winnard, who has cleverly taken an MDF key cupboard and altered it into this beautiful piece of home decor. This is quite a long post, but I know you are going to enjoy it.


List of Materials:
Chocolate Baroque Butterfly Flourish Swirls
Distress Inks - Weathered Wood, Evergreen Bough, Peacock Feathers, Iced Spruce, Black Soot
Black Stazon Ink
Clear embossing powder
FlitterGlu or similar adhesive
Brighton Pier gilding flakes
300gsm card
Paper and foam flowers
Bees wax
Melting pot
Rusty Keys
Metal lock & key embellishment
Natural twine and ribbon
Other metal and glass embellishments
Dries clear glue
Hot glue gun
Sponge/Cut n Dry foam


1. Remove all the fittings on the MDF key cupboard, sand and paint with a coat of gesso, then a coat of light coloured emulsion paint. 

2. Colour the cupboard with Distress Inks. I chose Weathered Wood, Evergreen Bough, PeacockFeathers and Iced Spruce to work with. 


3. Using the Butterfly Flourish Swirls stamp set, randomly ink areas of the large butterfly stamp with Distress Ink and the un-inked areas with FlitterGlu. Stamp the image on the inside back of the cupboard. (This creates a half inked/half sticky stamped image.) Cover the image with Brighton Pier gilding flakes and remove excess. 

4. Stamp the smaller leafy swirl on the inside back top part of the cupboard using the same technique.

5. Stamp the larger leafy swirl on the outside sides of the key cupboard and use the corner swirls to stamp on the outside top, using the same ink/glue technique. 

6. Stamp the corner swirls on the door of the cupboard using Black Stazon Ink, don’t press too hard to create a distressed look. Randomly dab FlitterGlu on to the cupboard door using a sponge/Cut n Dry foam and cover with the gilding flakes. 

7. Stamp the butterfly stamp on to 300gsm card using Black Soot Distress Ink. Heat emboss with clear embossing powder. Cut out the butterflies and colour them with Distress Ink to match the colour of the cupboard. 

8. Colour some paper and foam flowers with chosen colour of Distress Ink and dip them in bees wax using a melting pot. Glue some of the flowers on to metal plate embellishments.

9. Using a metal lock and key embellishment, dab some FlitterGlu randomly and add the flakes. Tie together using some natural twine and tie around the door knob of the cupboard.  

10. Using a hot glue gun, arrange and adhere a selection of metal embellishments on to the top and door of the cupboard. Add some natural thread ribbon to create texture. Add rusty keys to the inside of the cupboard. Add the cut out butterflies. 

11. Replace key cupboard fitting to finish.


A huge thank you from us Lisa for contributing this stunning project, I'm sure you will want to show your thanks by sharing your comments here. If you would like to see more of Lisa's artwork then please visit her blog - Lisa Makes


Tuesday, 24 June 2014

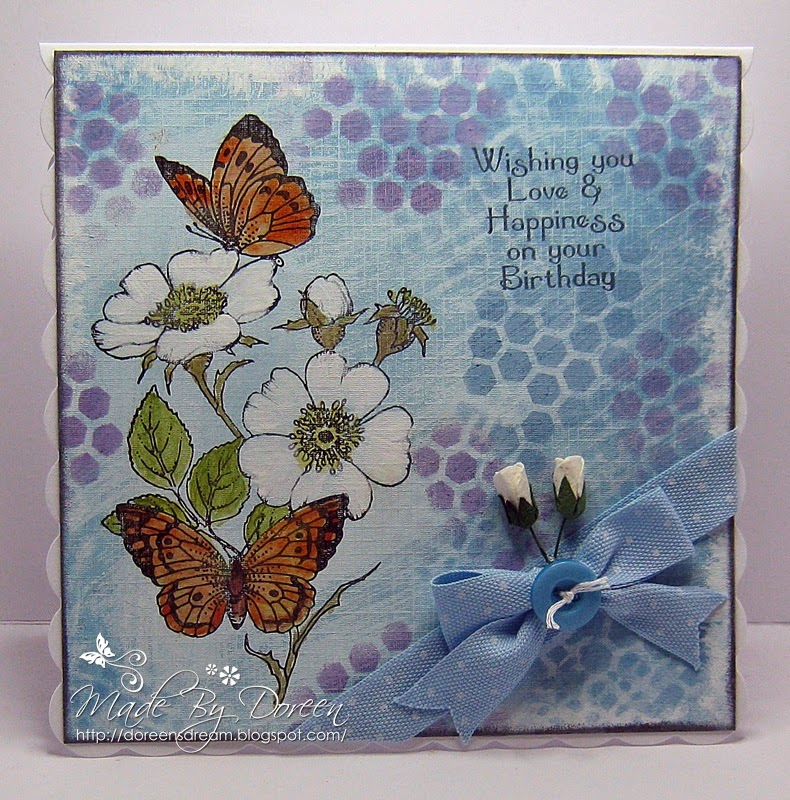
Wishing you Love by Doreen

Hello to you all. Today I am sharing a card made using one of the beautiful new stamps from 
 "Briar Rose Butterfly" stamp sheet. 


I first painted my card with Blue and white Acrylic paint,then inked up my image with Black Versafine Ink,  using Acrylic paints I proceeded to colour it. After this I used some Shaded Lilac Distress ink through a stencil and edged with Black Soot Distress ink. 
The sentiment is from the Birthday Words stamp sheet again inked up with Black Versafine.

Monday, 23 June 2014

Just a Note (by Shirley)

Hello everyone, I hope you had a great weekend.

I have two more designs today using the beautiful Harebell Butterfly and Briar Rose Butterfly sets.


I created the above background by blending Distress Inks and then flicking a little water over top.   The image from Harebell Butterfly was stamped with Coffee Archival Ink and coloured with Prisma pencils.  I stamped it a second time, decoupaged the butterfly, added stickles and poped it up.  I also outlined the sun with a white pen.   

I also have a CAS style design to show you:


The background  above was created by using a circle cut into card stock and sponging Distress Inks over top.  I stamped with a fragment from Texture Fragments.   After removing the 'mask' I stamped the image from Briar Rose Butterfly with Cobalt Archival ink and coloured with Prisma Pencils.  The sentiment is from Mackintosh Sentiments.

Thanks for your visits and have a great day,
Shirley

Sunday, 22 June 2014

Summer Fairies (by Asha)

Good morning, everyone. Let's kick start the lovely warm months ahead with a couple of magical makes using the Summer Fairies Collection - the last in Chocolate Baroque's trio of enchanting seasonal stamps.  
**********

The main image for this project is from the August Fairy DL stamp sheet, coloured with alcohol markers. I popped a sunflower on some foam tape to tuck in the card edge. The fairy's wings are heat embossed in silver onto vellum and adhered to her shoulder.

This is a trifold card. The sunflowers are from the June Fairy and July Fairy sheets. The fern fronds are from the August Fairy sheet, as is the silhouette which is heat embossed in black.

**********

For my second card, I started by blending distress inks to create a background reminiscent of breaking dawn. All stamps for this card are from the June Fairy sheet, except for the grassy bits which is from the Wild Meadow A4 sheet.

I added some sparkle to the fairy's wings and fussy cut the butterfly before adhering it to the card.

**********
Don't forget to swing by again for more fabulous makes by the rest of the Design Team. Here's to a magical summer, folks!

Beijinhos!

Saturday, 21 June 2014

Favourite Colours (posted by Judith)

Hi Folks, my sample today uses lots of my favourite colours, namely purple and teal. I often try to work outside my comfort zone when I am making samples and do not turn to these colours when making a project. It has been a real pleasure to make a card using this colour palette.

I started my card by creating a wrinkle free background using smooth watercolour paper, using blue and lilac tones. I then created an oval mask, which I placed in the centre of the page. I used a dark blue ink and sponged around the edge of the mask, creating a shadow. This helps create a faux layer. I also added the same colour to the edge of the background. Using a flower stamp from the Harebell Butterfly stamp set, I stamped around the edge of the background, and over the edges of the mask. I used a mixture of teal, navy and purple inks. I removed the mask and stamped the main image using navy ink. I stamped the butterfly from the main image again onto a scrap piece of watercolour paper and also onto sparkly acetate.

I bleached the image, and coloured it with pencils. I coloured the second butterfly, and stuck the acetate butterfly over the top. I added these to the main picture. The sentiment comes from the Amazing Birthday stamp set.


Keep checking back for more amazing samples from my team mates. Thanks for stopping by, Judith xx

Friday, 20 June 2014

Just paint a flower!!! (by Maria)


Hi , dear stamping mates,

Today I want to show you two stamped and painted cards. On the first card you can see, the rose of the new Briar Rose Butterfly and the yellow Iris from the Harebell Butterfly stamp sets. On the second card you can see, the Rose and the two small roses  from the Pretty Birdcage

I took two white papers 15cm x 15cm (5.51 x 5.51 inches) on the first one I stamped the big flower with black archival ink, I also stamped it on mask paper, cut it out and masked the big flower on the white paper with it. I stamped the yellow iris 4 times around the flower, then  the real work began, I took some watercolour paints and did the wet on wet technique. These flower stamps were just ideal for this technique. It was really the first time I did  this technique, and I hope the result is okay? The second card I did the same way. I used yellow, orange and greens, my favorite colours. As a finishing touch I gave some white accents with my white gelly pen. I hope you like my cards and hope that I inspired you to make a really painted work of ART. It's such fun!


As you see I couldn't stop, the small cards in the middle are made with the same technique. The  background I 've made with the sponge technique and distress ink, and I used the stamps from the same stampset. Have a lot of fun, as I did!


Greetings and till soon
Maria


Thursday, 19 June 2014

Magic in Fairyland by Glenda

Today I wanted to share a couple of cards I made with the Summer Fairies.

This first one features a background that I made with PanPastels for issue 2 of Monday Mojo Magic last year.  I stamped the fairy with a mixture of black and blue Versafine, then embossed with clear.  It looks black in the photo, but it's actually a very dark navy.  The sentiment and fuchsia are stamped with Versafine and I've coloured the fuchsia with ColourSoft pencils.  The strip of paper behind the stamped panel is from the Essence of Nature CD.


This one has a subtle landscape background - again something I have covered in detail in one of my Monday Mojo emails - this is in issue 24, complete with a downloadable landscape template you can print and cut up.


The fuchsias have been repeat stamped along the top in a soft pink, then coloured with pencils.  I stamped the fairy on a separate piece of card and coloured her with pencils before cutting her out.  I stuck the body down, but left the wings free to give some dimension. 

The foliage along the bottom comes from a mixture of stamp sets, mainly Wild Meadow which is one of those really versatile sets that I keep coming back to time and time again.  The sentiments on both cards are from Fairyland Words clear stamp set.

If you buy the Summer Fairy collection at the moment, you will get a wonderful downloadable leaflet sent to you automatically free of charge.  It's packed with beautiful artwork by the DT, each with a great step by step write up of how the piece was made.

http://www.chocolatebaroque.com/Summer-Fairy-Inspirations-Leaflet--FREE-with-purchase-terms-apply_p_6129.html#

I hope you're enjoying the absolutely delicious artwork that our DT are producing - I know I am and there's lots more yummy artwork to come!


Wednesday, 18 June 2014

Guest Post - A Thank You Bouquet by Jan Thompson

Our guest blog spot this week belongs to Jan Thompson, who has chosen to create this lovely tag. So it's all yours Jan.


I was so thrilled Glenda asked me to Guest DT for Chocolate Baroque so I had a play and this is what I came up with. 

  • I cut the tag out on my Silhouette Portrait die cutting machine using Kraft card.
  • Using Floral Bouquet I stamped the main image with Versamark and then embossed with black embossing powder. 
  • I then coloured the flowers with Picked Raspberry, Seedless Preserves & Crushed Olive distress inks. Tip: Make sure each colour of ink is dry before adding the next one so that they don't bleed together.
  • Next, to create a background, I stamped randomly around the main image with the Teeny Weeny Meadow stamps using Crushed Olive.
  • When everything was completely dry I distressed the edges with the Picked Raspberry to emphasise the colour in the bouquet.
  • Finally I added some twine and the Thank You message.
Hope you like it.
 
We did and our thanks to you Jan for taking the time to design this tag for us. I hope you show your appreciation by leaving a comment and if you would like to see more of Jan's work then please visit her blog Jan Loves to Craft.