Pin It button on image hover

Wednesday, 21 November 2012

Through the window (posted by Claire)

Hi there, Claire here with an altered art project combining the beautiful new clear stamps 'Terrific Treescapes' with some of my favourite stamps from Christmas Creatures and Home Sweet Home.

I recently had a Graze Box delivered and as soon as I opened it I thought it would be perfect for making a window scene so these stamps were just perfect to put my idea in to practice.

I began by painting the box with white acrylic paint. I've used lots of masking and coloured the images with promarkers, adding the deep blue sky with chipped sapphire and broken china distress inks. I've added a die cut icicle border along the top of the window:
 .

Here's a photo of the front of the box, again combining Terrific Treescapes with Christmas Creatures.


I hope you like my little window scene
thanks for popping by today
Claire xx

Monday, 19 November 2012

A Winter Scene (posted by Claire)

Good morning, the new clear stamp set Terrific Treescapes are just my cup of tea, I love creating scening cards and these beautifully designed trees are perfect for this kind of project. 


I've used PanPastels to create my scene, I've used shades of grey, ultramarine blue tine and a little red tint and diarylide yellow tint for the clouds. I didn't use masking for the hills but just sketched in the hills with a sofft knife tool and then stamped the trees using Memento Tuxedo black ink, adding a litle grey for shadows.

I've simply matted the scene in red, white and then black card. 
I hope you're enjoying all the wonderful projects from my talented teamies
Thanks for visiting today
Claire xx

Sunday, 18 November 2012

Tangled Garden meets Felt by Debbie

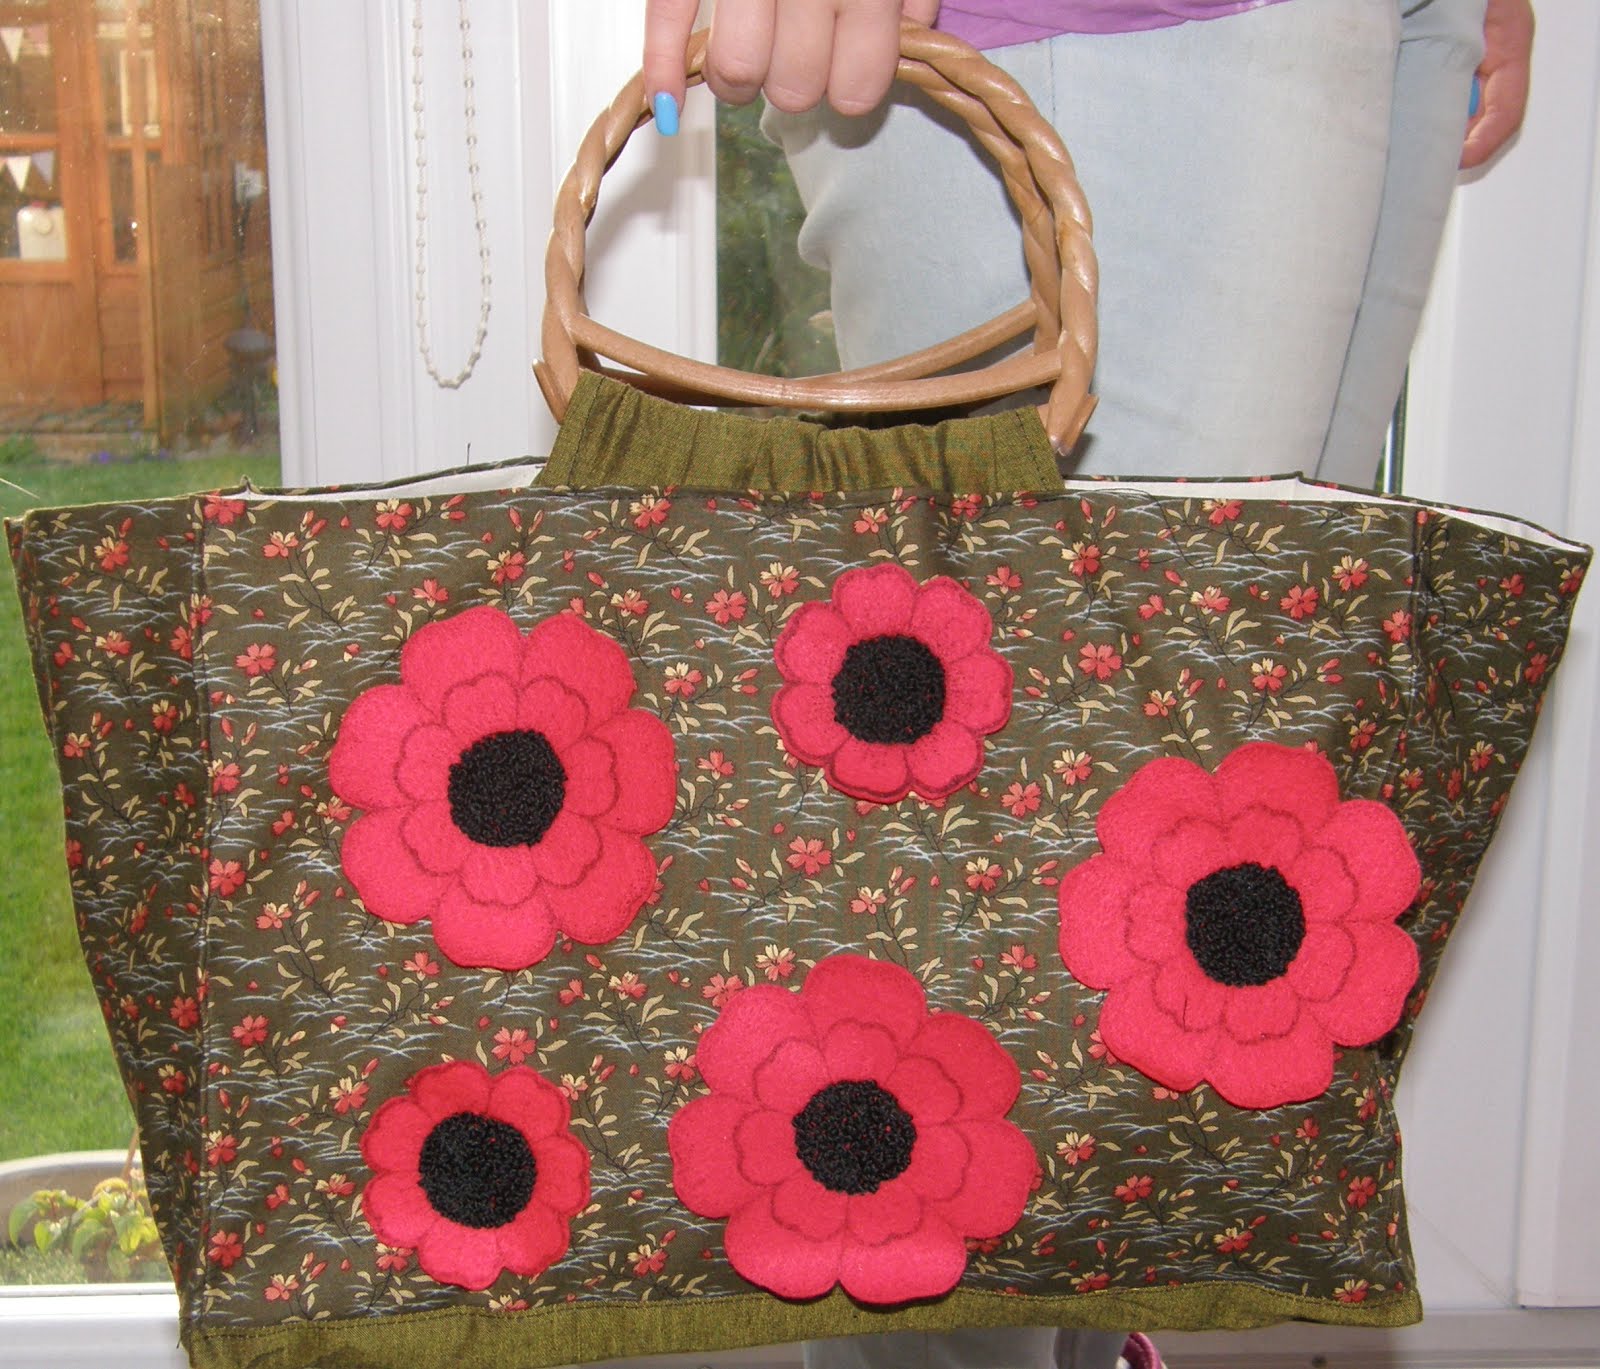
Well, my project today doesn't use card but it does involve stamps and ink. I love the versatility of stamps and immediately new that the large flower would be great stamped onto felt. It gives a great impression as there are no fiddly bits to cut out.
I used Black Stazon and stamped twice then cut them out. The centers are lots of french knots stiched with three strands of embroidery thread. A brooch back is stitched to the back so that it can be moved from the hat to my jacket. This photo gives a better view of the french knots.
We all have crafty things that we hang onto and feel they are to precious to use. I bought this fabric over two years ago and it fell into the strokable catergory. My first thought was to make a cushion but I decided the fabric was a good size for a bag.
I hope this post has inspired you to think about different ways of using your stamps. Debbie

Saturday, 17 November 2012

Snowy Christmas Trees (posted by Judith)

Hi folks, for those of you that like to make batch cards at Christmas, I have a set of samples that I'd like to show you today.

I made a set of masterboards, using a couple of snowflakes from the Damask Reindeer stamp set, which I embossed with white embossing powder over two thirds of each piece of white card. I then stamped the chosen colours of Distress Ink directly onto my craft mat and spritzed them with water, ensuring that I had at least covered an A4 area with colour. I laid my card face down onto the mat to pick the colour up, and patted it around a few times, until I had covered the card with colour, then set it aside to dry.

Once the card was dry, I took a piece of Cut 'N ' Dry foam, and one of the colours of Distress ink, and just blended over each snowflake. This really makes the snowflakes pop. I cut two ovals from the end of card that was free from embossing, and stamped one of the tree images in dark brown ink onto each oval. I left this to dry completely. I then stamped the tree again with Versamark, offsetting it slightly, and embossed it with white embossing powder. It then looks like the tree is covered with snow. The clear stamps are so useful for this, as you can line them up exactly, then just shift them a fraction, to get the snow effect.

From the remaining card section, I cut a large tag shape, and a strip of card 6 cms wide. I matted each oval onto a frilly oval shape that toned with the ink colours, and then placed them onto the cards and tags. I stamped a sentiment from the Warm Christmas Greeting set onto each card, using one of the Distress Ink colours that I had used on the background.

The ribbons that I have used are also available from the Chocolate Baroque website.
Keep checking back for more inspiration from my Design Team mates coming soon, thanks for stopping by, Judith xx


Friday, 16 November 2012

Tangled garden by Miranda.....


Hi there,
Today here some creations I've made with the new and gorgeous stamp sheet 'Tangled Garden'! I enjoyed it very much to play with these stamps, there are beautiful butterflies on it, one of my favorites!
Here is number one.... made with the Pan Pastels on linen structured paper as you can see here very well. The butterfly has been decoupaged and coloured with Derwent Soft Colour pencils. Added some gemstones on the body. The text is from the Artistic Affirmations sheet. On the background you can see fragments of the Lace Fragments sheet.


The 2nd one has become a Christmas one with the large open flower from the sheet. I've filled the flower with the texture fragments sheet and also coloured with Pan Pastels.( Phtalo green and Permanent Red shade )On the background you can see another pattern of the Texture Fragments. Also a lovely Ivy vine is used from the Christmas Foliage sheet. The Christmas sentiment is from the clear sheet 'Warm Christmas greetings'


And here are some creations made with those fantastic Pan Pastels and the new clear sheet 'Terrific Treescapes, they are great especially for this kind of work!


Till next time, have fun and enjoy creating


Thursday, 15 November 2012

Bottlecap Flowers (posted by Claire)

Good morning Claire here with a project made using the new Tangled Garden stamps. I'd had these little vases for a long time but never found any silk flowers that would look right in them. As soon as I saw the new stamps I new that I'd be able to make the perfect flowers for my little vases.


They were very quick and easy to make. I used watercolour paper as it holds its shape very well when making flowers. I coloured each sheet of paper with ink and glimmer mists until I got the colours I needed and then once they had dried I stamped the large open flower from Tangled Garden twice and the detailed flower twice on each sheet with versamark and embossed with gold embossing powder. I cut the flowers out and layered them up.

The flower centres were made with bottle caps crushed in my cuttlebug, I used the centre of the detailed flower and glossy accents in side the bottlecaps:


I found that drinking straws were the perfect height to be used as the stems for my flowers so I painted some with gesso and acrylic paint. I attached the straws while I was assembling the flowers. I layered up the 3 layers of petals with strong wet glue, once this was dry I punched 2 small holes in the centre of each and threaded some ribbon through before attaching the straw at the back of the flower with a hot glue gun. The ribbon then ties around the straw in a pretty bow so the back looks pretty too.

Thanks for visiting today
Claire xx

Wednesday, 14 November 2012

Blue Butterfly (posted by Judith)

I'd like to show you another sample using the new Tangled Garden stamp set. Although the weather is really cold and our thoughts are turning to Winter now, hopefully this card will make you feel more like Spring!

I have painted the background with a thin coat of Ecoline paint, before stamping a frame of leaves around the edge, using masking tape to allow me to overlap some of them as I went along. I drew small tangle designs in the gaps to complete the frame. These are not regular at all, and I wanted to show that you do not have to be a great artist to enjoy the spirit of Zentangle.

I have then stamped the butterfly onto a spare piece of card, and coloured it with pencils, adding some wire and a couple of pearls for antennae. I coloured the leaves with pencils, and added a lovely sentiment taken from the Patchwork Butterfly stamp set.

Thanks for stopping by, Judith xx

Tuesday, 13 November 2012

Tangled Christmas Rose (posted by Claire)

Good morning, Claire here with a Christmas card made using the new Tangled Garden stamps. 


The background was made using one of the new M-bossabilities 'Holiday Magic' and brushed pewter Distress Stain, I really love the new metallic distress stains, they give a wonderful finish.

I decided to create a Christmas rose with the detailed flower from  'The Tangled Garden' and stamped it 3 times on to vellum with versamark ink and then embossed with clear sparkle embossing powder. I also created some leaves using the same embossing powder, this stamp sheet really has a great selection of leaves too. The centre of the flower is a crushed bottle cap with a mixure of rock candy glitter, silver microbeads and silver glitter in the centre. 

To finish off  I've added some silver ribbon from my stash and some of the beautiful Scallop Rose Lace

Thanks for visiting today 
Claire xx


Monday, 12 November 2012

Wintery Treescape by Debbie

My card today is from the newly released Terrific Treescapes clear stamps which I love. They can be set out in so many combinations, giving so many different looks.
This is an easel card and it didn't take long to make. I stamped the taller trees first and the smaller filled in the spaces to give prospective for distance. I used a Sakura Pigma Micron pen to create the look of the hills that the trees are sitting on. The sky is coloured with Stormy Sky Distress Ink and dots of white to give the look of snow falling were added. I used stickles to give a frosty look. For the stopper I stamped the sentiment from Joyful Christmas and then stamped a line of trees across the bottom. The beauty of these stamps is that you can line them up easily. I hope this has inspired. Debbie

Sunday, 11 November 2012

Tangled Flutterbys

I hope you are enjoying seeing all of the newly released stamps by Chocolate Baroque, and the inspiration provided by some very talented and creative design team members!
Tangled Garden Unmounted Rubber stamp sheet - A4


This new set, called Tangled Garden, is now one of my favorites!  Although I do love fall and winter the best, I love flowers and butterflies as well!  Click on the name above, and you will be instantly transported through cyberspace to this set on the CB website!  The detail in these clear rubber stamps is exquisite, and so fine and tiny, but very, very detailed!  To color my large butterfly on the front of my card below, I actually had to use a magnifying glass!  I can't say I have a favorite, because they are all so lovely, but I think my top two would be the detailed flower and the floral butterfly.


My first thought was to make a mirrored-image of the butterfly, but I had trouble getting it lined up.  I don't know whether it's my eyesight, shaky hands, or what!  hehe  Anyway, I used white cardstock, and was given a gift of a new and improved Stampin' Up Melon Mambo classic inkpad, along with some plain and patterned cardstock in the same shade.  I think this color and black and white are striking together!  The sentiment stamp is from the Chocolate Baroque set called, Artistic Expressions, and I love the way it describes the "big" butterfly!
 
 
The little butterflies are punched with a little punch from my stash.  The border punch is one called Fancy Flight from EKSuccess.  I tried the masking technique for the inside, but I'm not really happy with the white spaces left.  I had trouble getting the stamps to print the image completely, especially when stamping over one of the masks.  I'd love to know if you have a better way of masking that you wouldn't mind sharing with me! 


The antenna on the front butterfly was just a piece of wire, coated with white paper that I found somewhere.  I cut it shorter, then wound it around a small paintbrush handle, pulled it out a little lengthwise, then glued in place.
Thank you for visiting!  

Clear Stamp update - Trees, Poppies, Butterflies, oh my!


I'm very behind here with new stamp updates, so there's a few at once here.  If you are on the Chocolate Baroque email list, you will no doubt have spotted our new clear stamp set, Terrific Treescapes which we launched last Friday.


This was almost named Very Versatile Trees because that's exactly what it is.  They will go with so many of our other stamps and the trees can also be used on their own to create beautiful scenes using brayered backgrounds, masking, PanPastels, etc. 


Click on the image below to find it on the website.


We also have some other new clear stamps - two single stamps and two coordinating mini sets.  These don't come in a wallet, but they do come on a folded polyester sheet so you can still store them neatly.

Today is Remembrance Sunday so what better day to tell you about Remembrance Poppy and Remembrance Words.


Then we have a little Tangled Butterfly - a simpler and smaller version of one of the designs on Tangled Garden.  I took this stamp with me on my recent teaching trip to Amsterdam and I included a couple of little greetings in Dutch, so for all our Dutch speaking customers, these are now available to buy.


Again, click on any of the images above to find the stamps on the website.


This card is made with paper masks which I stamped the trees on first so I could cut a hill that matched the line at the base of the trees.  I used distress inks for the sky and splattered it with water before removing the mask.  The tree is stamped in black Versafine and embossed with clear powder which allowed me to stamp the image first and position the masks in the right place.

The backing paper is ordinary photocopy paper, scrumpled and soaked with water, then painted with watered down precious metal paints.  When wet it is very fragile, but once dry, smooth it out and put under a weight to flatten, then you have lovely crinkly shimmery paper.

The die cut snowflake is made with Crealies dies laid onto a spellbinders tag die.

The DT girls have some stunning artwork to show with these trees so do check back soon.


Saturday, 10 November 2012

Autumn Colors "Waterfall" Card

"Happy Fall, Y'all," as they say here in the South!  The colors are so beautiful, and one more good rain storm and a little wind, and the trees won't have much left on them!  I love the crunch when one walks on fallen leaves!

Here's a new card that reflects the golden splendor of Autumn, using the new Terrific Treescapes clear rubber stamp set from Chocolate Baroque!  Just click on the name above, and you will be taken to the CB website page for this set.  Adding any of these trees to a hilly landscape will give you the perfect panorama view of Tennessee in the fall, and perhaps where you are, too.  Autumn is probably just as beautiful where you are, but I'm partial to my "neck of the woods", with our rolling hills, tall trees and thick forest.  There are birch, persimmon, oak, pine, juniper, Bradford pear, maple, cherry, and so many others! 


This type of card is called a "Waterfall" card.  The tab can be added any direction you want, to open the flipping layers.  It wasn't hard to make at all!  As you pull the tab out, each layer flips over.
 

The leaves were stamped using different images from the new Chocolate Baroque clear stamp set called Tangled Garden.  I used metallic gold, copper and other inks.  The gold leaf was stamped in craft ink onto a piece of gold mat board, then cut out.  The sentiment is one from my stash of vellum sayings, and this particular one is from Jim Bishop.  The background paper is from a DCWV stack of just photographs, and the solid cardstocks are from a small 3"x3" stack of textured stock from DCWV, and Stampin' Up.  I used two eyelets to keep the vertical bar in place, and an eyelet and several different types of cord/fibers for the pull.  If you have any questions, please contact us!
 
Have a wonderful Autumn!  Love that cooler air!

Thursday, 8 November 2012

Monochrome Blossom (posted by Judith)

Here's another sample using the Tangled Garden set of stamps. I wanted to create a simple monochrome feel to my project, and chose a background of Kraft card to achieve this effect. I have used the large open blossom, which I stamped three times onto a spare piece of card, and drew some tangle designs within the petals. I then coloured these and blended them, adding white highlights. I stamped some of the leaves, adding colour in the same way. I have also created a freehand addition, also on Kraft card, using a Micron pen, which I have cut out to add to my overall design.


A black mount and a textured white card were all that were needed to create the card, and a quick rummage through my stash box to find a few flat-backed pearls, which just finish off the corners.

Thanks for stopping by, Judith xx

Tuesday, 6 November 2012

A Tangled Tag by Debbie

When I recieved the Tangled Garden stamps I immediately set to and stamped the flowers and butterflies onto bits and bobs that in my stash box.
The flower on my tag is stamped onto a porous card that I've had for quite along time. It's a bit like blotting paper and soaks up the ink unfortunately I can't remember where I got it from. I coloured with Wild Honey Distress Stain and repeated so I had a few flowers to layer. The button in the centre was a find in a recycling store near to me. The tag is a pearlised card that I embossed and coloured with Brushed Corduroy Distress Ink and them ran back through the embossing machine to flatten. This allowed me to stamp onto it. The verse is from Loving Sentiments one of my favourites. The girls on the design team have lots of great inspiration so keep popping in. Debbie

Monday, 5 November 2012

Zentangle Flower (posted by Claire)

Hi there, Claire here with a card made using the new Tangled Garden stamps and my first proper attempt at zentangling too.


I stamped the flower 3 times and cut out the layers to decoupage the flower. I also stamped and cut out some leaves. The card was very simple to make I took a square of white card and drew a border around the edges and then spent a happy hour zentangling in the border. I then added dots around the border (I have to confess that I'm a very messy crafter and had got a couple of spodges on the nice white card so I added the dots to camouflage my little mistakes. I quite like the effect so perhaps it was a happy accident)

I used black card to mat my zentangle border and then added the flower and leaves with silicone glue. I also stamped the sentiment which is from the clear stamp set 'Best Relative Ever'.
To finish off I added some dotty black and white ribbon.

Thanks for visiting today. I hope you're getting lots of ideas for all this months new stamps
Claire xx

Sunday, 4 November 2012

Tangled Garden - autumn leaves (posted by Elaine)

The new Tangled Garden stamps include some great large statement flower and butterfly stamps and some gorgeous leaves. It was these leaves that I decided to play with by using masking.


I decided to use a simple colour palette for this card, stamping in black. This is a 6 x 6 inch card, so I cut the white panel before I started stamping. I stamped larger leaves on the panel and then masked them with the same leaves stamped onto Eclipse tape and carefully cut out. I stamped around the masked leaves to fill in all the gaps, moving the masks around the panel as I worked. 

I added some highlighted with a red marker, stamped a sentiment from the Pretty Poppies set and added a black ribbon and a couple of rows of black gems before matting onto a black panel to add definition to the edge.

Glenda commented that this card reminded her of piles of crispy autumn leaves, which is how this post got it's name!

There are more great cards to come from the other girls on the DT, plenty of inspiration to tempt you to these lovely new stamps.

Elaine x

Saturday, 3 November 2012

Tangled Butterfly Trail (posted by Judith)

As a fan of Zentagle, I was over the moon when I first saw this new set of stamps. They are full of possibilities for a beginner like myself, or someone with more experience to create some lovely artwork. They can also be used for some lovely projects that do not incorporate Zentangle elements at all, as you will see over the coming days.

For my first project, I chose a soft colour palette of dusky lilacs and honey tones. I made a mask by drawing a thick line onto Eclipse masking tape, using two pencils strapped around a glue pen. This is known as a 'string' in Zentangle terminology. I placed the string shape onto my background card, and also covered a thin strip at the top and bottom of my card with masking tape. I then created the background by colouring onto a craft sheet with Distress Marker pens and spritzing them with water. I placed the background card onto the craft sheet to pick up the colour, and then dried the card with a heat gun. I then patted the card onto the mat again, to pick up some of the remaining blotches of colour, and dried the card once more.

Once the card was dry, I removed the Eclipse tape, and drew the Tangle patterns inside the string, and within the narrow edge borders. I coloured the designs using watercolour pens and a blender pen. I stamped the Butterfly onto a spare piece of card, and coloured this with pens as before, and added some black wire for antennae, curling the ends. I also added a flower to my design, taken from the Bold Blooms stamp set, to complete the design.

Keep popping back to see what my Design Team mates have made with these great stamps over the coming days. Thanks for stopping by, Judith xx

Thursday, 1 November 2012

November Stamp of the Month

I've been dropping hints to our Wednesday chatters about a new stamp set called Tangled Garden and it is now out and it's our Stamp of the Month for November.  That means it is available at a super duper introductory price all month.

I am going through a simple phase at the moment, but these stamps look far from simple just because of the awesome detail that our artist, Sue, has put into them.

There are a mix of open and patterned designs in the set.  Above is one of the open butterflies.  I've stamped and cut out two and layered them up together and added a touch of stickles to the wings.  The sentiment is from Pretty Poppies.

This is one of the patterned butterflies which I have coloured with copic markers.  I then patted a Versamark pad over the whole thing and embossed with Clear Hologram Sparkle powder.


I've used the leaves from the set to create bodies for all of the butterflies shown.  This is another of the patterned ones, stamped on coloured paper and decorated with stickles.  Click on any of the images for a larger view.

The paper used throughout is from the Prima 6x6 paper pad - Firefly Collection.

So here's the stamp set itself.  It is an A4 sheet (8 x 11.5 inches) and some of those stamps are huge!  The largest butterfly will fit on a 6x4 inch block if you trim it closely.


Tangled Garden

I'll be back soon with some more - we have new clear stamps coming up!