Hello everyone, I hope you are doing well and enjoying this busy time of year.
I have two more floral designs using the new beautiful Floral clear stamps.
For the card above, I stamped the Big Bold Background - Wildflower on an orange/yellow sheet of designer paper with brown dye ink. I also stamped the Peony with the brown ink and coloured both the background and main image with my Prisma pencils. Joy is from Artistic Expressions.
And below is another design using the gorgeous Magnolia in a different colour combo.
The background was created with Seedless Preserves Distress Inks using
the Acrylic Block technique. All stamping was done with black
Versafine Ink. I coloured the Magnolia with Prisma pencils. The
corner flourishes are from the beautiful Fancy Flourishes clear set which I highlighted with a Gelly Roll pen and turquoise Pencil.
Thanks for your visit and enjoy the Season !
Shirley
Wednesday, 18 December 2013
Tuesday, 17 December 2013
Simple Flower cards (posted by Claire)
Good morning, my project today is a set of little cards made using the beautiful new clear flower stamps, these stamps are so pretty they don't need a lot of embellishments.

I've stamped the images on kraft card and coloured the images with Derwent Coloursoft Pencils and matted them on some green card. Quick and easy little cards, perfect for saying thank you for all those Christmas pressies
Thanks for visiting today
Claire xx
Monday, 16 December 2013
A Trio of Cornflowers (by Debbie)
In the middle of the rush towards the festive season, I have a card that reminds me of days walking through the fields during the Summer. It won't be long and the dark nights will start to get shorter.
The flower single Clear Stamps are delightful to colour.
When I had stamped the Cornflower three times with Memento black, I did a search of Pinterest to find pictures of the flower, the colours are amazing. I coloured with alcohol pens, the same for all three then trimmed and mounted onto a blue card. I was a little stuck for a background as I didn't want it to be to fancy working against the flowers so I set too with the pens I'd used to colour the Cornflowers. With my glass matt and a ruler I drew lines with the fine tip of the pen creating a checked background. I started by drawing the darker blue at one centimetre intervals and five millimetres and then in between with the lighter blue and green pens. When finished I trimmed the background, added a sentiment and the stamped images, the centre flower is raised on foam pads.
Many thanks for visiting, Debbie.
Sunday, 15 December 2013
Love with a Steampunk Owl (by Shirley)
Hello everyone, I hope you are enjoying the weekend.
I have a card today featuring the fun Owl from the new Steampunk Birds set. I plan to give this to my husband on his next birthday as he really likes the Steampunk designs.
The background is Turquoise Dylusions Ink which I stenciled over with TCW Gear stencil. I stamped the cog fragment from Steampunk Butterfly with Peacock and Walnut Distress Inks. Love is from Artistic Expressions. The Owl was embossed with copper powder and coloured with Tombow markers. I carefully cut him out and popped him up on the background.
Thanks for visiting and have a great day,
Shirley
I have a card today featuring the fun Owl from the new Steampunk Birds set. I plan to give this to my husband on his next birthday as he really likes the Steampunk designs.
The background is Turquoise Dylusions Ink which I stenciled over with TCW Gear stencil. I stamped the cog fragment from Steampunk Butterfly with Peacock and Walnut Distress Inks. Love is from Artistic Expressions. The Owl was embossed with copper powder and coloured with Tombow markers. I carefully cut him out and popped him up on the background.
Thanks for visiting and have a great day,
Shirley
Thursday, 12 December 2013
Delightful Flower (by Debbie)
There are so many beautiful flowers in bloom during the spring and summer seasons that treat our eyes to a festival of colours and the Fritillary amazes me with its checked petals. Nature has created the most amazing patterns.
For the flower I stamped with black Versafine, embossed with clear powder and coloured with a Graph'it pen the colour is Bougainvillea which is a beautiful deep purple colour. I lifted a little of the colour near the tips of the flowers with Copic blender pen. I purchased the Nestablities 5x7 Elegant Labels set during the Summer and used it to cut out the flower panel and background from purple. I added a rectangle of white card and fixed it to a purple card. These dies are so detailed I only need to add a sentiment to the bottom.
Thank you for stopping by, Debbie
Wednesday, 11 December 2013
Steampunk home (posted by Claire)
Good morning everyone, my sample today features the fabulous Steampunk Birds, these stamps are such fun and so versatile. I decided to create a new home card combining the new stamps with one of the quirky little cottages from Sunburst Scenes

The background was made using PanPastels, I used a die cut cog as a stencil to create the sun. I coloured the cottage with Graph'It markers. The main images were also coloured with Graph'Its and decoupaged for a little depth. The sentiment is from Home Sweet Home. I matted the scene on some brown card and layered it up on some Kraft resist paper that I'd coloured with Forest Moss distress ink.
Thanks for visiting today,
Claire xx
Tuesday, 10 December 2013
Baby duck (posted by Judith)
Hi Folks, I have a Steampunk sample of a softer variety to show you today. I wanted to create a congratulations card for a new baby using the paddle duck image from the Steampunk Birds stamp set, and so I chose soft pastel tones to create my card. I created a background using a texture stamp from the Nature Fragments stamp set, which I embossed with white embossing powder. I then covered the card using Squeezed Lemonade and Spun Sugar Distress Inks, before stamping the texture stamp again with Spun Sugar Distress Ink. I decoupaged the duck image, using three layers (the base layer is on the card), and I coloured the image with Distress Markers. I added a sentiment from the Loving Sentiments stamp set.
Some green lace and pink safety pins finish the card.Thanks for stopping by, Judith xx
Monday, 9 December 2013
Steampunkbirds by Miranda....
Hello there,
Today it's my turn to show you some of my creations with these funny Steampunk birdies! It is such fun playing with them and combine them with gears ,embossingfolders, stencils and also with the TH tissuewrap. I've used technique tiles this time, a chipboard material in all kind of shapes. I've used the circles.(2nd card) I've combined the steampunk owl with the steampunk trees from the Steampunk Christmas sheet.
I've made the first card in real Christmas colours and used the owl. The quote is also suitable for Christmas I think, because without love it all means nothing mmm? I've used Distress inks Evergreen Bough and Festive Berries. The white dots are a chunky white embossing enamel from Stampendous. The owl is coloured with twinkling H2o's and some gold ink.
Today it's my turn to show you some of my creations with these funny Steampunk birdies! It is such fun playing with them and combine them with gears ,embossingfolders, stencils and also with the TH tissuewrap. I've used technique tiles this time, a chipboard material in all kind of shapes. I've used the circles.(2nd card) I've combined the steampunk owl with the steampunk trees from the Steampunk Christmas sheet.
I've made the first card in real Christmas colours and used the owl. The quote is also suitable for Christmas I think, because without love it all means nothing mmm? I've used Distress inks Evergreen Bough and Festive Berries. The white dots are a chunky white embossing enamel from Stampendous. The owl is coloured with twinkling H2o's and some gold ink.
Now on to the 2nd card where I've used the tissue wrap and the technique tiles. The pattern you see in the technique tile is from the Abstract Fragments, such a versatile sheet to use. I love all the fragment sheets.......The tissue wrap is also great to use in every way and on every shape or material. I've blended the tissue wrap a bit with Distress inks and beneath it I've stamped the fragment of the Punky Romance sheet. You can see a glimpse of it shining through the tissue wrap. I glued the tissue wrap with Glue 'n seal and coloured the butterfly with Distress inks. I've attached all the elements and added some metal wire.
How did I make the tiles:
I've blended them with Distress inks and stamped the birds or the fragment pattern onto it. The birds were coloured with Distress markers. Than I've triple embossed with clear EP using Versamark and when the layer was still warm I've pressed the clean stamp into it. Than I've applied some perfect pearl powder in the relief which gave it a lovely shine.
Just adding a 3rd card which I've already posted on my own blog but maybe you did not seen it yet.....
if you want more details you can take a look there;
If you have any questions, don't hesitate to ask and I hope I have inspired you!
Thanks for watching and your visit and comments are always appreciated,
till next time,
Sunday, 8 December 2013
Two little dickie birds (by Debbie)
sitting in a tree (well flowers for my card). The title came from a rhyme my Mum used to say to me, one was called Peter and one called Paul. While making this card they verse constantly went around my head.
This card definitely evolved from the birds I stamped and coloured, I used alcohol pens and triple embossed with clear powder. The background needed to be colourful but dark to help the birds stand out from it. I used salty ocean, peacock feathers and picked raspberry and smooshed them randomly onto white card. The birds needed something to perch on so I reached for the flowers from the Punky Flowers and stamped and coloured them with water colour pencils. I added clear Wink of Stella glitter, I think the photograph shows how rich these pens are with sparkle. To create a border I stamped one of the flower heads with picked raspberry randomly around the edge. Finally, I used a bright pink, black and bright blue card to triple mount, highlighting the colours I used.
Thanks for visiting. Debbie.
Saturday, 7 December 2013
Bliss with Gorgeous New Florals (by Shirley)
Hello everyone, I hope you are enjoying the weekend.
I love the new gorgeous Floral clear stamps and thoroughly enjoy working with them. I used the new beautiful Snake's Head Fritillary on this card:
The background was created with Vibrant Turquoise and Cut Grass Dylusions spray inks. I added a little sea salt while the inks were still wet. I stamped branches from Spring Foliage with Mowed Lawn Distress Ink and the rest of the stamping was done with Cobalt Blue Archival ink. The foliage at the top is also from Spring Foliage and the bottom edge is from Floral Edges. I highlighted the Fritillary and branches at the top with Prisma Pencils. Bliss is from Artistic Affirmations, another word stamp set that I use frequently. I also added glitter on the top branch and on the leaves of the Fritillary.
Thanks for your visit and I hope you can come back often, as we have lots to show you:)
Shirley
I love the new gorgeous Floral clear stamps and thoroughly enjoy working with them. I used the new beautiful Snake's Head Fritillary on this card:
The background was created with Vibrant Turquoise and Cut Grass Dylusions spray inks. I added a little sea salt while the inks were still wet. I stamped branches from Spring Foliage with Mowed Lawn Distress Ink and the rest of the stamping was done with Cobalt Blue Archival ink. The foliage at the top is also from Spring Foliage and the bottom edge is from Floral Edges. I highlighted the Fritillary and branches at the top with Prisma Pencils. Bliss is from Artistic Affirmations, another word stamp set that I use frequently. I also added glitter on the top branch and on the leaves of the Fritillary.
Thanks for your visit and I hope you can come back often, as we have lots to show you:)
Shirley
Friday, 6 December 2013
Marvellous Magnolia (by Debbie)
I'm delighted that one of my favourite flowers is now available for me to play with. I have a four year old Magnolia bush in the garden that we planted five years ago and it is such a pleasure to see the buds bursting through, one of the signals spring is on its way. It releases the most beautiful perfume during the evening.
The stamp is a lovely size and I stamped it twice with black Memento ink. I coloured with light pink onto the base of the petals and green alcohol pens for the branches. I trimmed around the flowers and as they are at the edge of the card I added pink card behind. Next, I stamped the sentiment onto white and die cut with a nestablilitie. With next size nestablitie I cut out a pink backing, glued together and added to the card. I tied a white organza bow around near the folded edge.
Thanks for stopping by and have a lovely day. Debbie
Thursday, 5 December 2013
Well done to our November winner
Last month I announced that I would be doing a different kind of blog giveaway based on asking each DT member to pick their favourite comment from the month. I would then put the list into the random number generator choose one person to win a £20 gift certificate.
So the girls duly sent me their choices and the outcome was actually unanimous - they had all chosen comments by the same person!
So I'm delighted to announce that Paula (PEP) is this month's voucher winner!!
Congratulations Paula - we all really appreciate you taking the time to leave such thoughtful and detailed comments. You win £20.00 to
spend on stamps of your choice from the Chocolate Baroque stamp range
(clear or rubber). I will be in touch with the details.
Labels:
Winners
Steampunk goes French Country (posted by Judith)
Hi Folks, I have another sample using the Steampunk Birds rubber stamp set to show you today. I love this image, and wanted to give it a French Country feel, as soon as I saw it. I have coloured the image with Inktense pencils, and inked around the edge of the card with Distress Ink. I have used dark green card to mat my layers, and added some gingham ribbon and a couple of cogs, in keeping with the steampunk theme. The sentiment is from the Loving Sentiments stamp set.
Thanks for stopping by, Judith xx
Wednesday, 4 December 2013
Owl you need is Love (by Debbie)
Hello.
I decided to make a bright and colourful background for this little owl to sit against. So out came the inks, stamps and stencils.
For the owl I used glossy card and distress inks and stamped with Archival black as I used Versafine wasn't drying on the card. He is a little cutie and not so tricky to cut out.
For the background I started colouring a white piece of card with squeezed lemonade, peeled paint and peacock feathers. With stormy sky I stencilled through a circle mask and then stamped with the wavy lines stamp from Abstract Fragments. I had my melt pot handy and poured UTEE onto the stamp and cut out a wavy edge heart. When it cooled I rubbed with gold wax to highlight the detail. Finally I stamped the sentiment and added to the top corner. The Design Team have lots of beautiful samples to show so please pop back.
Thanks for visiting. Debbie
Tuesday, 3 December 2013
Christmas Farewell (by Clare)
Hello! It's almost that time of year again! Christmas! I cannot believe how fast time is flying by, although having to sit without being able to do much makes time seem to drag by. I am so sad to say that after having a fourth surgery on my left shoulder, one on my right elbow and right shoulder upcoming, I am stepping down from the design team for a while. I haven't been able to keep up with all my talented and creative team mates! I hope you enjoy these few last cards of mine. I wish each and every one of you Merry Christmas, a blessed holiday, and a prosperous and healthy New Year! I will miss you all!
This first card was made with two stamps. The background is from the Winter Edges set, and the main image is from the Reindeer Landscape set. I used a wood-look embossing folder on the blue base, and placed two rows of glue and blue chunky glitter across the bottom. The background was stamped in dark blue on white cardstock, then cut in half to fit across the 6" width behind the main image. The deer landscape was stamped on white and heat embossed in teal blue. I used a sponge dauber and blue inks in three different shades on the top and bottom. There is light blue sparkle sheer ribbon 1" wide tied around the top, with a small piece of teal 1/8" wide satin ribbon tied around the center and a plastic snowflake button glued over that. I adhered the main panel over all with dimensional squares.
The card just below was made using the ornament edges from the Christmas Edges stamp set, and a bauble stamp from the Pears and Baubles set. The white card base background was stamped in dark green with the bauble edge stamp after cutting the card out with a large die. I cut a smaller green panel with a smaller die, then positioned a scalloped-edged die in the middle of the green card cutting it twice to create the desired effect. A white oval was die cut and lifted off the green panel with dimensional dots. The beautiful bauble was stamped and heat embossed in white on dark green cardstock, then touched up with a silver marker. I hand cut this out then positioned it on the white oval with dimensionals. A piece of 1/8" wide silver ribbon was tied around and rhinestones placed to enhance. (the green is a dark forest green, not teal as this looks) The final touch was a thin line of silver marker around the periphery.
I'm really fond of this next card, because I love Poinsettias, and Chocolate Baroque has really done a great job with these Zentangled ones. The stark red and black on white is really striking! I've used two stamp sets on this card - Christmas Edges, and Joyful Christmas. The card base is white, with dry embossed dots across the top half of the front. The Christmas Edges poinsettia stamp was used in black across the bottom, and I applied some tiny little shiny red stickers for the centers. Red was daubed all around the outside edges of the card. Red 3/8" grosgrain ribbon was glued across the center of the card, with red cording glued over that. I stamped the larger flowers from the Joyful Christmas set two times, then cut them out and layered them for dimension. Yellow rhinestones were glued to the centers. I framed the sentiment with red cardstock after stamping in black, then glued on. A very easy card to make!
This next card is another favorite of mine, and I love the icy feel of it. I used an "all-over" punch to make the snowflakes in the white panel which was glued over the white card base, shaded with stamp paints in blue and lavender. I stamped the three different snowflakes and embossed in silver, tinting the center or the edges with light blue ink and a dauber. I cut them out by hand. The snowflakes and trees are from the Reindeer Landscape set. The trees were stamped on white with silver embossing, then shaded in with markers. I stamped the sentiment "Winter Wonderland" from the set Bold Christmas Words on blue cardstock then embossed it in white. I cut it out with a large banner die, and shaded the edges in blue stamp paint. Before gluing everything down, except for the snowflakes which I adhered with dimensional dots, I tied a piece of 1" wide sheer blue ribbon around the bottom, and tied a bow, gluing a small blue snowflake brad in the center.
This first card was made with two stamps. The background is from the Winter Edges set, and the main image is from the Reindeer Landscape set. I used a wood-look embossing folder on the blue base, and placed two rows of glue and blue chunky glitter across the bottom. The background was stamped in dark blue on white cardstock, then cut in half to fit across the 6" width behind the main image. The deer landscape was stamped on white and heat embossed in teal blue. I used a sponge dauber and blue inks in three different shades on the top and bottom. There is light blue sparkle sheer ribbon 1" wide tied around the top, with a small piece of teal 1/8" wide satin ribbon tied around the center and a plastic snowflake button glued over that. I adhered the main panel over all with dimensional squares.
The card just below was made using the ornament edges from the Christmas Edges stamp set, and a bauble stamp from the Pears and Baubles set. The white card base background was stamped in dark green with the bauble edge stamp after cutting the card out with a large die. I cut a smaller green panel with a smaller die, then positioned a scalloped-edged die in the middle of the green card cutting it twice to create the desired effect. A white oval was die cut and lifted off the green panel with dimensional dots. The beautiful bauble was stamped and heat embossed in white on dark green cardstock, then touched up with a silver marker. I hand cut this out then positioned it on the white oval with dimensionals. A piece of 1/8" wide silver ribbon was tied around and rhinestones placed to enhance. (the green is a dark forest green, not teal as this looks) The final touch was a thin line of silver marker around the periphery.
The next card is a favorite of mine! I love the color purple (for royalty) and this turned out so pretty combined with the plum and silver. My camera shot didn't do it justice! I made a card base from white cardstock, and covered the front completely with purple/lavender paper. I heat embossed both the deer image and the trees, using purple and silver, respectively. Purple and plum ink was daubed onto the top and bottom of the image, as well as on the horizon. The trees were hand-cut, and positioned with dimensional dots, giving the view some depth. Some iridescent silver ribbon 1/8" wide was glued around the outside edge of the image, and was very easy to do. A super CAS card! The stamp set I used is Reindeer Landscape.
I'm really fond of this next card, because I love Poinsettias, and Chocolate Baroque has really done a great job with these Zentangled ones. The stark red and black on white is really striking! I've used two stamp sets on this card - Christmas Edges, and Joyful Christmas. The card base is white, with dry embossed dots across the top half of the front. The Christmas Edges poinsettia stamp was used in black across the bottom, and I applied some tiny little shiny red stickers for the centers. Red was daubed all around the outside edges of the card. Red 3/8" grosgrain ribbon was glued across the center of the card, with red cording glued over that. I stamped the larger flowers from the Joyful Christmas set two times, then cut them out and layered them for dimension. Yellow rhinestones were glued to the centers. I framed the sentiment with red cardstock after stamping in black, then glued on. A very easy card to make!
This next card is an easel. It's 4 1/2" wide by 11" total length, scored at the 2" and 4 1/2" marks. It's folded in half, then the bottom 2" flap is folded up. I cut a piece of coordinating card stock (red) to 4 1/2" wide and 4" top to bottom, then scored in half widthwise. Unfolded, I die cut the top edge (inside) with a scalloped edge, the inside the bottom, used another scalloped edge die to make the design through which the white card base is seen. I stamped the sentiment in black. With this flap folded down, I glued a little plastic snowflake button in the center for the top front to catch on forming the "easel". For the top front, I cut a piece of patterned coordinating paper to fit, leaving only 1 3/4" of the white card base showing at the bottom. Using a scalloped die, I cut the same as on the front in the bottom white edge. On the bottom right of the patterned paper, I stamped in black the tree grouping from the Winter Edges set. I placed some red shiny sticker circles on the garlands on the trees. At the top of the card in the score line, on the left about 1 " in from the left edge, I used a craft knife to cut a 1/8" cut to thread the yarn through with a needle. Before tying into a bow, I threaded a plastic tree onto the yarn to finalize the card.
This next card is another favorite of mine, and I love the icy feel of it. I used an "all-over" punch to make the snowflakes in the white panel which was glued over the white card base, shaded with stamp paints in blue and lavender. I stamped the three different snowflakes and embossed in silver, tinting the center or the edges with light blue ink and a dauber. I cut them out by hand. The snowflakes and trees are from the Reindeer Landscape set. The trees were stamped on white with silver embossing, then shaded in with markers. I stamped the sentiment "Winter Wonderland" from the set Bold Christmas Words on blue cardstock then embossed it in white. I cut it out with a large banner die, and shaded the edges in blue stamp paint. Before gluing everything down, except for the snowflakes which I adhered with dimensional dots, I tied a piece of 1" wide sheer blue ribbon around the bottom, and tied a bow, gluing a small blue snowflake brad in the center.
This last card is a wonderful image of a winter fairy. She originally had a fall of roses in her hands, but since I was making her for Christmas, I changed it up with holly boughs. She was so much fun to color! Love those wings! She comes from the new set, February Fairies. For the top and bottom borders, I used the holly edge stamp from the newly released Christmas Edges.
Again, I'd like to wish you all a very Merry Christmas, a Happy and Healthy New Year, and I've really enjoyed working with all the wonderful design team ladies! Please continue to check back for their amazing work! Here's to better health, healing and getting back into the swing of everything Chocolate! Yum, yum!
I'd like to thank Glenda and Adrian for being so generous, and their patience during my learning how to manage a blog entry, working with editing of photos, and computer glitches. Lesley, I wish you continued healing, and pray that you will be back to "normal" very quickly! Sue, thank you for drawing up some gorgeous "must-have" stamps! You're amazing!
Merry Christmas, with love!
Clare
Peony Fairy (posted by Claire)
Good morning, Claire here with my first sample using this months stunning new stamps. I've used the beautiful Peony Clear stamp for this card, peonies are one of my favourite flowers and I couldn't resist sitting this lovely little fairy from the September Fairies set on one of the flowers

I created the background with Picked Raspberry and a little Shabby Shutters distress inks, I popped some on my ink blending mat, misted with water and swooshed the card through it, once dry I stamped the peony here and there with more Picked Raspberry ink.
To create the focal image I stamped the fairy with black ink, (I only inked up the fairy, not the toadstools) and then masked her to stamp the flowers. I coloured the flowers with Graph'It markers and then used some Fantasy Film from my stash to stamp the wing and attached it with a little silicone glue. I used a shaving brush to dust ink around the image and matted it on white and then black card. To finish off I added some black lace, ribbon and a little button from my stash.
Thanks for visiting today
Claire xx
Labels:
Peony,
September Fairies
Monday, 2 December 2013
Grey Parrot with splattered background (by Debbie)
I'm sure we are all guilty of waiting by the door for the postman to deliver goodies through the letter box. When Glenda showed us the first drafts of the Steampunk birds I fell in love with them.
My bird today is from the idea of an African Grey parrot and I wanted to add colour. I set too by stamping the bird with memento black and coloured with grey alcohol pens. Then made a mask to cover him and placed it carefully over. I put a plastic glove on and sprayed a selection of inks into my hand and spattered the inks onto the card. When the inks had dried I lifted the mask and used Broken China Distress Ink around the edge. I mounted onto black and a magenta colour card that was closest to one of the spray ink colours. The sentiment is A clear stamp that can be bought as a single or as part of a multi buy Fairyland Words.
Thanks for visiting. Debbie
Sunday, 1 December 2013
Steampunk Tropical Garden (by Shirley)
Hello everyone, I hope you are having a great weekend.
As soon as I saw the 'punky' Parrot from Steampunk Birds I wanted to create a tropical garden for him to hang out in:) It's been colder than normal here in Ontario, Canada so it would be great to feel warm tropical sunshine.
I started by stamping cog plants from Punky Flowers on the background with white Colorbox Pigment ink. I blended a few colours of green pigment ink over top and then rubbed off ink over the images (ghost stamping), but they are hidden into the 'garden'. Next I stenciled with Distress Inks and TCW Gears (at the top) and TCW Ferns in the centre.
I embossed the Parrot from Steampunk Birds and the flowers from Punky Flowers with copper on watercolour paper, coloured with Tombow markers and cut them out to attach. I added die cut leaves and a small metal cog. Imagine is from Artistic Expressions.
I hope you can come back often as we have lots to show you this month.
Thanks for visiting and have a great day,
Shirley
As soon as I saw the 'punky' Parrot from Steampunk Birds I wanted to create a tropical garden for him to hang out in:) It's been colder than normal here in Ontario, Canada so it would be great to feel warm tropical sunshine.
I started by stamping cog plants from Punky Flowers on the background with white Colorbox Pigment ink. I blended a few colours of green pigment ink over top and then rubbed off ink over the images (ghost stamping), but they are hidden into the 'garden'. Next I stenciled with Distress Inks and TCW Gears (at the top) and TCW Ferns in the centre.
I embossed the Parrot from Steampunk Birds and the flowers from Punky Flowers with copper on watercolour paper, coloured with Tombow markers and cut them out to attach. I added die cut leaves and a small metal cog. Imagine is from Artistic Expressions.
I hope you can come back often as we have lots to show you this month.
Thanks for visiting and have a great day,
Shirley
Saturday, 30 November 2013
Green feathered Fairy by Miranda
Hi there,
Today one of the December fairies I've played with........I've stamped her on a piece of watercolour paper which was worked on with Dylusion inks. I did use a crafters template(peacock feathers) on the background. The fairy was stamped on the same paper and coloured with Derwent Soft Colour pencils. In the background you can see a fragment of the Nature Fragments sheet. These fragments are such fun to work with and so versatile to use.
Only added some gemstones for a subtle sparkle..........and the quote is from the 'Reindeer landscape', one I am going to use a lot! Believe.......
Thanks for visiting and have a sparkling day!
Miranda
Labels:
Nature Fragments,
Winter Fairies
Friday, 29 November 2013
It's a Hoot (posted by Judith)
Hi Folks, I have a sample to show you today featuring the new Steampunk Birds unmounted stamp set. I have used a small frame which I have painted with blue and brown paint, and then covered it with Tim Holtz tissue wrap. I added a coat of matte medium to protect the tissue wrap and left this to dry. I added more paint over the areas that I wanted to highlight, like the buildings and the butterflies.
I stamped and embossed the owl using copper embossing powder, and also stamped some flowers from the Punky Flowers stamp set. I coloured these using Distress Markers. I die cut a branch from brown card, and assembled my project, adding some brass cogs, and a spinner. Finally, I added a sentiment from the new stamp set.
Thanks for stopping by, Judith xx
I stamped and embossed the owl using copper embossing powder, and also stamped some flowers from the Punky Flowers stamp set. I coloured these using Distress Markers. I die cut a branch from brown card, and assembled my project, adding some brass cogs, and a spinner. Finally, I added a sentiment from the new stamp set.
Thanks for stopping by, Judith xx
Thursday, 28 November 2013
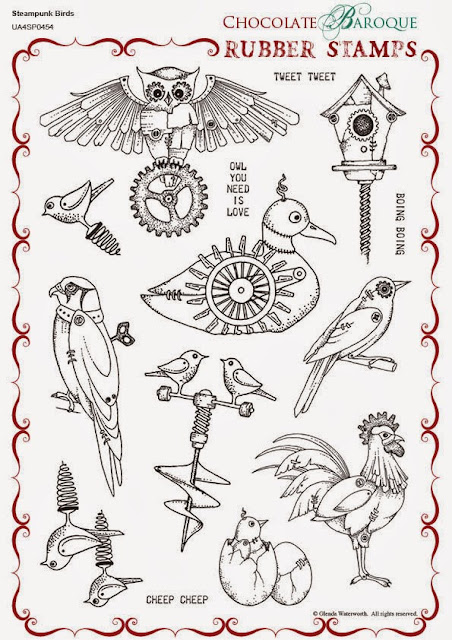
Steampunk just got wings - announcing STEAMPUNK BIRDS!
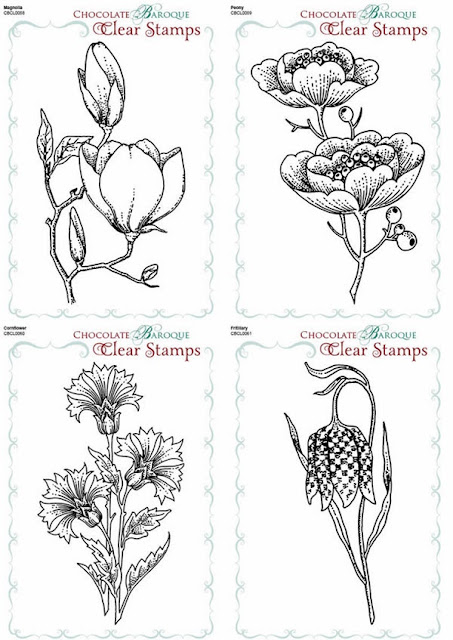
We have something for the steampunk fans this month, but if that's not your thing, don't worry, we also have some beautiful individual floral stamps too.
Say hello to Steampunk Birds!
I think of these as quirky rather than full on steampunk and they really could be very useful for masculine cards (Adrian loves the paddle steamer duck). But for a complete contrast, here's our other new release this month - four delicate and very beautiful floral stamps in our clear range.
Available as single stamps or as a money saving multi-buy, these clear stamps can be positioned accurately exactly where you need them.
So there you have our December releases - I hope you are enjoying the girls artwork and don't forget we'll be giving away a Chocolate Baroque gift voucher from comments chosen by the DT this month.
PS - we have lots of offers that will expire at the end of November - don't miss out on introductory prices and our special £10.00 off promotion - click here for details.
Say hello to Steampunk Birds!
I made this jumbo tag using a distress stain background (covered in Monday Mojo issue 16) and lots of layered stamping. The birds are coloured with a mixture of Derwent ColourSoft pencils and Derwent Graphitint pencils. The Graphitint are a mixture of graphite and colour and I thought they would give me that worn, rusty look that I was after. When I first saw the stamps, I had this vision of mechanical metal birds roaming wild in a steamy rainforest, their bright colours dulling down as they acquired a patina of rust.
Here's a couple of close ups showing the colouring and layered stamping. I've mixed in stamps from Punky Flowers and Texture Fragments.
I think of these as quirky rather than full on steampunk and they really could be very useful for masculine cards (Adrian loves the paddle steamer duck). But for a complete contrast, here's our other new release this month - four delicate and very beautiful floral stamps in our clear range.
![]() |
| More details on this card coming up on my own blog soon. |
PS - we have lots of offers that will expire at the end of November - don't miss out on introductory prices and our special £10.00 off promotion - click here for details.
Wednesday, 27 November 2013
Winter Fairy and Snow (by Shirley)
Hello everyone
I have a design today featuring a fairy from the new Winter Fairy Collection and it's starting to snow on her. I guess fairies don't need warm clothing :)
The beautiful fairy is from January Fairy and the tree is from February Fairy. I also used the snowflake edge from Winter Edges. I love how Chocolate Baroque's beautiful stamp sets work so well together. The designer is very talented.
I used blue design paper from my stash that actually has a wood grain pattern, but I liked the colour for the sky. I did all the stamping with Rich Cocoa Memento Dye Ink and colouring with Prisma Pencils. I masked the fairy before stamping the trees and 'ground'. I stamped the bottom part of the snowflake edge on the ground and coloured it in. I used puff paint for the snow.
Thanks for visiting and have a great day
Shirley
I have a design today featuring a fairy from the new Winter Fairy Collection and it's starting to snow on her. I guess fairies don't need warm clothing :)
The beautiful fairy is from January Fairy and the tree is from February Fairy. I also used the snowflake edge from Winter Edges. I love how Chocolate Baroque's beautiful stamp sets work so well together. The designer is very talented.
I used blue design paper from my stash that actually has a wood grain pattern, but I liked the colour for the sky. I did all the stamping with Rich Cocoa Memento Dye Ink and colouring with Prisma Pencils. I masked the fairy before stamping the trees and 'ground'. I stamped the bottom part of the snowflake edge on the ground and coloured it in. I used puff paint for the snow.
Thanks for visiting and have a great day
Shirley
Tuesday, 26 November 2013
Fairy Dust (posted by Claire)
Good morning, Claire here with another sample created using the beautiful Winter Fairy Collection. As soon as I saw these stamps I pictured the fairies flying around in a circle scattering fairy dust as they went.

I began by blending distress inks on some white card (I used Peeled Paint, Tumbled Glass, Broken Chine, Shaded Lilac) and then stamped the swirls from the January stamp set around the edges. Once the background was dry I stamped the fairies (also from the January set) and the fairy dust (from February) with versamark and then embossed with a sparkly white embossing powder.
The sentiment is from Damask Reindeer, again embossed with the same embossing powder and die cut with Spellbinders, dusting a little more embossing powder around the edges. To finish off I added a bow and some little pearls in the corners.
Thanks for visiting today
Claire xx
Labels:
Winter Fairies
Subscribe to:
Posts (Atom)