Pin It button on image hover

Tuesday, 19 May 2015

Tussie Mussie (posted by Claire)

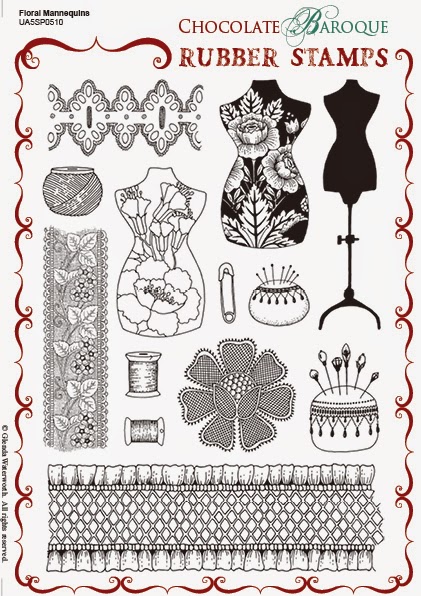
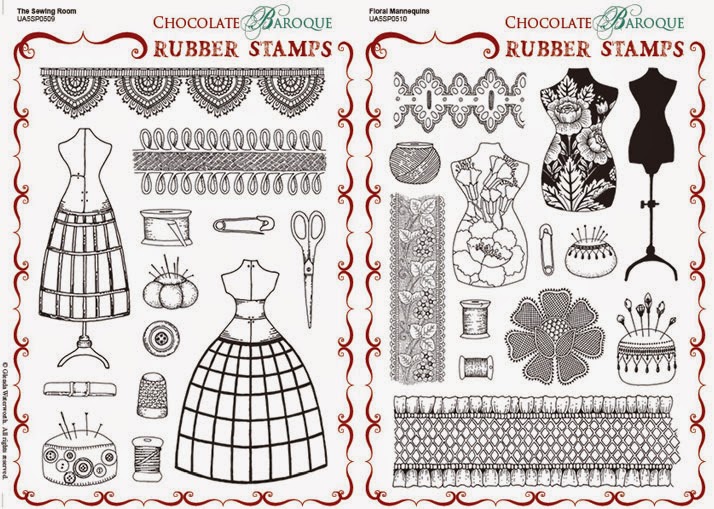
Good morning, Claire here with a project made using some of this month's new stamps. I've used stamps from Floral Mannequin and The Sewing Room to create a Tussie Mussie.


I've made a tussie mussie by stamping lots of the smaller stamps on cream card. I cut a circle from the cream card and then cut a wedge from the circle (about a third) and used this to create cone shape. I added lots of lace, some ribbon and a pretty tassel. I've filled the tussie mussie with stuffing for soft toys and coved it with some tulle (no sewing involved lol, I just used a little glue).

I stamped the dress form, flower and lacey border on cream card using tea dye and victorian  velvet distress ink before cutting them out and popping them in my tussie mussie.

Thanks for visiting today
Claire xx

Monday, 18 May 2015

Floral Mannequins and The Sewing Room by Florence

Morning everyone

I hope you have had a great weekend.


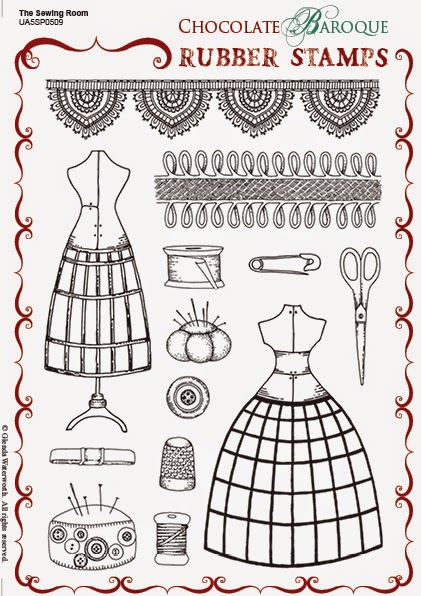
Today I would like to share with you a card made using the fabulous Floral Mannequins and The Sewing Room rubber stamp sets.  Please click on the links to see full details of the stamps.


To make this card

Dab some Distress Ink onto a piece of plastic or an acrylic block and spritz with water.
Take a piece of A6 size white card and "swish" it around in the diluted ink and leave to dry.
Stamp all of the images onto the background piece and leave to dry.
Stamp the ruffled ribbon onto a piece of white card, color and cut out.
Stamp the floral lace two times onto white card, color and cut out.
Stamp the sentiment onto a piece of white card, trim to size and color with Distress Ink.
Stamp the two mannequins onto white card stock, color and cut them out.
Make up the card as seen using foam pads behind the stamped embellishments to give a 3D effect.
The joining of the two pieces of floral lace is hidden behind the mannequin.


Thank you for looking
Happy Stamping

Florence x


Sunday, 17 May 2015

Lace and Waste Cards (by Debbie)

Good morning. Two cards from me today.
 
The first is a clean and simple using the newest release stamps and a lovely verse from
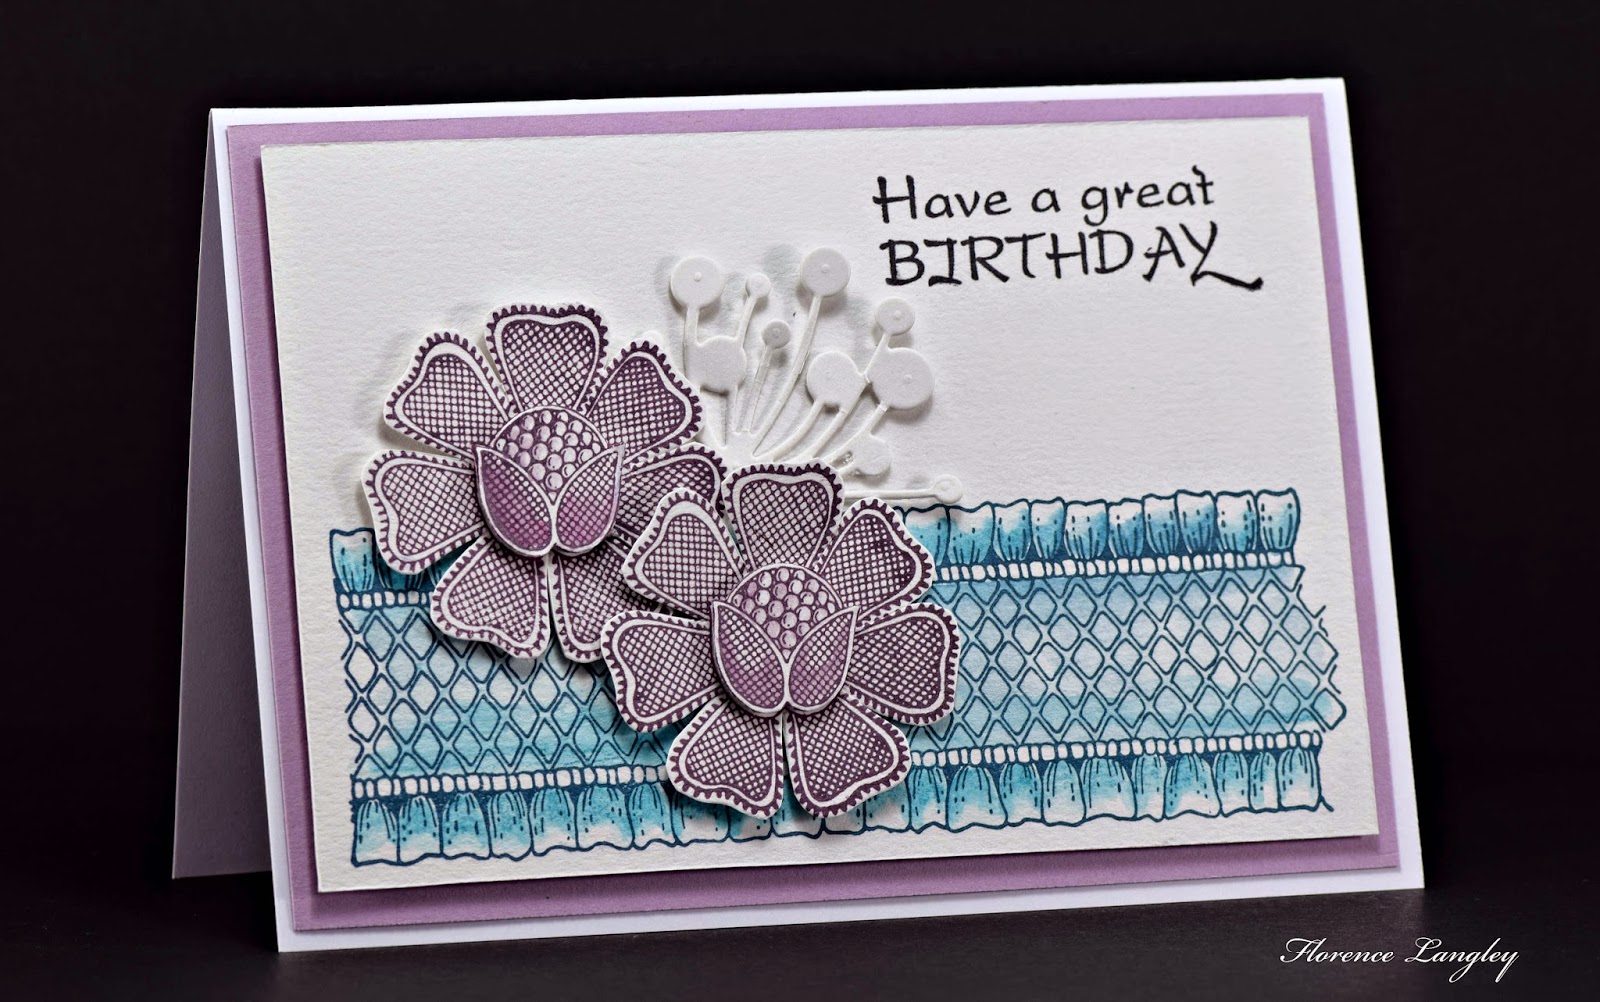
 Loving Sentiments. The ribbon/lace was stamped onto the cream card and the flower on another piece and cut out. I cut close to the centre which allowed me to curl the petals for dimension. I matted onto a similar blue card to the ink and fixed to the A5 base card.


The second card was made during an inky play session. I cut a piece of A4 white card into two and out came the Brusho Colours. For one piece of the card I sprinkled the Brusho lightly and spritzed with water. When dry, I distressed through sequin waste with black soot DI ink and cut to DL size. The other piece of card had a lot more Brusho on and I stamped the Sewing Room mannequin with black ink and cut out.
I stamped the mannequin from the Floral Mannequins set onto the card and placed the cut out on top.


Thanks for visiting
Debbie

Saturday, 16 May 2015

Bodice And Bouquets (by Julie)

Good morning, I hope you have been enjoying this months sewing theme. Today I have two cards created from the two new sets that Chocolate Baroque have to offer which are The Floral Mannequins and The Sewing Room. I have used elements of both sets on both of my cards.


 I tried to keep this floral card as clean and simple as possible which I generally find quite hard to do. The floral ribbon has been stamped with Sepia Versafine and coloured with pencils. The three lace flowers have been decoupaged and stamped with blue Versafine onto light-blue card and the leaves were die cut from green card which I had previously stamped with the ruffled ribbon from the Floral Mannequins and one of the vintage mannequins from the Sewing room. I think the sentiment is very fitting for the card and comes from the Mackintosh Clear Sentiments set.


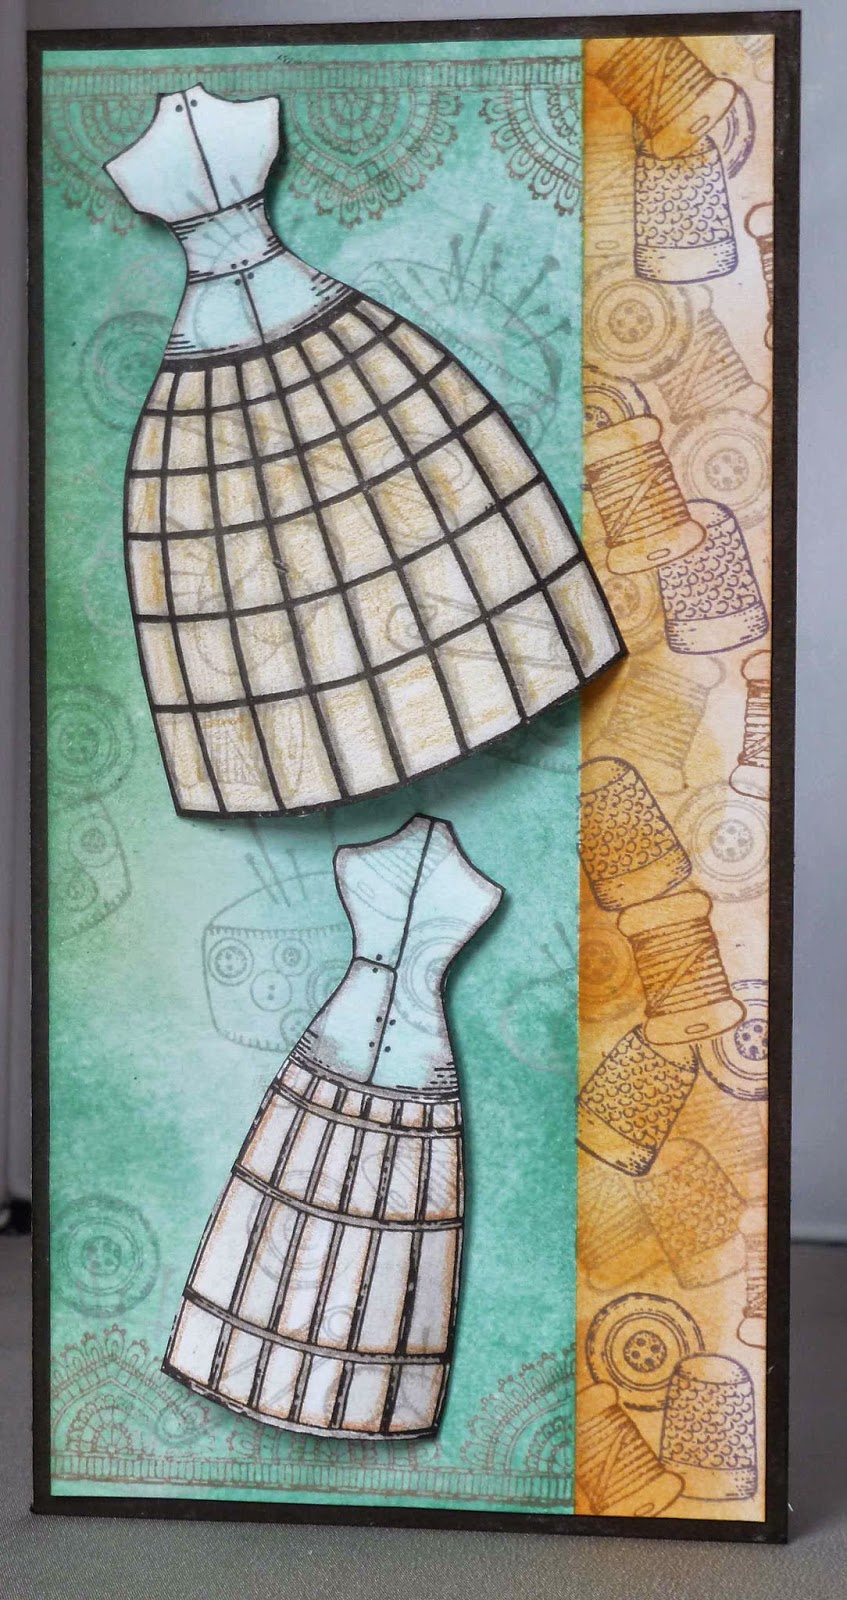
My second is a DL card and is created using basic masking techniques and again I have taken stamps from both sets. I started by stamping the button, thimble and cotton reel onto multiple layers of sticky notes so that when I cut them out I had more than one of each mask. I then applied a length of masking tape from top to bottom and approx. 3 cm in from the edge of the card before stamping the button, thimble and cotton reel, remembering to cover with  masks as I went along. After stamping I coloured the panel with Marigold and Mustard Seed Distress ink, then moved the masking tape so that it covered the coloured panel. You can then start stamping the Peacock Feather Distress ink panel. This panel is very much easier and doesn't require any masking. I stamped a selection of the haberdashery items along with the lacy ribbon using grey Versafine before sponging on the Peacock Feather Distress Ink.
On a separate piece of card I stamped some of the haberdashery items using the grey Versafine before over stamping the vintage mannequins with black Versafine. I then coloured them with pencils before cutting out and adding them to the card with silicone glue.
The finished panel was mounted onto the base card that I had edged with Black Soot Distress Ink.

Thank you for stopping by and we hope to see you tomorrow with some more Design Team inspiration.

Friday, 15 May 2015

Vintage Dressmaker (by Asha)

Hello again, friends. I'm back with 2 vintage inspired card projects featuring stamps from The Sewing Room, Floral Mannequins and Dressmaking Collage. The patterned papers used on both my cards are from an old magazine - a great way to recycle!

My first card features a dress form from The Sewing Room sheet which I heat embossed in black and fussy cut. I coloured the body with Polychromos. Same treatment for the pin cushion from the Floral Mannequins sheet.  There's also some second generation stamping of safety pins at the bottom ... if you look hard! :) The sentiment is form the Birthday Words A5 sheet. To finish, I added Liquid Pearls and cream cotton lace.


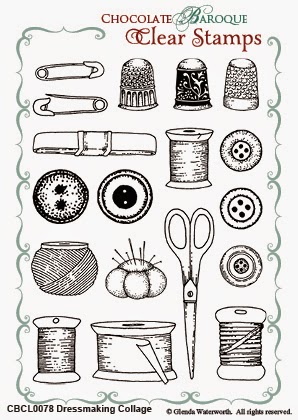
My second card is also a vintage affair. This time I did some stamping directly onto the design paper and distressed the edges. The lace is from The Sewing Room sheet and for the background stamping I used the Dressmaking Collage clear sheet. The dress form is from the Floral Mannequins sheet, heat embossed in black, fussy cut and adhered to the card. And to finish I stuck on a few buttons.


That's all from me today. I trust you'll be busy with these fabulous stamps this weekend!  I'll be posting  more photos and details of products used for these projects on my blog tomorrow.  The Design Team has lots of amazing ideas coming up to inspire you, so make sure you swing by often. :)

Beijinhos,
Asha

Thursday, 14 May 2015

Design Team Call

Today I have hijacked the Blog to announce that Chocolate Baroque is currently looking for new people to add to our Design Team!  If you love Chocolate Baroque stamps and have a desire to share your creativity then we would absolutely love to hear from you. 

There are some basic guidelines to help answer any questions you may have and you can find these on a separate page - click here to read the information and get details of how to apply.

Please feel free to pass on this DT call to your friends or any bloggers out there who you think would be interested, we'd love to hear from you.

If you are attracted by the idea, but are worried about the commitment or the timing, why not apply anyway because we can always talk about those things.  Maybe you'd like to just do the odd guest post rather than have the commitment of regular monthly submissions - that's a possibility, but the application process is still the same.

If you have any questions which have not been addressed on the information page, please email me at sales@chocolatebaroque.com and include a daytime telephone number in case we need to have a chat.

And if you are tempted, but maybe not very confident then please be brave and have a go.  All communication is completely private and confidential and who knows, it could be the start of a whole new creative adventure!  

So what are you waiting for, I know we can't wait to hear from you.

Wednesday, 13 May 2015

All Wrapped Up (by Lesley)

For today's card I wanted to show you how to create embellishments using stamps from The Sewing Room and Floral Mannequins. There is a full step by step for this, so please pull up a chair and take a break for a few minutes.

  • Stamp the ruffled ribbon from Floral Mannequins three times on to some 160gsm smooth white cardstock using Vintage Photo distress ink.
  • Use a water brush to 'pull' the colour from the ink over each image. Leave to dry thoroughly.
  • Stamp the ribbon again with the same ink, turn the cardstock over and stamp on the reverse in the same position. You want to achieve a 'double sided' ribbon for the faux bow. Easiest way it to measure up from the bottom of the cardstock on both sides, mark a line and then position the stamp on this line.  Repeat the water brush technique and set aside to dry.
  • Stamp the button from The Sewing Room three times using Vintage Photo and then water brush as detailed above.
  • Add shade to the ruffled edge on the ribbons and around the buttons with a watercolour pencil and water brush this shading.
  • When everything is dry cut out and then use a darker colouring pencil along the edges of the ruffles and round the buttons.
  • To make the faux bow use the double sided ribbon you have stamped and bring both edges into the middle to form a bow shape. Glue together with wet adhesive. When dry cut a curved 'V' shape across the top and bottom edge to create a bow shape. Use a pencil, or similar, in the ends of the bow to help form the 'ears'.
  • Glue two of the ribbon pieces together with wet adhesive. When dry attach the full strip horizontally on a folded 5" white square card, placing the join slight left of centre, with wet adhesive. Trim off the excess.
  • To create the vertical ribbon cut the remaining ribbon in two so that when attached it looks like a full strip. Fix with wet adhesive, slipping the edges under the ruffled edge of the horizontal one and trim off any excess.
  • Attach the faux bow over the join and the three buttons as shown.
  • Finally add a wooden button, paper flower or similar in the centre of the bow and stamp the sentiment from the Amazing Birthday clear stamp set using a Versafine inkpad in Vintage Sepia.

I really enjoyed using these stamps to turn paper images into realistic looking embellishments. Hope that you will give this one a try and thank you for visiting. Don't forget there is still more fabulous artwork to come from the Design Team girls.


Tuesday, 12 May 2015

Vintage Floral Mannequin (by Miranda)


Hi there,

Today it's my turn to show you what I've created with the new beautiful stamp sheets from Chocolate Baroque.
I have been working with Floral Mannequin and the Sewing room. There is also another one in this serie called Dressmaking collage. Difficult to  choose, isn't it? 

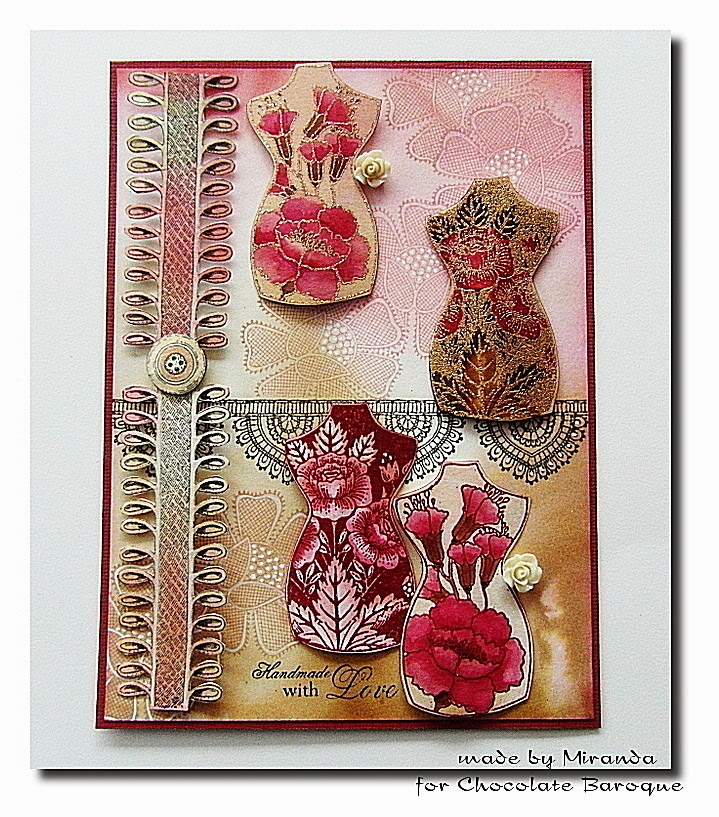
The background is done with Distress inks, Victorian Velvet,Walnut stain and Vintage photo.  The borders are stamped with Memento Espresso Truffle and the one with the loops have been decoupaged. I have stamped the lace flower in the background several times and masked it.
I have embossed the torso's with Wow primary Burgundy and Wow Fool's gold. Also coloured them with water based markers in matching colors.
I've added some lovely rose embellishments from ScrapBerry's.


Hope I have inspired you with my card!
Thanks for your visit and hope to see you next time,

Have a nice day,


Monday, 11 May 2015

Window on the world (posted by Claire)

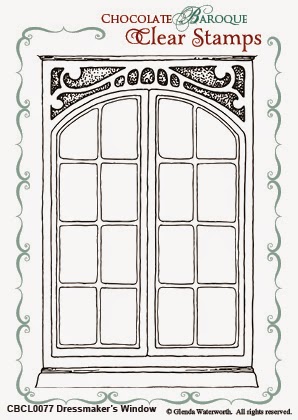
Good morning folks, Claire here with my first sample made with this months new releases. As always there are some stunning new stamps, two A5 stamp sheets with a sewing theme and some gorgeous clear stamps too. I've used this lovely (and very useful) Dressmakers window stamp for this card (you can find it here)


I began by creating a background using a Crafters Workshop Brick Stencil and texture paste. Once that was dry I applied colour with PanPastels (Neutral grey tint, Burnt Sienna and a little Raw Umber). To create the window I  stamped the image onto black card with versamark and embossed with white embossing powder before cutting out the window panels. I then stamped and embossed the image onto acetate with versamark and embossed with white embossing powder. I created the little scene using my PanPastels and some old favourite stamps from Home Sweet Home and added a little colour to the cottages with coloured pencils. I layered the window up over the scene using 3d foam tape and then added ribbon, lace, paper flowers and a wooden button topped with a twine bow.

Thanks for visiting today
Claire xx

Sunday, 10 May 2015

Floral Mannequins, The Sewing Room and Dressmaker's Window By Florence

Hi everyone

I hope you are enjoying the weekend and the weather is being kind to you.

Today I would like to share some projects made using some of the new stamps. They all work so well together.  To see the new stamps sets in full please click on the individual links:  Floral Mannequins, The Sewing Room and The Dress Maker's Window.   Do also check out the website for the multi-buy offer on these stamps.

Just a thought on the Dress Makers Window stamp.  This stamp can be used in so many different ways not just with the sewing stamps.  Personally, I have been after a window stamp for a many years and this one is perfect.  An absolute delight to craft with.  The design and size of it is fabulous.


My first project is a box style card.  


Box cards are really easy to make and a lot of fun.
The inside of the box is made in exactly the same way as you would make up a front of a card.  The only difference with box cards is that you score the card more times to give you the box shape.

Front view


The next project is a quick and simple card


For this card I have just stamped the frilly ribbon and the sentiment directly onto the card and added a hint of color on the ribbon using water color crayons.  The flowers have been stamped onto separate card stock and cut out.  The card has been made up as seen with foam pads behind the stamped flowers and the addition of a little die cut.

The next card is simple in style but it did take a little time to cut out the bottom of the dress form.  Having said that it was quite easy to cut out with a craft knife.  I found it easier to make all of the downward cuts and then make all of the across cuts.


I mixed and matched the dress forms and made a little modification to the body piece.

For this card I started by stamping the sentiment and the lace trim. I then stamped and cut out all of my pieces and decoupaged them onto the base card using foam tabs.


That's all from me today
Thank you for stopping by

Happy Stamping
Florence x

Saturday, 9 May 2015

Pretty paper and Mannequin card (by Debbie)

Good morning.
The sewing themed stamps are right up my street and they make up into really great cards.


My last order from Chocolate Baroque a paper pad fell into my shopping basket and I thought I'd use some of the paper for a card. The pad is from Prima 6x6 size, double sided and it's called Butterfly. Unfortunately it's out of stock at the moment but there are others that could be as pretty.
 The mannequin was stamped with black ink onto cream card then clear embossed. I stamped the flower with pink as I wanted to add a little detail to the bodice. For the skirt of the mannequin I used a knife and cut out the detail so the patterned paper of the oval showed through. A second oval was added behind and then attached to the card. The natural ribbon makes lovely bows and for another project I have coloured it.

Thanks for stopping by
Debbie

Friday, 8 May 2015

Floral Mannequin Collage (by Julie)

Hello and thanks for stopping by. I have loved working/playing with this months new stamps and hope you will too. The card I have for you today has been created using the brand new Floral Mannequin set along with the clear Dressmaking Collage stamp.


The Dressmaking Collage stamp is so versatile. I have used it to create the background of this card along with the decorative panel. I have left the whole stamp intact to stamp my design but you can easily cut into the clear stamp and use the designs individually.
If you wish to find out more details about my card then you can find full instructions on my blog.
Many thanks for your visit and please pop back tomorrow for some more Design Team inspiration. 

Thursday, 7 May 2015

Ribbon & Lace (by Asha)

Good morning all! Are you enjoying the new stamps? Let me tell you -I am LOVE-LOVE-LOVING them. So, follow me into The Sewing Room and let's have fun with the Floral Mannequins.  It's been more than 4 decades since I had this much fun playing dress-up!

My first card highlights the lovely dress-form from The Sewing Room A5 sheet and was inspired by a wedding dress. I heat embossed the dress-form in black onto heavy weight kraft card. Then I ruffled up some sheer white ribbon and cream lace to "build" the under-skirt of a wedding dress in progress. I can only imagine the hustle and bustle in a real sewing room! For a touch of bridal glamour, I added tiny bling to form a necklace. The greeting is from Loving Sentiments A5 sheet.


More lace on my second card, only this time I'm using stamps from the Floral Mannequins A5 sheet.  The background was created by stamping the lace fragment directly onto a piece of patterned paper followed by a little colouring with Polychromos. The ruffled lace is also from the Floral Mannequins A5 sheet, but this time I heat embossed it in white onto vellum and fussy cut it. I coloured the mannequin with alcohol markers, fussy cut and mounted it with some foam tape. The greeting is from the Birthday Words A5 sheet.


Thanks for stopping by today. Details of products used for these projects are available on my blog. The Design Team has lots of fabulous ideas coming up to inspire you, so make sure you swing by often. :)

Beijinhos,
Asha

Wednesday, 6 May 2015

Mixing and matching (posted by Judith)

Hello everyone, I have a project to show you today using the Sewing Room/Floral Mannequins multi-buy stamp set plus the Dressmaking Collage clear stamp. I have combined these stamps with an older stamp set: Haberdashery, to create a collaged card.

I started to make my background by stamping the buttons in two corners of a piece of watercolour paper using Versafine Onyx Black ink. I coloured the images with pencils, and then painted the images with Acrylic Wax. I spritzed two pieces of tissue paper with red and orange Dylusions spray, crumpled them up, and dabbed the background to create a mottled effect.

I stamped and embossed the silhouette mannequin onto the background, and then stamped and embossed the floral bodice onto a spare piece of card. I coloured the bodice using water based markers and a water brush. I coloured another piece of card firstly with orange and red inks and stamped and embossed the lace flower twice, which I cut out and layered together. I then coloured the card with Scattered Straw Distress Ink to create a little banner for the sentiment.

I added some background stamping using one of the border images, and finally added some hand drawn stitching, before placing the background onto a black card blank.


Thanks for stopping by, Judith xx

Tuesday, 5 May 2015

Stamps and paper (by Lesley)

I have always loved patterned papers and I still border on wanting to keep them to stroke because they are too nice to use! However today I want to show you how to get colour into your stamping with very little effort using some of those precious papers.


  • Stamp the ruffled ribbon border from Floral Mannequins, twice, onto a piece of pale patterned paper with Versafine Onyx Black. When dry colour the ruffled edges with pencils that tone in with the paper.
  • After fussy cutting the borders, use a darker co-ordinating pencil and run it along the edges of the ruffles. This gives the appearance of dimension to the ribbons.
  • Stamp the larger of the wire dress forms from The Sewing Room, twice, onto patterned paper (I used the free download from week 4 of our Challenge Blog 8). Cut out the entire image and then cut the tops from the wire frames. Swop these over so that you have a different coloured top to the bottom and glue together. You will have a spare for another project.
  • Stamp out two of the small dress form onto another piece of patterned paper, preferably one with a lighter background. Cut out.
  • Fold a piece of A4 white cardstock at 12.5 cm to create an oversize DL card, trim as required, and attach the ribbon border across the card as shown. Use a wet adhesive and overlap the borders (you will cover the join with the dress forms). When dry trim off the excess from each edge of your card.
  • Stamp the sentiment from the Card Sentiments clear set with Onyx Black then attach the two smaller dress forms flat to the card with double sided tape, positioning as shown.
  • Finally curve the larger dress form with your fingers for added dimension and attach with gel adhesive.
I hope this will encourage you to start using some of your paper stash and if that's asking a bit too much why not check out our Challenge Blog where you will find a free printable download every month.

As always there are some fabulous ideas bursting out from the Design Team so why not pop back tomorrow for another dose of inspiration.

Monday, 4 May 2015

Sewing together (by Judith and Lesley)

Today's design is a combined project between Judith and myself using the new sewing stamps.  We decided to do a shared card when we were in Portpatrick last weekend having loads of inky fun at Glenda's first workshops.


Judith started off our 'round robin' by stamping the lace border from The Sewing Room stamp set across an 8" square card. After masking off the top and bottom edges of the lace she coloured the centre panel using shades of orange and yellow ink and then stamped a selection of the sewing images to create the background. At this point she posted it to me, complete with a piece of spare card coloured with the same shades of ink.

I stamped and embossed the embroidered flower, from the Floral Mannequins set, 5 times on the coloured card and then fussy cut. I used the sentiment from the Thinking of You Sentiments clear stamp set and finished the card by attaching the flowers with gel adhesive. 

I know that many of you craft alone and would love to be able to share your creativity with crafty friends, only distance is an issue. Well why not start your own round robin?  Come up with an idea between you and then share the making and finishing of the project. Not quite the same as being in the same craft room, but it can be a great experience to share your work as Judith and I did.

Oh and just in case you wondered, from the original idea to finished project this card completed a journey totalling approximately 633 miles. Proof that you can do things together even if you are miles apart.

Thanks for joining us today, please drop in again soon to see more gorgeous artwork featuring our sewing themed stamps.


Sunday, 3 May 2015

Floral Mannequins (posted by Claire)

Good morning, I hope you're having a lovely crafty weekend. My card today features some of this months new stamps from Floral Mannequin which you can find here.


I've created a background by collage stamping the stamps from Parfum de Paris with Memento Tuxedo Black in on white card, using both first and second generation stamping. I then stamped the stand from the smaller dress form on this set. I stamped the floral mannequin and coloured with distress markers before cutting out and inking around the edges with Black soot Distress ink. I used 3d foam pads to attach the floral mannequin to give it some depth. I used a black fineliner pen to add faux stitching around the card. I popped some little pearls in the corners and added lace, ribbon and a crystal button to finish off.

Thanks for visiting today
Claire xx

Saturday, 2 May 2015

Floral Mannequins and The Sewing Room By Florence

Hi everyone

I hope you are enjoying the weekend.

Today I would like to share a card made using stamps from Floral Mannequins and The Sewing Room sets.  The Multi-buy option can be seen HERE.

These are fantastic sets of stamps to use whether you are an experienced stamper or whether you are just starting out on your stamping journey.

The stamps are a really great size for Card Making, ATCs, Hand Made Gifts or for making Home Decor projects.  Can you tell I am really excited about them!  I know you will love them as much as I do.


This is a really easy card to make but there is a little bit of cutting out to do.  Nothing too difficult though as the stamp images are such great shapes.
To make this card
Trim a piece of backing paper to size.
Stamp the smaller bold dress makers dummy onto your backing paper. You will only see the stand on your finished card.
Stamp all of the images onto white card, color the images and cut them out.
Make up the card as seen, attaching all of the stamped embellishments using foam tabs to give it a  3D effect.

Thank you for looking.
Happy Stamping
Florence x

April Comment Winner

Hello everyone, we hope you have a great crafty bank holiday weekend planned.

Thank you so much for your visits and all the comments you have made during last month, we truly appreciate the time you take to let us know your thoughts about our designs.

Each comment made during April was assigned a number and we used Random.org to draw a winner.  Congratulations to Pat you have won a £15.00 voucher to spend on Chocolate Baroque stamps for leaving a comment on April 12th!  Please send a quick email here to confirm your email address and Lesley will send you your gift certificate.

Lesley will be giving a £15 gift voucher next month to another lucky winner drawn from May's comments. The more comments you leave, the better your chances to win.

We hope you enjoy our designs this month featuring the fabulous new The Sewing Room, Floral Mannequins, Dressmaker's Window and Dressmaking Collage

Good Luck from the Design Team

Friday, 1 May 2015

Sew simple (by Debbie)

Hello to all visiting today. You are in for a treat this month with the new stamps. The design team have put together many fabulous cards and projects.


I have used the Mannequin from The Sewing Room and the buttons from the clear set called the Dress Making Collage. I created a border with tape and stamped the buttons with three different blue inks. The tape was removed and I stamped the Mannequin with black archival ink then coloured with pencils. The sentiment I've added means I can send the card for various occasions.

Many thanks for visiting
Debbie

Thursday, 30 April 2015

The Chocolate Baroque Sewing Bee

Today we are launching our May stamp designs and the clue really is in the title.  This month all our stamps are based a sewing theme.

First there is The Sewing Room


swiftly followed by Floral Mannequins


Available as individuals or as our usual multi-buy


As you can see both of these A5 sets are filled with images that would not be out of place in any sewing room and our the Design Team have had a ball putting together some stunning projects for you.

Here is a card designed by Judith which has a wonderful vintage appeal.


She has used an old paper pattern for the background and mixed and matched one mannequin with the stand from another.

We are also launching two new single clear stamps today.

Dressmaker's Window


and Dressmaking Collage


I can visualise the window being used with a variety of our stamp designs, creating both interior and exterior scenes. And although the collage is a single stamp you could cut out each image and have a collection of small individuals stamps; fabulous for creating embellishments.

Finally I have to make an announcement with regard to our wonderful Design Team.   Sadly today we are losing two of our members, Shirley and Maria, as both ladies wish to pursue other areas of their life. 

Glenda and I will miss their colourful and unique artwork and also their comradeship - they have been stalwarts of the team.  We hope you will join us in wishing them well and we look forward to spotting some of their creative talents popping up on their own blogs. Goodbye ladies and thank you so much for all your hard work and contributions to this blog.


Wednesday, 29 April 2015

Faux Decoupaged Auricula (by Julie)

Hello, today I have a trio of cards that I have created using the fabulous Auricula Script cling mounted stamp.
I have cheated a little with this faux decoupage technique by stamping the image just once, colouring with pencils and then arranging a set of nesting dies on top of the design before passing it through a die cut machine. This will then leave you with a set of frames of your image.

 The next step is to cut the whole shape of the nesting dies  from plain card-stock and glue the stamped frames to its corresponding plain shape. You can then layer them up using silicone glue so that it looks like you have stamped the image 4 or 5 times.
Distress inks through elements of the 12 x12 Well Rounded stencil have been used to create the background. If you squint slightly I think you can almost say that the splat design from the stencil looks like the flower head, what do you think....have I got too much imagination?
The cards have been finished off with a With Love sentiment from the Mackintosh Sentiments clear stamp set.
Thanks for your visit today. You are most welcome to hop over to my blog for another Chocolate Baroque make, however please pop by again tomorrow for another Design Team member's creation.

Tuesday, 28 April 2015

Auricula (by Asha)

Good morning, fellow Chocoholics. Today I'm playing with the new Auricula Script cling stamp.

For my card project, I heat embossed the image with silver embossing powder and sponged it with Distress Inks. After a little fussy cutting, I adhered the image to a piece of red card stock and secured it to a couple of pieces of green card stock with little green brads.

The sentiment is from Pretty Poppies, heat embossed in white. I finished the card with a little green twine and tiny yellow bling in the middle of the flowers.

Thank you for stopping by today. As always, details of tools and products used are available on my blog. Don't forget to swing by often for more exciting ideas from the rest of the design team.

Beijinhos,
Asha 

Monday, 27 April 2015

Mackintosh Ovals (posted by Judith)

Hello everyone, I hope that you are enjoying the inspiration provided by my team mates this month. I have a card to show you today, using one of the images from the Floral Eggs clear stamp set, along with some older favourites of mine.

I started my card by stamping and embossing the Mackintosh style egg repeatedly onto a piece of black card, using Versamark and some platinum embossing powder. I also stamped and embossed the oval part of the central image several times onto a spare piece of black card. I mixed some blue and green Brusho powder with iridescent medium, and coloured areas of the images and left them to dry. I cut out the ovals from the spare piece of card, and stuck them to the background card inbetween the Mackintosh egg images.

I stamped the main image, from the Mackintosh Windows stamp set, onto a piece of white card, using Versafine Onyx Black ink, and embossed it using clear embossing powder. I coloured the image using watercolour pencils and a water brush. I coloured a die cut of white card with pencils and a water brush before stamping a sentiment from the Mackintosh Sentiments clear stamp set. I chose a toning green pearlescent card to mat all of the layers before assembling my card.


Thanks for stopping by, Judith xx

Sunday, 26 April 2015

Brusho and template (by Maria)


Hello crafters, I have another sample to show you today,  I hope you like it and will try it too.


I made this card with a stamp from Awesome Orchids clear stamp sheet, a flower template and some Brusho. I took some smooth white paper, stamped my image and stamped it again on masking paper. I cut it out and put the mask on the flowers, then I placed my template over the top and sprayed a tiny bit of water over it. You do need to be careful not to use too much water otherwise it goes under the template and you get a messy background. Then I took my orange Brusho and sprinkled a tiny amount all over the background. I took away the template and the mask and dried the card with a heat tool. Normally you have a white card with the orange flower background, but I wanted more colour, so I coloured it with some orange Distress Ink. I coloured my flowers with some alcoholic markers and I gave them some accents with a yellow gelly pen to look like daffodils. I hope you will try this project.
Have a wonderful day and a lot of fun!

Greetings,
Maria

Saturday, 25 April 2015

Just in case (by Lesley)

How many times do you wish you had a card right now? Perhaps for an unexpected birthday or that time when you forgot or even just because you want to cheer someone up.  Today's card has been made for when I need a standby.

  • Stamp the Ladys Slipper Orchid image onto watercolour paper with Versafine Onyx Black. When dry colour with watercolour paints or pencils. Leave to dry thoroughly.
  • If necessary add extra colour and shading using coloured pencils and then fussy cut around the lace edge.
  • Cut two pieces of co-ordinating background paper; one at 15 x 9.5cm and one at 15 x 10.5cm.
  • Attach the larger piece portrait style on the front of an 8" square card with double sided tape (make sure the fold of the card is at the top to make it tent style).
  • Fix a piece of ribbon across the second piece of paper and the attach across the first piece as illustrated.
  • Position the watercolour topper using 3d foam pads.
You will notice there is no sentiment on this card and that is because, as yet, I don't know when I am going to use it. But I have one ready, just in case.

So the next time you have a crafty session, why not make up some of your work into finished cards but leave out the sentiment, just in case!

Thank you for stopping by today. Please keep popping in so that you can receive a daily dose of inspiration from the very creative Design Team.

Friday, 24 April 2015

Beautiful Birdcage Collage (by Shirley)

Hello creative people, I hope you are doing well.

I have a design to show using a gorgeous new cling single stamp - Birdcage Collage.


The background was created with Dylusions inks and Distress Paint (yellow).   I over stamped with a stamp from the beautiful Dusky Damask set.   The main image stamped with Cobalt Archival ink was painted with water colour markers.


Thanks for stopping by and enjoy your day,
Shirleyx