Pin It button on image hover

Wednesday, 9 December 2015

Guest Post - A vista under the sea by Rachel Fisher

Hi everyone, I would like to introduce you to a brand new member of the Guest Design Team - Rachel Fisher.  As you know Veronica Pell recently became a permanent member of the Design Team, so I was very happy when Rachel agreed to join us.  This is her very first post in her new Guest role and I just know you are going to love what she has to share with you.


Hello there! My name is Rachel Fisher and  I am delighted to be joining you for the first time as a member of the Chocolate Baroque Guest Design Team! I do hope you will enjoy what I have made for your inspiration.


My first piece shows a scene I developed on a canvas. I used paints, stencils, stamps and paste to build up the background then stamped the images from two sets of stamps – Mermaid Queen and Seadragon.  After colouring in with distress markers I fussy cut each image and then glued them to the canvas background.
Full step by step details can be found on my blog – FishersCards and Crafts.


I hope you have enjoyed what I have done with these beautiful stamps!

Big Hugs

Rachel.

We certainly have enjoyed your beautiful design Rachel and can't wait to see what else you have lined up for us this month.

Don't forget to keep dropping by to see what fabulous artwork our DT ladies have created using our new individual background stamps.

Tuesday, 8 December 2015

The gift of a Candle (by Veronica)


Loving the new background stamps, this one is called Baroque Orchids and reminds me of brocade, and it seems  a shame to cover any of it up!


Recently I finally managed to get a candle that looked ok when finished – previously they have looked decidedly the worse for wear and rather mis-shapen. Using baking parchment wrapped tightly round when heating the tissue paper onto the candle makes all the difference! Pushing my luck, I thought that I would have a go with this stamp and my last remaining candle.......


I stamped with black memento ink on to what I thought was white tissue paper (reminder, don’t choose your tissue paper by artificial light next time!) then cut out around the image to make a strip to fit the candle, which was too short for the whole image.  I tightly wrapped the candle with the baking parchment, and held it by this while heating gently – I still have a very old hairdryer type heat gun, which has a more gentle heat than the newer guns.

The box was painted with black acrylic paint, and I smudged the corners with versamark and copper EP to make it a bit more interesting. The image for the lid was stamped in versamark onto black card, embossed with copper EP, cut to size and glued down.


Finishing touch was the tissue paper, black paper  randomly stamped using a copper pigment ink pad.

Thanks for calling in today, please come back soon to see more wonderful project from me fellow team mates using these gorgeous background stamps.

Veronica

Monday, 7 December 2015

Studded Lattice (posted by Claire)

Good morning, Claire here with a sample made using one of the gorgeous new background stamps which Lesley was showcasing over the weekend on The Craft Channel. The new stamps are stunning and didn't Lesley do some fantastic demos? This project features Studded Lattice which is a really pretty and very useful stamp. I've made a project using one of the wooden art blocks which are great fun to decorate and look lovely in a window as you can decorate both sides.


I began by painting the block with white gesso and then gave it a coat of pale blue acrylic paint, Once the paint was dry I sanded it to create a distressed effect. I stamped the Studded Lattice with versamark and embossed with a sparkly white embossing powder on both sides of the block. 

Next I die cut some flowers and coloured with turqouise PanPastel. I stamped them all with the Studded Lattice stamp, some were stamped with Gathered Twigs distress ink and some were embossed with the sparkly white embossing powder. I distressed the edges with Gathered Twigs distress ink and curled the petals before layering them up to create two large flowers. I popped a faux pearl in the centre of each. I die cut some foliage and embossed with a mix of blue and gold embossing powder. I arranged the flowers and foliage on  the block as shown and added a brass flower to the top of the block.

Thanks for visiting today
Claire xx


Sunday, 6 December 2015

Individual background stamps by Zoe

Hello there! Or should I say "Happy Christmas" lol ok ok I guess it is a tad early yet :) I love Christmas but it is a hectic time, I hope you're all keeping on top of your prep?

Anyway! Today it's my turn to share with you my projects made with the fantastic new Background stamps, featured on The Craft Channel yesterday and again today, I hope you manage to watch our fab Lesley?

I love these stamps they are so versatile, they're not actually available from Chocolate Baroque until the 7th December as they are exclusively The Craft Channel until then.

My first project is an MDF Xmas tree shape which I black Gesso'd first, then covered with Versamark Inkpad and used Lapis Black UTEE and heated until melted, I repeated the process but the second time I inked up this gorgeous ornate background stamp "Baroque Orchid" with Versamark and while the UTEE was molten I stamped into it, waited a moment or two for it to slightly cool before lifting the stamp off, once it was cool I added some gold gilding wax and buffed with a soft dry cloth.

Another MDF piece I Gesso'd first then painted with a Buff colour chalk paint, once dry I stamped the "Open Weave" stamp using an Archival Inkpad, I used the gorgeous Patchwork Butterfly as my feature which I stamped onto card and coloured using pencils, the sentiment is from "Positive Beauty" clear stamp set, the border is from the "Floral Edges" rubber stamp set.

Here I started by colouring my card with liquid watercolour inks, once completely dry I stamped the "Floral Weave" Stamp with Versamark ink and heat embossed with clear embossing powder, I then inked over the whole design using Chipped Sapphire Distress ink very generously, I stamped the sentiment onto Vellum and created a wrap to finish off. The sentiment is from the same set as the plaque above.

I hope you like my designs as much as I enjoyed making them and they've inspired, thank you for taking the time to visit and comment, please pop back each day to see what my wonderful teamies have created with these gorgeous stamps, have a great day xx Zoe xx


Saturday, 5 December 2015

New Lattice Stamps (by Debbie)

Good morning.
 
I am excited to be sharing a card and notelet set I recently made for Lesley to take with her to The Craft Channel for the recording of the Chocolate Baroque shows.
The stamps will be on the shows that are being aired this weekend so if you'd like lots of inspiration from Lesley, check the channels schedule for the show times.
These new stamps and a couple more are exclusive from The Craft Channel until the 7th of December.
 
The open Open Weave stamp has been used for the background of this card along with splatters of different colour inks. This stamp along with the others are ideal for mixed media projects.
 
 
I really enjoy giving handmade gifts to people and this set of notelets are going as a Christmas present. The Floral Weave stamps are a lovely size for A5 cards. I used water soluble oil pastels to colour the stamp and spritzed with water before stamping onto white card. If the stamp is spritzed again you can get a second image. These were great fun to make and quick.
 
 
Many thanks for visiting and keep popping in for more inspiring work from the Design Team
 
Debbie

Friday, 4 December 2015

At The Haberdashery (by Julie)

Hello and welcome. Today I am sharing a card that I made for one of the first Chocolate Baroque television shows, over  on The Craft Channel. Talking of television shows, there are some brand new shows coming your way in the next few days so keep your eyes peeled for further details.


The stamp sets used for this card are Haberdashery, Lace Fragments and Artistic Expressions.
It is easier to make this card if you start by creating the two mounted panels first. Just ink up the stamps with Onyx Black Versafine, stamp the designs, add some watercolour with Distress ink and then cut the panels to suit the size of your card. I have then mounted onto red card and used a corner rounder but that is completely optional.
Decide where you want to place your panels then ink up your Lace Fragments and stamp them so it looks like the lace is disappearing under the main images. After the stamping is complete take a wet wipe, dab it in some Distress ink and sponge the background. When you are happy with the result stick the two main panels to the base card.

Many thanks for stopping by,

Julie x

Thursday, 3 December 2015

2 or 3 little things

Hello
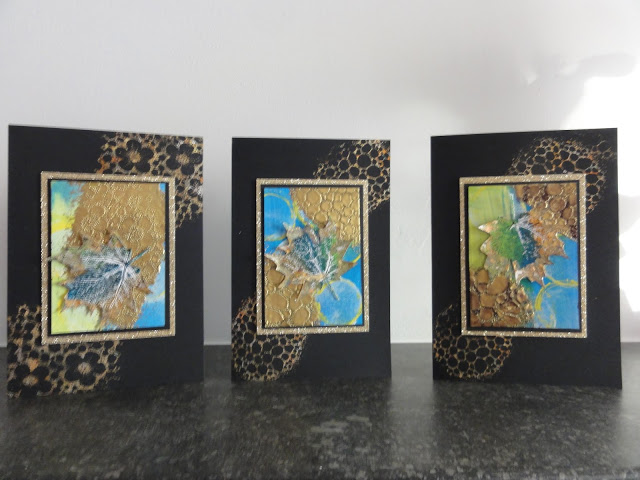
It is unsual for French people to send cards for Christmas. The tradition is for the new year. So these cards are examples of what I realized for 2016. "Meilleurs vœux" is "All my best wishes".

Ce n'est pas habituel pour les français d'envoyer des cartes pour Noël. Traditionnellement c'est réservé à la Nouvelle Année. Voici quelques exemples de celles que j'ai faites pour 2016.


This one is made on a glossy paper. I apply 2 colors, yellow and red, on paper and pull the colors to obtain the effects. Then I apply the stamp.
Celle-ci a été réalisée sur du papier glossy. J'applique 2 couleurs, jaune et rouge, directement sur le papier et je tire pour obtenir l'effet souhaité. Puis je tamponne.

 This one is made on a piece of paper painted with acrylic. I paint the branches and the light with Zig.
Celle-ci a été faite sur un morceau de papier peint à l'acrylique. Les branches et la lumière sont peintes au feutre Zig.

And the last one is made with a piece of Canson paper painted with acrylic.
Le dernière est faite sur un morceau de Canson peint à l'acrylic.

I hope you like. Thanks for your comments which give me a great pleasure. Kind regards.
J'espère que vous aimez. Merci pour vos commentaires qui font toujours plaisir. A très bientôt.

Dominike


Wednesday, 2 December 2015

The Chocolate Baroque Reader's Gallery- it's your turn to shine!

Hello everyone, it is time for our monthly peek at what you have all been up to in Blogland, on Pinterest, and on the Chocolate Baroque Facebook Group this month. You are such a talented bunch, and we love to see what you make with the beautiful images available as Chocolate Baroque stamps. It really is a delight to see your creativity, and the variety of techniques and colour that you employ.

So it's over to you for a look at the projects that we found during November:

These first few projects were found on the Chocolate Baroque Facebook Group, and there have been some fabulous creations this month:

Akkina:


Rae:

A stunning entry from the Chocolate Baroque Challenge Blog:
Val Early:

Spotted around Blogland:


Finally, a couple of photos from the Chocolate Baroque Postcard swap. This takes place every month on the Chocolate Baroque Ning Group, and the participants create some lovely artwork, which is swapped amongst them.

Here are Mickie Sutcliffe's swaps:
and Jean Straw's swaps:

We hope that you have enjoyed this month's selection, and have been inspired by the beatiful artwork. If you do not have a blog, or have access to the Facebook Group, we would be delighted if you could send good quality photographs of your artwork to Lesley to sales@chocolatebaroque.com and we can then upload them to the gallery for you. Please do not be shy, as it would be lovely to share more of your fabulous artwork with everyone.


Tuesday, 1 December 2015

Dutch Scene Card using Country Views and Sunburst Scenes (by Anne)

Here is another of my designs created for the recent TV shows on the Craft Channel using the lovely scene building stamp sets - Country Views and Sunburst Scenes.

I love scene building. I disappear into a fantasy world while creating these.
I hope that you like my Dutch inspired scenic project.

Anne x.


Materials:

  • White card blank 20.5cm square, white stamping card, blue and white pearlescent card
  • Copy paper to create masks
  • Distress Inkpad (Chipped Sapphire)
  • Fine marker pen and alcohol ink marker (dark blue)
  • Adhesive

How to make it:

  1. Cut a decorative mat approx. 18cm diameter and back with blue card. Cut small corner elements in blue card. Cut circular topper approx. 13.5cm diameter from stamping card (to fit onto decorative mat).
  2. Stamp the scene using Distress Ink. Use masks to cover the foreground images while stamping the ones behind in the background. Complete the scene using the fine blue pen.
  3. Colour the image by putting Distress Ink onto a tile or palette and picking up ink with a wet brush.
  4. Outline the edges of the topper with blue alcohol ink.
  5. Glue decorative mat, corners and topper onto the card blank.


Blog Comment Winner November

Hello everyone.
 
Once again we would like to thank you all for your visits here at the Design Team blog.  We truly appreciate the time you take to let us know your thoughts about our designs.  
Each comment in November was assigned a number and we used Random Org to draw a winner.  Congratulations to Susan Battensby (Beautiful work. These flowers are so useful) you have won a £15.00 voucher to spend on Chocolate Baroque stamps! 
 Please send a quick email to confirm your email address
and lesley@chocolatebaroque.com will send you your gift certificate.
Lesley will be giving a £15 gift voucher to another lucky winner drawn from December's comments. The more comments you leave the better your chances to win!  
 
 
Thank you for your kind words and comments,
Good luck from the Design Team!


Sunday, 29 November 2015

Double Flower Power (by Asha)

Good morning, friends. I'm still playing with the new Flowerhead stamps and today I've used 2 -  Dotty Centre Flowerhead and Circle Centre Flowerhead - to make a one layer card.
  1. Start by stamping one flowerhead in the top right hand corner in the front of the card base and another in the top left hand corner inside the card.
  2. Trim the around the flowerheads so that they stick out of the top and side edges. 
  3. Colour the flowerheads. I used Faber-Castell Polychromos.
  4. Start at the edges and continue to blend the Distress Inks inward. Stopping short of the flowerheads creates a halo effect.
  5. Stamp a greeting from Birthday Words A5 sheet and fill the rest of the card with leaves from Autumn Poppy A5 sheet.
  6. For a final flourish, little droplets of Liquid Pearl and a few strokes of Clear Wink of Stella pen on the petals.


This is the inside of the card. As with the card front, I inked the inside edges with Distress Inks too.

So there you have it - a floral one layer card, perfect for mailing. I hope you'll give it a try. Details on tools and products used above are available on my blog.  Don't forget to stop by for more fabulous makes by my team mates.

Thank you for stopping by today and have a crafty weekend!

Beijinhos,
Asha

Saturday, 28 November 2015

Christmas Flower (posted by Judith)

Hello everyone, I have another project using one of the large Flowerhead collection stamps to show you today. I have really enjoyed creating projects with these lovely large stamps, great for that focal point on a card. I have chosen to use the Circle Centre Flowerhead for this project.

I created my background by covering a gelli plate with turquoise ink, using a brayer. I used a piece of white card to take a print from the gelli plate. This is a really quick way of colouring a piece of card if you want a single colour. Once the card was dry, I stamped and embossed a harlequin design from the Harlequin Fragments stamp set onto the background, using gold embossing powder. I added some droplets of red ink over the rest of the background, and a little bit of gold shimmer, using a gold pen.

I stamped and embossed the flower onto red vellum twice, using gold embossing powder, and cut it out. I added a leafy die cut, and dark green matting to complete my card.

Thanks for stopping by, Judith xx

Friday, 27 November 2015

Brusho Swirl Flowerhead (by Veronica)


Hi everyone, today I have two more cards using the Swirl Centre Flowerhead cling mounted stamp and brusho powders.


This first one is very simple, just the flowerhead stamped into one corner and embossed in white, with turquoise brusho powder. The white 7” square base card is randomly stamped with the same flowerhead using broken china distress ink, which had also been sponged round the edges.


For the second one the background is randomly stamped with the flowerhead, also white embossed, then sprinkled with turquoise and cobalt blue brusho and sprayed until the colours run together. The Flowerhead is stamped on to black card and embossed using a shocking pink powder, cut out and glued onto the background, then onto a black A5 card blank.

I am really enjoying playing with these big stamps and hope you are enjoying seeing all the different ideas from the DT. There are full details of how I made both of these cards on my blog.

Thank you for visiting our blog today, please drop in again to see more gorgeous examples using the large flowerhead stamps.

Veronica