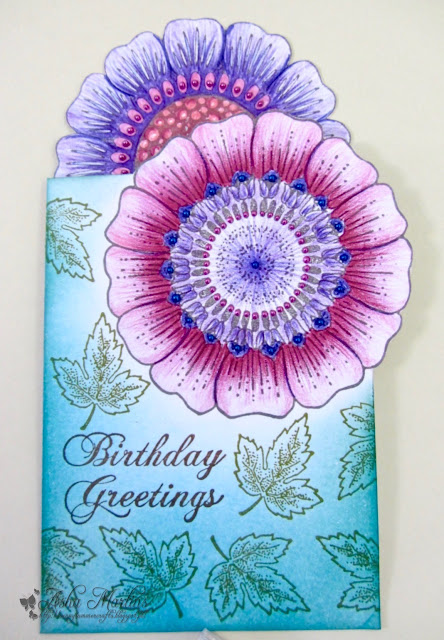
- Start by stamping one flowerhead in the top right hand corner in the front of the card base and another in the top left hand corner inside the card.
- Trim the around the flowerheads so that they stick out of the top and side edges.
- Colour the flowerheads. I used Faber-Castell Polychromos.
- Start at the edges and continue to blend the Distress Inks inward. Stopping short of the flowerheads creates a halo effect.
- Stamp a greeting from Birthday Words A5 sheet and fill the rest of the card with leaves from Autumn Poppy A5 sheet.
- For a final flourish, little droplets of Liquid Pearl and a few strokes of Clear Wink of Stella pen on the petals.
This is the inside of the card. As with the card front, I inked the inside edges with Distress Inks too.
So there you have it - a floral one layer card, perfect for mailing. I hope you'll give it a try. Details on tools and products used above are available on my blog. Don't forget to stop by for more fabulous makes by my team mates.
Thank you for stopping by today and have a crafty weekend!
Beijinhos,
Asha


Gorgeous card Asha! A wonderful card design and the colouring is just lovely. The leaves and sentiment finish it off beautifully. Debra x
ReplyDeleteWhat a brilliant idea - I love the whole concept and those flowerheads are gorgeous. Thanks for yet more inspiration.
ReplyDeleteThis is sooo beautiful Asha, and a brilliant design, super inspiration, Kate x
ReplyDeleteBeautiful card, I love your colouring.
ReplyDeleteWhat a great way of using these flower heads Asha and the colours are so pretty. A really clever card. x
ReplyDeleteoh so beautiful - I love it Asha xx
ReplyDeleteFun shape and I love the effect that you get by fussy cutting around!
ReplyDeleteThank you, ladies! :) xxx Asha
ReplyDelete