Pin It button on image hover

Saturday, 13 April 2019

A Little Bird Told Me by Penny

Good morning peeps, I hope you are all well and looking forward to the Easter break.  Here is my first post of this month to share with you today, one of my samples from last month's shows.  For this project I have used stamps from the Fluttering Hearts and Punky Hearts sets, CB Useful Leaves Mask/Stencil, two tone acrylic paints, Distress Inks, gold embossing powder, Versamark ink, white pen and gold pen.


I took a piece of white card and stamped the large floral heart image and the bird and butterfly images using Versafine ink and embossed them with gold EP.  I masked the images before blending inks over the card then sponged the acrylic paints all over.  When dry I stamped another heart image in 2nd generation ink randomly, then added some leaves with the stencil.  I removed the masks and coloured the images. 


On another piece of card I stamped and embossed another bird, coloured it and cut it out.  I used a white pen around the leaves and a gold pen around the edges of the panel.  I then matted the panel onto green card.  I took a cream base card and stamped the floral heart randomly, twisting the stamp, to create a border around the edges of the card.  I attached the focal panel to the base card then added the bird with 3D foam.   


I stamped and embossed a sentement onto a piece of white card, die cut it, added DI and gold pen before attaching it to the card with 3D foam. 

Thank you for popping by, I hope you like this project.  I shall be back later in the month with another creation to share, but my team mates will be here in the meantime with lots of lovely artwork.

Take care and Happy Easter,


                        xx  Penny  xx

Friday, 12 April 2019

Hearts and Flowers (by Judith)

Hello everyone, I have a few projects to share with you from last month's TV shows on Hochanda, featuring the lovely heart stamps.

My first projects are three very quick cards, 4" square, using images from the Floral Heart stamp set. I stamped straight onto the card blanks to create a set of clean and simple cards that could be used as little notelets.


The first card uses three different colours of blue Memento ink and the bubble heart, around one of the sentiments which was stamped in black ink. I covered the card very quickly, simply stamping the heart in the different colours to create an all over background.


The second card was created by stamping the large heart, and then stamping the flower cluster down the side using four different colours. I then painted the flowers in the large heart using the four colours and added white highlights.


The third card was created by stamping the heart in second generation randomly over the background with red ink. I stamped the sentiment in black ink as before. Using a small white board circle from the Hearts and Circles pack, I added red ink before coating the circle with UTEE, heating it with my heat gun and stamping the same heart image into the hot embossing powder. I brushed some gold mica powder over the image to pick out the detail.

The following cards were shown as a demonstration on one of the TV shows last month. I created a Toile de Jouy background using the flower sprig from the A Heart Full of Love stamp set, stamping onto 160gsm Luxury Smooth paper I cut a smaller square of the paper to stamp the corresponding heart image. I coloured the heart with pencils, before matting both layers with coordinating card. I coloured a piece of ribbon with Distress Ink to get the ribbon to match the project exactly. I created a couple of colour options for the show, one pale, and one much brighter, to show that by changing the colours, you can create a very different effect. Apologies for the photo of the paler card, it has been given away now, so I cannot photograph it again.

I will be back later in the month with more projects to share with you, thanks for stopping by,

Judith xx

Thursday, 11 April 2019

Hearts by Zoe

Good morning Lovelies and welcome to my first post for April featuring these fabulous stamps.
I hope you manage to watch the shows on Hochanda.

I’ve gone rather CAS with these first 4, using Linen Texture cardstock and diecuts.
The first is coloured with Inktense pencils.

I inked up using various colours and decoupaged.


I stamped and heat embossed and coloured using Inktense pencils, I then blended Distress Oxide Antique Linen and stamped using the same ink to create texture in the background.

I’m calling these these “Love Letters” which I used 3 shades of ink to create an Ombré effect and used Stencils with water and inks to get some texture before stamping and using a white gel pen to make some highlights. 
I cut an envelope in half to make a little holder for the love letters.

I hope you like my creations. I’m away on holiday at the moment and will catch up with you all later in the month.
Thank you so much for visiting and leaving your comments.
Have a wonderful day xx Zoe xx


Wednesday, 10 April 2019

ATCoins (by Gerrina)

Hello everyone, this month we are welcoming our long term Guest Design Team member Gerrina back for three inspirational posts. She has created some fabulous projects and here is the first of her designs, some bright and cheerful ATCoins.

Gerrina writes:

Feels so good...it is my turn again to show some things I made for the Guest Designer Team at Chocolate Baroque! Three weeks in a row you will find makes from me with the beautiful stamps from Chocolate Baroque...This week the first one(s). Some ATCoins:

Used Materials:
Stamps: Chocolate Baroque Steampunk Birds and Tangled Fragments
Die: Crealies ATCoins die, (but a similar circular die would do).
Ink: Versafine Onyx Black, Memento Lilac Posies, Bahama Blue and Elderberry, Distress Ink Twisted Citron, Tumbled Glass and Carved Pumpkin
Other: Stamping and masking paper, blending tool, water based markers, white cardstock

All three designs are made the same way:
Die cut an ATCoin from some watercolour paper.
Stamp the birds and mask them off.
Stamp the harlequin stamp over the whole coin.
Sponge over the harlequins with the colour of your choice.
Remove the making paper and colour the bird stamp.
Die cut an ATCoin from some plain paper.
Glue the coloured ATCoin on the backing and write your name, the date, number of coins on the back.

Since I want to swap these and want to keep one of each for myself, I made four of each:


Creatieve groetjes,


 Gerrina


Monday, 8 April 2019

Pretty in Pink by Brenda


Good morning everyone, Brenda here to share a few of my samples from Lesley's recent Hochanda shows featuring the romantic steampunk stamps.

My first share above uses one of the most beautiful floral images from the new A Heart Full of Love stamp sheet. I used a brayer and Distress Inks to create background, I wanted a fairly random finish so went in different direction with three different coloured inks. I then used Versaine black to stamp the images in each corner and also onto three chipboard circles which I had also covered with the same DI's. The flowers are all coloured in with pencils and paints, the circles raised on foam pads and some liquid pearl dots.


Using Versafine Clair black I stamped the broken hearts from A Heart Full of Love onto acetate and placed card over and rubber to transfer the image, I did this four time and then stamped again in Clair red and matched them up, one was actually going in the opposite direction but I decided I quite like the variation........artistic licence. Next I used sentiments from the various sets in the show to stamp between the hearts.  


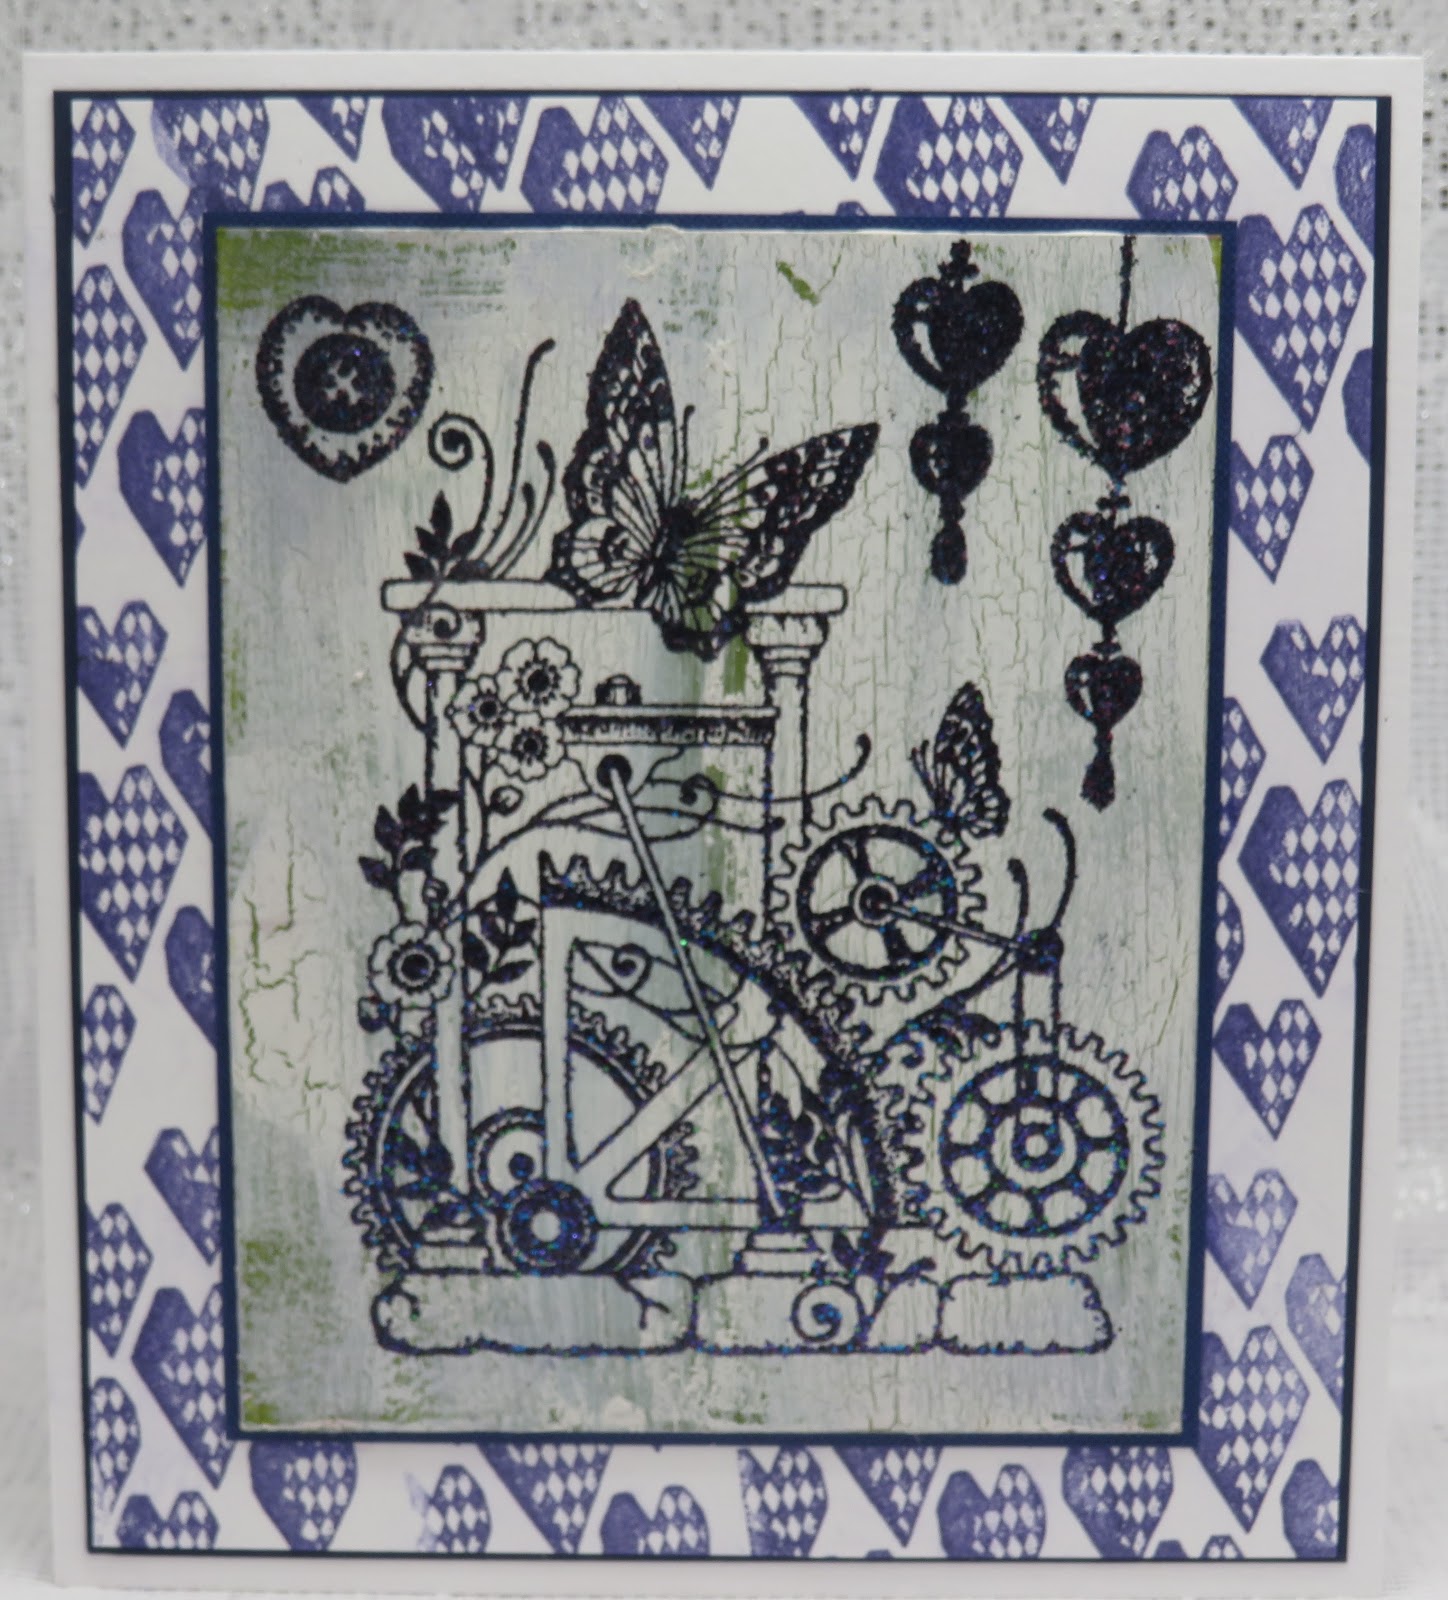
The background panel was created using the heart stamp from Punky Hearts and Versafine Clair ink. The base of the focal image is a 600gsm piece of cardstock painted with acrylic pain and covered with crackle glaze, sanded down and stamped with one of the stamps from Punky Romance using Versamark and heat embossed using cobalt blue sparkle EP. I also stamped some hearts from Punky Hearts across the top.


Lastly a small 7x7 canvas covered with black gesso, then stamped with the clocks from Punky Romance and heat embossed with detail copper EP twice to give more depth. Next I some interest to the corners with a stencils and texture paste and liberal coatings of copper gilding wax. The heart and bird are from Fluttering Hearts stamped and embossed with detail copper EP, fixed onto the canvas along with some Little Birdie flowers. sentiment and twine.

Have a good day and as always my thanks for popping into our blog today.


Sunday, 7 April 2019

Love is.... ( By Marga)

Hello everyone, hope you are all good. Today I want to show you two tags I have made.


The first tag I have made with Distress Oxide and I used the stamp set Floral Heart. I stamped the images with Versafine Onyx Black and I used a white gel pen for the edges and the accents.


The second tag I made also with Distress Oxide and I used the stamp set Fluttering Hearts. I stamped the image with Versafine Onyx Black and the background images with Distress Oxide and I used a white and black gelpen for the edges and the accents.

Hugs Marga

Friday, 5 April 2019

My Heart's All of a Flutter (By Julie)

Hello, today it is my turn to show a couple projects.
My first card is stamped with the brand new stamp set, A Heart Full of love.


To start with I stamped the floral corner design and coloured with Polychromus pencils. 
 Apply green and blue inks through a dotty stencil all over the background, but try to avoid the corner design and when dry take the sentiment from Floral Heart and stamp it in the bottom right corner. Cut your panel so that it fits your card blank, leaving approx. 1cm border all around the edge. To finish off, stamp the heart design, colour with the pencils, cut out and then mount in the centre with 3D glue gel.


My second card is stamped with both Punky Hearts and Fluttering Hearts. Both of these sets are brilliant and work so well together.
 I stamped the Butterfly Heart from Fluttering Hearts onto my card blank, starting with the image at the top, followed by the bottom image and then the left and finally the right image. You then need to make a mask. I did this by stamping onto copy paper and then folding the paper so that when I cut out the image I had two copies. Place your masks onto the top and right hand side images, ink up your Butterfly Heart, stamp onto scrap paper and then stamp onto your card, over the top of your masks. This is second generation stamping and you need to repeat this step until you have stamped in between all of the butterflies. Colour with Polychromus pencils.
Ink up the cluster of hearts from Punky Hearts, stamp around the background and finish off with Distress ink blended into the background.

Thanks for stopping by and please call again soon for more Design Team inspiration.

Julie xx

Thursday, 4 April 2019

Oil Burner by Rachel

Hello there! I have my oil burner to show you today that I painted for the March shows...


I decorated the piece using stamps from the fluttering hearts stamp set. I stamped them onto a ceramic piece then painted using glaze. I had to then outline the image in glaze as the ink burns off in the kiln. After drying a final clear glaze is added and the piece is fired.

Hope you have a great day!
Hugs

Rachel xx

Wednesday, 3 April 2019

Steampunk Panel - (by Magda)

Hello everyone
I am back with my April posts.

For my first project "Steampunk Panel"  I used a heavy craft cardstock, on which I stenciled gears with dark brown and black soot Distress Ink Pad .  For the front panel I used a white cardstock on which I layered at first white gesso then  acrylic paints and stamped with Archival Jet Black the image of Punky Romance . I coloured the butterflies, flowers and highlighted the machine with Faber Castell Art Grip Aquarelle Pencils. 


For my second project I used Fluttering Hearts rubber stamp

1. On a white cardstock stamp directly yellow, greens, blues and violet Distress Ink Pad
2. Stamp on it randomly with Versamark  the flowers-hearts with bird and butterfly of Fluttering  
    Hearts rubber stamp
3. Spread pearl mica on the background and remove the excess.  You will see the stamped images
    glitter on the background.
4. Stamp the big heart of the same plate with Archival Jet Black on a second piece of white cardstock
    and color it with the same colors used at point 1.
5. Cut out the image and glue it  with Cosmic Shimmer PVA glue on the background
6. Stamp  with Archival Jet Black in third generation all around the border the little hearts of the
    same plate Fluttering Hearts
7. A nice ribbon and a gem-heart complete the card.


Thank you for passing by.
Magda


Monday, 1 April 2019

punky romance and brusho (by Veronica)

 I get to be the first to blog the stamps from the last tv shows, when we had a lovely variety of stamps to play with, and there were were some really fab samples from everyome, which i am sure will be popping up over the month.
Here are my punky samples to start the month, mostly using my favourite brusho powders
Thie big stamp from punky romance was stamped with black versafine and clear embossed onto a piece of card already coloured with brusho powders,mostly using sandstone and a green.
I used more of the same colours to paint the image, with turquoise for the butterflies.
The sentiment came from punky expressions. I edged the card using a black marker pen before adding it to a square card blank
 These papier mache letters were found when looking for some boxes to decorate - I couldn't find the right boxes, but found these further along the shelf in the store........and thought I would have a play.
They were painted with white gesso first, then coloured with distress oxide inks . Some of the images were stamped in white directly onto the letters to make the background. Several other images from the set were stamped in black versafine onto white tissue paper,  torn out and added using modpodge.

These were the only boxes I had, they were quite small so i just decorated the lids.
The heart shaped one used a scrap of brushoed card, image stamped in black versafine , cut to shape and glued on. The oval one was triple embossed using a copper powder and the stamp pressed into the final layer while it was still hot.

March's Blog Comment Winner

Hello everyone, 

We truly appreciate the time you take to let us know your thoughts about our designs, so each and every comment is very important to us.
Each comment in March was assigned a number and we used Random Org to draw a winner.
Congratulations to Linda Simpson, you have won this months £15.00 voucher to spend on Chocolate Baroque stamps. To claim your prize, please email here to confirm your email address and Lesley will send your gift certificate.

Lesley will be giving another £15 gift voucher to another lucky winner drawn from April's comments. The more comments you leave the better your chances of being the winner.

Thank you so much for all the kind comments you leave.

Good luck from the Design Team

Sunday, 31 March 2019

Swirly Mannequin by Penny

Goodly morning peeps, I hope you are all well.  This is my last post this month and it features another sample from the CB shows.    I have used stamps from the Haberdashery, March Fairy, and Artistic Affirmations sets, Distress Inks, black Versafine ink, clear embossing powder, silver pen and alcohol markers.


I stamped the swirly mannequin in black Versafine ink and embossed it with clear powder.  I then masked it off so that I could create the background.  I also stamped and embossed a pair of cotton reels, then coloured and masked them as well. 


To create the background I blended three shades of pink Distress Inks, then stamped a few worker stamps randomly over the panel, using the same inks.  I added black ink around the edges, then matted the panel onto black card.  I removed the masks and attached the panel to a white base card.  I then stamped and embossed a pair of scissors onto acetate, coloured them on the reverse with a silver pen, and cut them out.  On a spare piece of card I stamped the word 'Create' in black and embossed it with clear EP.  I edged the word panel with pink ink before matting it onto black card.  I then attached the word panel and the scissors to the card.


Thank you for taking time out to read this post, I hope you enjoyed it and found it inspiring.  Stay safe and well everyone, and I'll see you in April with another project,  


                          xx  Penny  xx  

Saturday, 30 March 2019

Positive Thoughts (by Judith)

Hello everyone, I am sharing my final makes with you for this month. I hope that you have enjoyed what we have created using the sewing themed stamps and the fabulous new Folk Art Garden set of stamps.

I have two projects for you today, the first was created using a limited edition kit that we brought to Hochanda last month featuring a wide paintbrush, which I decorated. I painted the brush using a pale blue paint and dry brushed it with a magenta paint for an accent colour. I stamped some linen fabric which had also been painted with the blue paint, using Plum Archival Ink. I chose one of the ribbon trim images from the Floral Mannequins stamp set. I cut the image out and gathered it up around the top of the bristles with cotton, and stuck it down using double sided tape. I added some Little Birdie Flowers that had been dry brushed with the magenta paint. To complete the project, I stamped part of the large image from The Folk Art Garden onto card, coloured it with water based pens and cut it out, before adhering it to the paintbrush.

To create my second project, I cut a piece of smooth 160 gsm ivory paper to the required size, and made a gelli print. I used two colours of Distress Ink, and added a textured pattern to the plate before I pulled a print. I added the stamped image from The Folk Art Garden all over the background using Sepia Archival Ink. I stamped the sentiment onto a spare piece of paper created in the same way.

To complete the card, I added a strip of hessian, and some toning ribbon before adhering the background to a card blank. The sentiments on this stamp set are so useful to add to a card for someone who needs a bit of encouragement or positivity.

I will be back next month with more projects to share with you. Don't forget to look out for Lesley and I on Hochanda on Tuesday at 10.00 a.m. and 3.00 p.m. with some brand new stamps. Lesley will also be featuring on the screen on Sunday and Monday, so you will have lots of opportunities to see her in action!

Thanks for stopping by,

Judith xx

Friday, 29 March 2019

Ornate Floral (by Zoe)

Good Morning Lovelies and welcome to my final post this month.

Whoa! These stamps are stunning, I really loved using these, especially the large one, and boy is it large! Such a versatile set tto.

So I used a greyboard tag from the website, I did gesso it first and used spray inks to colour it. I had to apply it several times to get some depth of colour as they don't seem to like gesso. Once I was happy and it was dry I just heat embossed using a Versafine Clair inkpad in Nocturne and clear embossing powder. I used a white paint marker pen to highlight some areas, which I think makes it 'pop', a couple of glassy gems, and gold gilding wax around the edge, and voila!

I used the 'Wrinkle Free Distress' technique using Distress Oxides and Distress Inks. I edged using Distress too, simply stamping, coloured a few areas using Sparkle Brush pens, and a white paint pen. I stamped again onto some scrap card for the butterfly which was also coloured with Sparkle pens and cut it out. I added some dots and dashes around the edge to create some depth with a fine nibbed marker pen.

Now this is my favourite! I heat embossed in white onto watercolour card, I wet it and just added watercolour paints and watched the magic happen, such a simple but effective technique. I mounted it onto some card from packaging that I had gessoed and edged with silver gilding wax to create a plaque.

Three little greyboard tags from the website, I just coloured them using Distress Oxides. I used a harlequin stencil from my stash. In the same shades of Oxides to add some texture, I added simple stamping incorporating second generation stamping to get some interest going. Little greyboard hearts I had in my stash that I'd added texture paste to through a stencil.


Thank you for visiting. We will be back next month, have a wonderful day.


xx Zoe xx

Wednesday, 27 March 2019

Dressmakers window by Brenda


Hello all, Brenda here with my last post of March and some more Sewing Room inspiration.

My top creation was inspired by a recent trip to Paris and the fashion houses and I saw one that didn't have any beautiful dresses but instead was luring their clientele with the lure of a window display of dressmakers mannequins. So I stamped three of the images from Floral MannequinsThe Sewing Room and Haberdashery, created a window with a die and used some lace, a window box, and a brickwork wall using an embossing folder.


Next a canvas, a base of gesso and texture paste through stencils and sanded it down a little when dry then sprayed dylusions which I watered down a bit to tone down the colour. The same colours onto the chipboard Butterfly which I then stamped with the beautiful new Folk Art Garden and added some of the sentiments from the same sent.


My final piece is another using Folk Art Garden stamped with Versafine onto purple vellum and heat embossed with detail white powder. I stamped the Butterfly twice more and cut out to decoupage mounted onto a white card base and some purple ribbon down the side.

My thanks for your visit today, your encouragement is always appreciated.


Tuesday, 26 March 2019

Fashion ( By Marga )

Hello everyone, Marga again to show you something


This card I made with a scrap paper and the stamps I embossed with silver embossing powder, and then cut them out and put them on the card.


The background I made to fit, stamped the edges with Versamark and then embossed it with white embossing powder. Then I made the background with Distress Ink in different colours. I stamped the images with red ink and some parts I cut out and then put it on the card. I also put some lace and buttons on the card.


Hugs Marga