Pin It button on image hover

Sunday, 12 June 2016

Cards in a Flash- More Quick and Easy Projects

Hello everyone, are you looking for simple, easy cards to make? Do you feel put off by complicated designs and that they are beyond your capabilities? Are you looking for quick batch cards, or designs to make for craft stalls? If any of these questions apply to you, then we have the solution to your problem. Twice a month, the Design Team, and the Guest Design Team come together to create cards and projects that take no more than fifteen minutes to create. We want to show you that simple can be just as beautiful and effective as something that has taken several hours to make. There are so many fabulous Chocolate Baroque stamps that you may already have in your stash that could be used to create some of our examples. We hope that you will enjoy our selection in the first of our posts for this month.

Anne has created some lovely tags to match some cards that she made previously. She combined the cards and tags in the end to create a fabulous stationary set. Her tags would make a beautiful addition to any gift. By choosing different coloured background paper, but using the same stamp, and some glitter pens, you can create a beautiful co-ordinated set in a very short space of time:
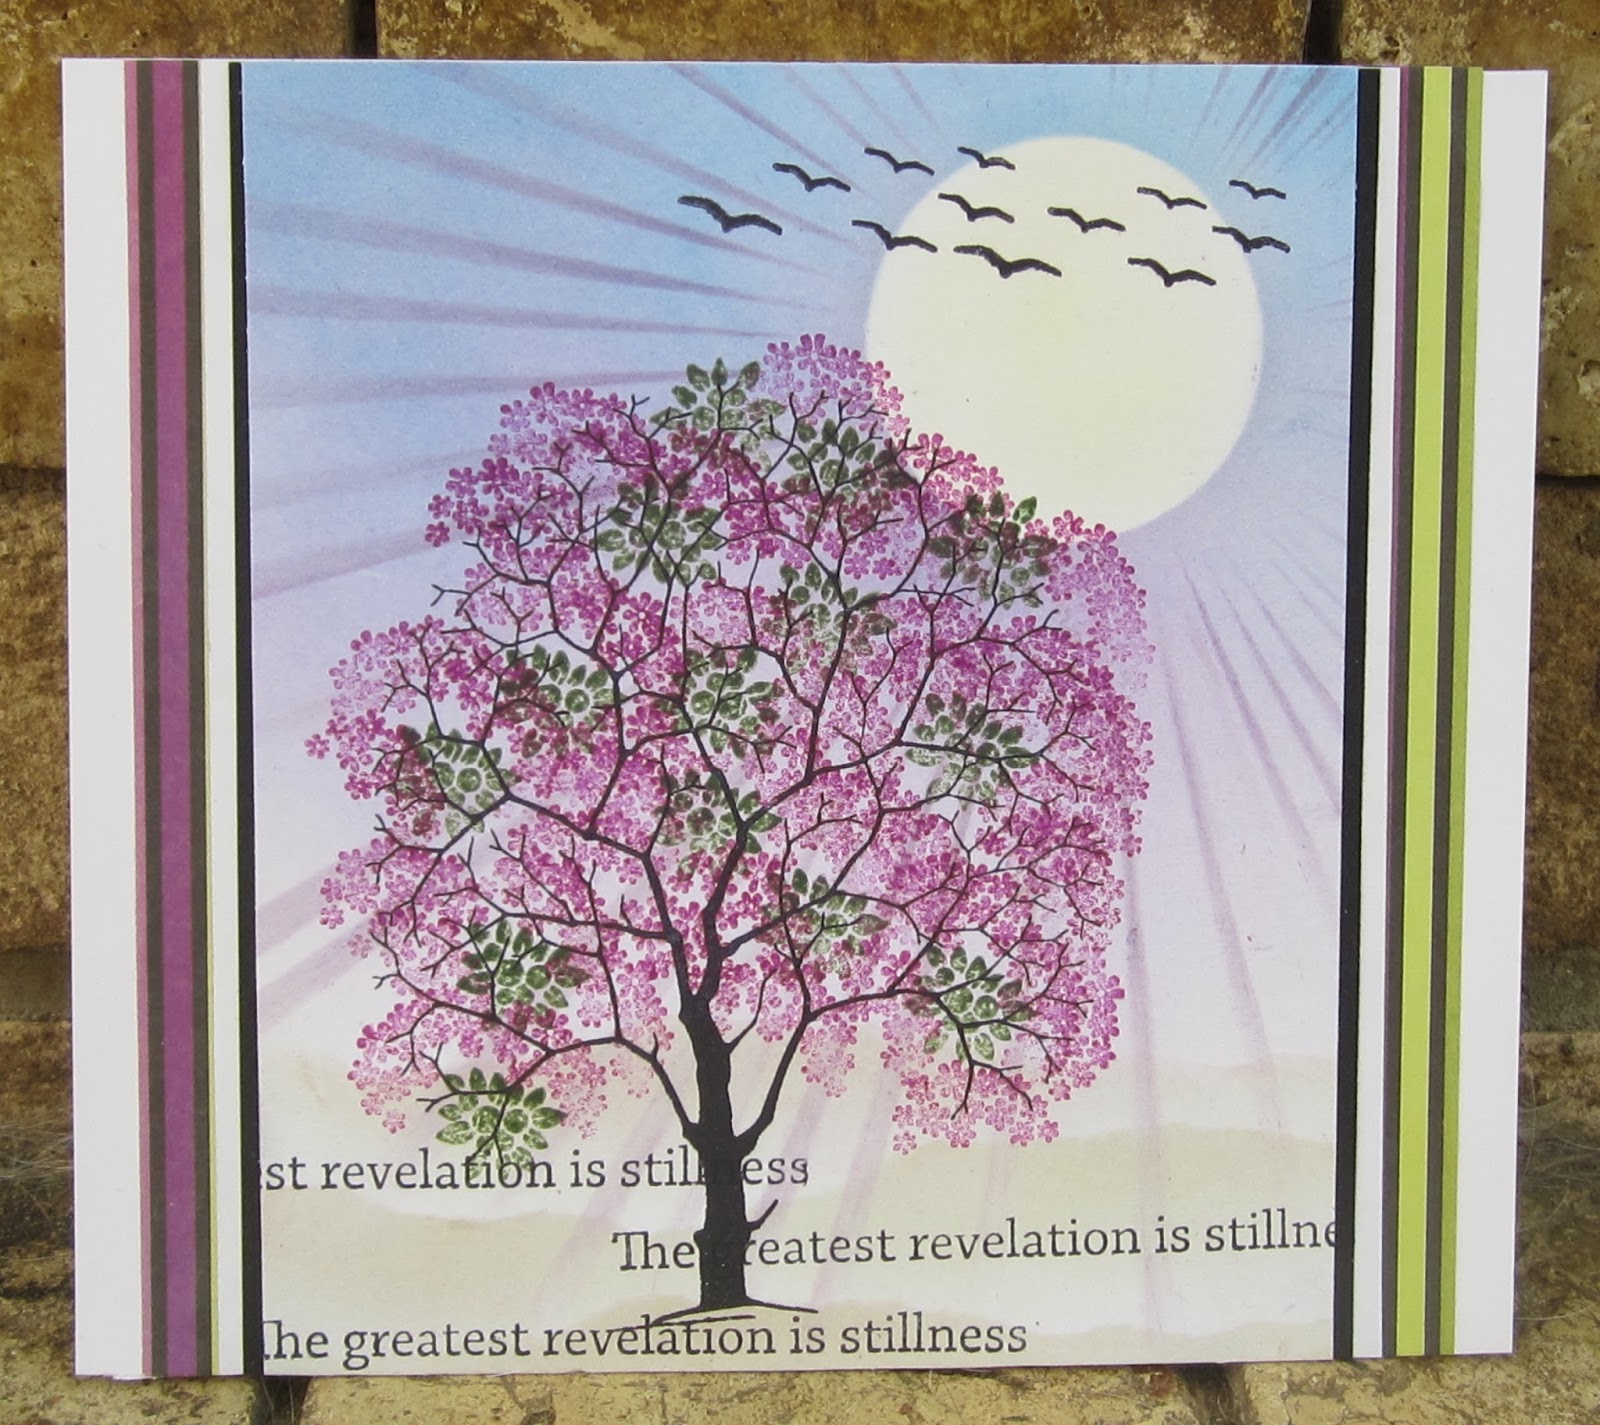
Brenda has created two beautiful projects for our post this time. Her first card uses Pan Pastels to create a beautiful soft background, masking the sun, before applying the pastels. She used Distress Ink and a stencil to stencil in some sun rays. She stamped a tree from the Spinney stamp set in Black Archival Ink, and used two of the small stamps in the set to add leaves and blossom, using Distress Inks. Finally, she repeat stamped one of the sentiments from the Words of Inspiration stamp set.
For her second card, she stamped the butterfly from the Butterfly Flourish Swirls stamp set with Versafine Onyx Black ink and heat embossed with clear detail powder. She then coloured the butterflies with Brushos Lilac and Yellow. Next she stamped a sentiment from the Pretty Poppies stamp set along the bottom of the piece, and using a fine line pen and a ruler, drew a box around to frame the stamping. She then matted and layered onto co-ordinating cardstock.
Claire has created a super quick five minute card, using Dylusion sprays to create her background, and added a gold embossed peacock as her focal point.

Dominike has made some beautiful vibrant backgrounds for her cards using Brushos. These are just perfect for creating quick cards, and every background is different. Whether you choose to use an image, or a sentiment as your focal point, as Dominike has done in her final example, you can create stunning cards.


I know that it is currently very warm, and the last thing you are thinking of is preparing for Christmas. However, I have created three Christmas card ideas for you, because it is never too early to start getting your Christmas cards started! I have used embossing on all three cards, and Brushos, selecting some of our Big Bold Background stamps, which make creating cards so quick and easy.
For this first example, I chose blue and purple Brushos, added white embossing, and stamped the sentiment onto a scrap of card which I trimmed from the original background. I added a few gems in the centre of the snowflakes, and used blue card for matting and layering.
This second card was completed in much the same way, using gold embossing, but sprinkling the red, yellow and orange Brushos onto the baubles, and using the green for the background areas, before spritzing with water. I left the card to dry naturally before matting onto co-ordinating card.
For my final card, I stamped with Versafine OnyxBlack Ink, and used clear embossing powder, for a crisp image. I painted the baubles using green, turquoise and lilac Brushos and a waterbrush. I then painted the background areas liberally with a waterbrush before sprinkling Black Brusho onto the areas very carefully. Again, I chose a toning card to mat the background.

Magda has created a very pretty card using a gelli plate background and our newest clear heart stamp. She has added some glitter detail to the flowers.
Finally three colourful samples from Zoe. She has used her gelli plate to create the first two shaped cards.

Her third card is so cheery with these bright zingy colours, and upbeat message.
We hope that you have enjoyed our varied selection this time around, and that we have inspired you to create something using the tips and techniques that we have shared with our projects. You can click on any of our names to visit our blogs, where you will see lots more inspiration. Look out for our second Fifteen Minute blog post coming later in the month.

Thanks for stopping by,


Saturday, 11 June 2016

Tulip Journal Page (by Shilpa)

Today sees the first post from Shilpa as a regular member of our Design Team, she is making the move from the Guest Design Team to become one of our regular contibutors. We would like to welcome Shilpa to her new role.

Shilpa writes:

Hello everyone, I am sharing my mixed media journal page today for which I've used the Chocolate Baroque Spring bird Tulip stamp set.
To create the background, first I adhered different washi tapes onto the page.

Next I spritzed blue and green inks randomlly on the surface, I used more water to spread the colour on the surface. Dried it with a heat tool.
For extra texture I applied coloured Gel medium through a stencil.
My focal point are these wonderful tulips, which I stamped in black Archival Ink. I've also stamped cute dragonflies from the Just Butterflies stamp set.

I hope you liked my journal page. Thanks so much for stopping by, Shilpa.

Friday, 10 June 2016

Palm Fan Dream (by Julie)

Hello and welcome. I hope you are loving the new Ornament stamps this month. I have had so much fun playing with them and today I have two creations to show you, made with the pretty Palm Fan Baroque Ornament


My first card is on a base of Kraft card, which I have then matted with a piece of wood effect, embossed card. I decided to keep it pale so just sponged over some Old Paper Distress ink.
The Palm Fan was stamped and embossed with white embossing powder, onto Kraft card, coloured with Polychromas pencils and then cut out with a circle die. I inked up the stamp with Potting Soil Archival ink and stamped twice onto shrink plastic. Before shrinking I punched a small hole in each of the images so that I could attach a jump ring to each piece, making it easier to attach the cord. Once the beads and shrink plastic Ornaments were threaded I attached the cords to a hat pin with 3 more jump rings. Both ends of the hat pin have been secured with foam pads and the main image placed over the top.


My second design is a bit of a play on the Dream Catcher theme. As before I have stamped and embossed with white powder onto Kraft card and coloured with Polychromos pencils followed by die cutting with a circle. I then punched three holes along the bottom of the circle for the jump rings, so the acetate feathers could be attached. 
The feathers are from Dawn Chorus which I stamped with purple Staz-on and then cut out. I punched a hole in each and attached the jump rings so that the cord could be attached.
The Dream sentiment is from Artistic Expressions and the background is Dusty Concord and Abandoned Coral sponged over the card using a piece of kitchen towel.

Thank you for popping in and please call back tomorrow for some more Design Team Inspiration.

Julie xx

Thursday, 9 June 2016

Alcohol and Baroque Ornament (by Dominike)

Hello

Few weeks ago I made a workshop introducing alcohol inks. So, after that, I had a lot of tries.
It is the opportunity to show you two cards made with those tries.
I used : alcool ink, rodhoïd, cardstock, glossy, black stazon  and the beautiful stamp here.


I hope you enjoy.
Kind regards.

Wednesday, 8 June 2016

A song in your Heart (by Rachel)

This week we welcome back Rachel Fisher in her second guest design team spot.  Rachel has been combining several stamp sets with Brushos to create this fiery card. Enjoy


Hi everyone

So nice to be back here in the Design Team blog.  My design this week is all about contrasts, I love the idea of the bird silhouetted against the bright sky, almost like a morning sunrise.


To make the topper I used reds and orange Brushos for the background then overstamped using the main image from Let Your Heart Sing.


To create the card background I have used a combination of distress inks in similar colours to the topper and then I stamped images from the same set with Archival black ink. Finally I added a couple of stamps from the Texture Fragments set..

Hope you like the splash of colour, see you again next week

Rachel x

We love colour Rachel so this is a great start to the day. Look forward to seeing your next post.

If this design has inspired you then please drop by again tomorrow to see more wonderful artwork from our fabulous Design Team girls.


Tuesday, 7 June 2016

Teardrop Bag (By Magda)

 Teardrop Baroque Ornament Bag

I needed a little shoulder bag for my quick shopping and I decided to do it with the new Teardrop Baroque stamp of Chocolate Baroque.

For this project you can follow the instructions of any pattern or tutorial of a simple fabric shoulder bag or make up bag.

You might have:

1. Chocolate Baroque Teardrop Baroque stamp
2. Distress Paint
3. Brayer
4. Gelli Plate
5. Cotton Fabric
6. Quilt padding
7. Sewing machine
8. Scissors and thread
9. Zip

Step by Step:

1. Distribute the colour with a brayer on the Gelli Plate
2. Put the stamp on the Gelli as if it is an inkpad.
You will so lift colour from the Gelli and could stamp it on a cardstock. On this way you don't waste colour and you can use the cardstock for a later project. Stamp on the Gelli and on the cardstock until you are happy.
Clean immediately the stamp with warm water.
3. Put the piece of cotton fabric on the Gelli, press firmly.
4. Lift the fabric and let dry.
5. Repeat points 1-4 for all of the pieces of fabric you need for doing your project.
6. Stamp Teardrop Baroque Ornament stamp with Versafine or Archival on the front and back piece of your bag.

Assemble, sew all the pieces as explained in your pattern and have fun with the new stamps and all the other products of Chocolate Baroque!  

Magda


Monday, 6 June 2016

Gilded Ornament (by Asha)

Hello everyone. Are you having fun with the new Baroque Ornament stamps? They are absolutely gorgeous. I've got an easy card project to share with you, featuring the Palm Fan Silhouette Baroque Ornament stamp.  It is a luxurious blend of spice and gold and full of eastern promise.

I prepared the back ground with Distress Inks. Then, I stamped the ornament design 3 times and heat embossed them in gold. After fussy cutting them in one piece, I adhered it over the prepared card base with foam tape.

The greeting is from Loving Sentiments A5 stamp sheet.


I had so much fun with this project. I hope you'll give it a go too. Over at my blog I've got details of tools and products. And don't forget to swing by often for more crafty inspiration from the rest of the team. Thank you for stopping by and have a lovely day!

Beijinhos,
Asha


Sunday, 5 June 2016

Textured Ornaments (by Judith)

Hello everyone, I have two cards to share with you today, using the current stamps of the month.

I have used the Palm Fan Baroque Ornament stamp to create my first card, creating a wrinkle free distress background using a palette of blues and greens. I added a stencil over the top of the background. The sentiment is from the Birthday Words stamp set.

For my second card, I created a wrinkle free distress background as before, using a colour combination of blues and purples, and used the Tangled Baroque Ornament stamp as my focal point. The sentiment is from the Words of Gratitude stamp set.

Further details of how I created my cards can be found on my blog. I hope that you have been enjoying the inspiration provided by the Design Team using the Baroque Ornaments, do keep checking back for daily posts from my team mates. Thanks for stopping by, Judith xx

Saturday, 4 June 2016

palm fan


Good morning everyone, today I have two brusho cards using the new palm fan stamp - I love these new versions of mandala stamps, and kept my first efforts simple.
For both of them I started by stamping several times with versamark ink on heavy card and embossing with white powder - if you have a clean versamark pad (mine are definitely on the black side of grey!)  you can just emboss with clear powder to get the same effect.
For the first card I also stamped the image in black on a spare bit of the card and clear embossed it. Both pieces of card were then sprinkled with turquoise and lime powder , spritzed with water and left to dry.
The larger bit was cut down to fit a 6"x6" white card blank with a dark turquoise mat, then the separate image was cut out and added with
sticky pads

For the second card I stamped the first image and black embossed it, then stamped the others around it and embossed with white powder. Brushos were lemon, orange and ost red this time.
Base card is still the 6"x6" white, with a black mat, and this time I coloured the edge of the image with a black marker pen to add a bit more definition.

There are some gorgeous creations coming up on the blog, everyone is loving working with these stamps,  so keep checking!

Hopefully the weather will be better this weekend, it has definitely been stay in and craft weather here lately!

Veronica


Friday, 3 June 2016

Tangled Baroque Ornament

Good morning folks,Claire here with a  little tag made with one of this month's gorgeous new stamps. This one is called Tangled Baroque Ornament but there are a whole selection of these beautiful mandalas, you can find them here.


I began with a piece of card from my scrap pile, it had a crackled background but I didn't like the colour so I recycled it by applying metallic acrylic paints and once they were dry I lightly applied some gilding wax to highlight the crackle.

I stamped the image four times and embossed with gold embossing powder and then painted them with distress inks (I used Peeled Paint, Forest Moss, Wilted Violet and Picked Raspberry). I cut the layers out and layered them up with 3d foam pads. To finish off I added some die cut swirls and a little scrap of rainbow ribbon attached with a brad.

Thanks for visiting today, I hope you're enjoying this month's new releases, we've had loads of fun with them!
Claire xx


Thursday, 2 June 2016

Baroque Ornaments by Zoe

Good Morning Lovelies, today I'm sharing 2 projects I've made using the gorgeous Baroque Ornaments

The first card you may of seen on the website already advertising the new stamps? aren't they pretty?

So this card I used mica spray inks and simply stamped the Palm Fan stamp using Versamark Inkpad and heat embossed using Black fine detail EP, I stamped onto shrink plastic using Stazon ink and coloured using the same inks with a paintbrush and shrunk it down, I used a bookmark tag for which I stamped my sentiment and adhered it all onto some black card.

I used an MDF heart that I had in my stash and simply melted 3 colours of EP onto it, I used my pokey tool to stir it up a bit once it melted to create a sort of marbling effect, I then inked up my Palm Fan stamp with a Gold Pigment Inkpad and stamped straight into the molten EP, held it there for a few seconds until the EP had cooled the carefully peeled my stamp off, I was happy that the EP didn't go right to the edges as I wanted a "shabby" effect, I then applied some gold gilding wax to the design and around the edges of my heart.

I hope you like my projects, I love these stamps, so pretty and versatile, please pop back each day and check out my fabulously talented teamies creations, have a wonderful day xx Zoe xx


Wednesday, 1 June 2016

May Blog Comment Winner


Hello everyone, we hope you are doing well.

Once again we would like to thank you all for your visits here at the Design Team blog.  We truly appreciate the time you take to let us know your thoughts about our designs.  

Each comment in May was assigned a number and we used Random Org to draw a winner.  Congratulations to Chris Creswell you have won a £15.00 voucher to spend on Chocolate Baroque stamps!  Please send a quick email here to confirm your email address and Lesley will send you your gift certificate.

Lesley will be giving a £15 gift voucher to another lucky winner drawn from June's comments. The more comments you leave the better your chances to win! 

Thank you for your kind words and comments,
Good luck from the Design Team!


Chocolate Baroque Reader's Gallery- Showcasing Your Talents

Hello everyone, today we are sharing some of your artwork on the Design Team Blog, taking a wander around Facebook, Pinterest and Blogland, to showcase how talented you all are. The Design Team enjoy creating projects to inspire you, but we love to see what you create once you receive the stamps yourselves. This monthly blog post is a chance to reflect on the enormous variety of creativity that is going on with the stamps and products at home, in workshops and in craft clubs, both here in the UK, and internationally.

Found on the Chocolate Baroque Facebook Page:

These are from Corine van Kuilenburg:


It is great to see some new names cropping up on the Facvebook page, as well as our regular contributors. Here are a few projects from some members that have not featured before. Thank you so much for adding your photos.

Denise Wrighton has made a lovely card in vintage colours.

Linda McCormick has created two vibrant dragon cards using Brushos for her backgrounds.

Lorraine Porritt has made a fabulous clock using images from the Fancy Flower stamp set:

Nadia Vanhamel's beautiful floral card would be perfect for so many occasions.:
Shirley Deatcher's card is so elegant:
Eva posted these on the Facebook Group, but they were found on her blog first:

Eileen has been preparing more fabulous workshop samples, and one of them uses Chocolate Baroque stamps:
Jane has been creating some beautiful projects for her blog:

Here's something colourful from Miranda:
Something from Barbara who has been creating with her watercolours lately:

Finally, we had to squeeze this one in from Maria, because we missed it last month!

What a great feast of talent again this month. We hope that you have enjoyed the selection, and will be inspired by the wealth of wonderful projects that we have managed to find. We would love to share more of your fabulous artwork each month. If you would like to forward your photos directly to us, because you do not have a blog, ot access to the Facebook Group, then please email a good quality photograph, along with your name to Lesley on sales@chocolatebaroque.com and we can then include the pictures in the blog post as inspiration for others. Please do not be shy!

We will be back next month with anotherpost, so please keep posting photos of your projects, so that we can see what you are creating.