Pin It button on image hover

Sunday, 29 November 2015

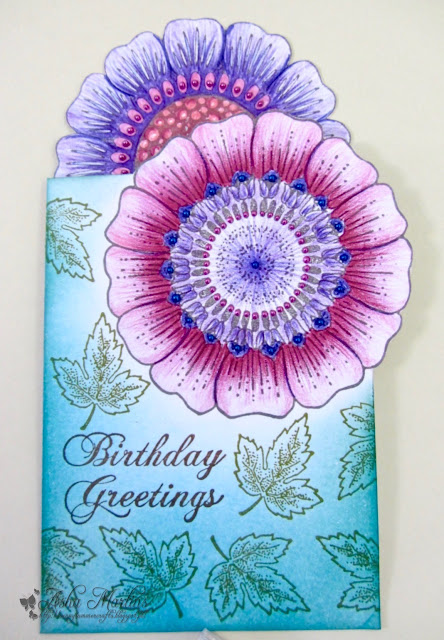
Double Flower Power (by Asha)

Good morning, friends. I'm still playing with the new Flowerhead stamps and today I've used 2 -  Dotty Centre Flowerhead and Circle Centre Flowerhead - to make a one layer card.
  1. Start by stamping one flowerhead in the top right hand corner in the front of the card base and another in the top left hand corner inside the card.
  2. Trim the around the flowerheads so that they stick out of the top and side edges. 
  3. Colour the flowerheads. I used Faber-Castell Polychromos.
  4. Start at the edges and continue to blend the Distress Inks inward. Stopping short of the flowerheads creates a halo effect.
  5. Stamp a greeting from Birthday Words A5 sheet and fill the rest of the card with leaves from Autumn Poppy A5 sheet.
  6. For a final flourish, little droplets of Liquid Pearl and a few strokes of Clear Wink of Stella pen on the petals.


This is the inside of the card. As with the card front, I inked the inside edges with Distress Inks too.

So there you have it - a floral one layer card, perfect for mailing. I hope you'll give it a try. Details on tools and products used above are available on my blog.  Don't forget to stop by for more fabulous makes by my team mates.

Thank you for stopping by today and have a crafty weekend!

Beijinhos,
Asha

Saturday, 28 November 2015

Christmas Flower (posted by Judith)

Hello everyone, I have another project using one of the large Flowerhead collection stamps to show you today. I have really enjoyed creating projects with these lovely large stamps, great for that focal point on a card. I have chosen to use the Circle Centre Flowerhead for this project.

I created my background by covering a gelli plate with turquoise ink, using a brayer. I used a piece of white card to take a print from the gelli plate. This is a really quick way of colouring a piece of card if you want a single colour. Once the card was dry, I stamped and embossed a harlequin design from the Harlequin Fragments stamp set onto the background, using gold embossing powder. I added some droplets of red ink over the rest of the background, and a little bit of gold shimmer, using a gold pen.

I stamped and embossed the flower onto red vellum twice, using gold embossing powder, and cut it out. I added a leafy die cut, and dark green matting to complete my card.

Thanks for stopping by, Judith xx

Friday, 27 November 2015

Brusho Swirl Flowerhead (by Veronica)


Hi everyone, today I have two more cards using the Swirl Centre Flowerhead cling mounted stamp and brusho powders.


This first one is very simple, just the flowerhead stamped into one corner and embossed in white, with turquoise brusho powder. The white 7” square base card is randomly stamped with the same flowerhead using broken china distress ink, which had also been sponged round the edges.


For the second one the background is randomly stamped with the flowerhead, also white embossed, then sprinkled with turquoise and cobalt blue brusho and sprayed until the colours run together. The Flowerhead is stamped on to black card and embossed using a shocking pink powder, cut out and glued onto the background, then onto a black A5 card blank.

I am really enjoying playing with these big stamps and hope you are enjoying seeing all the different ideas from the DT. There are full details of how I made both of these cards on my blog.

Thank you for visiting our blog today, please drop in again to see more gorgeous examples using the large flowerhead stamps.

Veronica

Wednesday, 25 November 2015

Guest Post - Vintage style by Shilpa Nagaonkar

It seems all too quick that we have come to the last of our Guest posts from Shilpa and this week she is delighting us with a gorgeous mixed media project.

Hello everyone, hope you are having great week!

I've my third GD post today to share with you. It is a grungy vintage style mixed media piece which I've created with Chocolate Baroque Key to My Dreams stamp set and Deco Art Media Products.


Here is the procedure I followed:

I started with stamping the Keyhole stamp with Mermaid Lagoon distress ink, sprinkled clear embossing powder on it and heat set it with heat tool, it is a beautiful stamp.

For the brown background I applied Deco Art Quinacridone Gold on chipboard, dried it completely and stamped texture on it with one of the texture stamps from the Abstract Fragments stamp set. For the crackle effect at the edges I applied Decoart clear glaze.

To make the patina background, I adhered cogs die cuts to the surface and applied gesso on it. Next several layers were with Decoart Cobalt Teal Hue, Titan Buff and Quinacridone Gold fluid acrylics. I let it dry completely and stamped on it with another texture stamp from Abstract Fragments using Jet Black Archival ink.

I layered all pieces with foam adhesive and my project was ready.


Thanks so much for stopping by today, I have enjoyed showing my designs and look forward to seeing you again soon.

We would like to extend a huge thank you to Shilpa for her beautiful and creative work during the last three weeks, her interpretation of some of the older Chocolate Baroque stamps has been inspirational. We will be seeing more of her stunning creations again next year and hope that you have enjoyed seeing her designs as much as we have.

And remember there are more great ideas to come from our Design Team, so please join us again soon. 


Tuesday, 24 November 2015

Cheery Flowerhead Top (by Anne)

Good morning. Today I am sharing a stamped and coloured T shirt top using the gorgeous Flowerhead stamps and alcohol ink pens to colour. I had ruined this top while cooking a curry and couldn’t get rid of tiny yellow stains splashed across the front. Now you would never know that they are there.

I hope that you like this fun project. We need some summery florals to brighten up these darker winter days.


Materials:
  • Flowerhead stamps (Mesh Centre, Daisy Ring and Dotty Centre), Leaf from Tall Trees stamp set
  • Dye based inkpads suitable for fabric (black and dark blue)
  • Alcohol ink pens (citrus greens, yellow, pinks, orange, greenish blues and turquoise)

 How to do it:
  1. Wash and dry the item thoroughly and do not use conditioner.
  2. Place some scrap paper under the shirt to absorb any ink that may bleed through. Stamp the Flowerheads with black ink and the leaves in blue ink.
  3. Colour the images with alcohol ink pens. Note: it is not possible to get controlled colouring and blending as the ink instantly sucks into the fabric. I used absorbent cartridge paper underneath to take up the excess ink (keep the stained paper to create backgrounds on your cards – it looks quite pretty). I used the lighter more transparent colours for the main colour fill (so as not to obscure the stamp detail), then added accent shading with the darker colours.
  4. Leave overnight for the inks to ‘set’ into the fabric. Iron fix with a dry iron (at the hottest setting that your fabric will tolerate) to make the images and colouring permanent and washable.
Anne x.

Monday, 23 November 2015

Flowers of ice (by Miranda)


Hello lovely people,

Where I live (in the Netherlands) the weather is changing.....it's getting colder and it feels like Winter is finally coming. So to stay in the same sphere I created some flowers of ice with one of the new flower heads. I have used the Circle center flowerhead. I like all the six new flower heads and could not make a choice if I had to......so they can also be bought in a multi-buy which saves you some money and than you can play with all of them!

I had already this icy coloured background in my stash, made with fluid inks on water based paper and some salt effects. As you can see I have also used some sparkling paste through a stencil on the background.


I have stamped the flowers using Memento de Luxe in different colors for each flower. Than I have embossed them with Wow clear silver highlight embossing powder which has a lot of holographic sparkles. I coloured them with water based markers and decoupaged them.

The word Bliss is from the Artistic Affirmations sheet.

From a different angle so you can see the sparkle even better.......

I hope I have inspired you with these flowers of ice.......
Thanks for your visit and hope to see you next time!


Sunday, 22 November 2015

Acetate Flower Post it Holder (posted by Claire)

Good morning folks, Claire here (again) as I got confused and posted this Friday instead of today, still I'm very easily confused lol. My project today would make an idea stocking filler made using the beautiful Dotty Centre Flowerhead stamp.


I stamped the Flower on heat resistant acetate using Versamark ink and embossed with Gold Embossing Powder. I cut the flower out and snipped in between the petals before bending each petal up a little. I stamped the center of the flower again on a scrap of my background card, embossed with Gold Embossing Powder and then cut otu the centre and layered it up over the acetate flower. This enables you to glue the flower onto your projects without seeing the glue.

It was at this point that I decided to make a post it holder as popped the flower to dry on top of some post it notes and realised it was a perfect size. I didn't bother to measure anything, just used the pad of post-its to score a strip of white linen card to fit.


I cut some scraps from my stash of inky backgrounds to cover the white linen card, edging each piece with a gold Krylon pen. I attached the pieces of background to the linen card, trapping a scrap of ribbon at each end of the inside to create a fastener.

I stuck the flower to the top of my little project and to finish off I added some dots of faux pearls to the flower.

Thanks so much for visiting, hope you're enjoying these gorgeous new stamps
Claire xx

Saturday, 21 November 2015

Flowerheads by Zoe

Good morning Lovelies, I'm back with my second post this month using the beautiful "Flowerhead" stamps they are stunning and such a great size.

Today my designs are Monochrome.

My first card is very simple, I first created a mask on scrap paper, using a stitched circle die set I cut various sizes using a white Linen Texture card and just simply stamping off the edge and covering with the mask to repeat stamping using Versafine black tuxedo inkpad, I just stamped parts of the Flowerheads onto the smaller circles and using mounting foam to create dimension, the sentiment is from "Fantastic Florals" set.

I used a Linen texture card for this card and using a Crealies Patchwork die cut out I stuck it together using lo tack tape on the back and stamped the Flowerheads on the front using Versamark inkpad and a Silver Detail embossing powder, and just simply stuck it all on the base card and mounted onto some silver mirror card, I used some liquid pearls for a bit of bling, the sentiment also heat embossed is from the "Words of inspiration" stamp set

Thank you again for visiting I really love to read your comments, have a wonderful day xx Zoe xx


Friday, 20 November 2015

One Stamp Dotty Flowerhead Card (by Debbie)

 
Good morning,
 
I decided to make a card with lots of colour.
I used the Dotty Centre Flowerhead as a one stamp card.
 
 
After several attempts with small inkpads and brush marker pens with not a lot of success. They either dried to quickly not laying down much colour or the ink mixed more than I wanted. These stamps are large and I wanted multiple colours on each flower. I turned to my water soluble oil pastels and am delighted with the results. There are many brands of water soluble crayons.


For the background I  coloured the Flowerhead stamp with the purple pastel, next the pink then the orange. Because the flower is large you can colour it easily. When finished colouring spritz with water and stamp onto the card. I repeated stamping the flower, spritzing with the water each time. When the flowers had been stamped all over the card I used Picked Raspberry on the edges.
I used Picked Raspberry, Squeezed Lemonade and Rusty Hinge Distress inks for the tag and stamped with a Black Versafine inkpad. The sentiment is from Positive Beauty clear stamps.
I'm keeping this card on my desk for a while so I see it  before looking through the window at the dull skies.
 
Have a great day
Debbie

Thursday, 19 November 2015

Double the stamping fun (by Lesley)

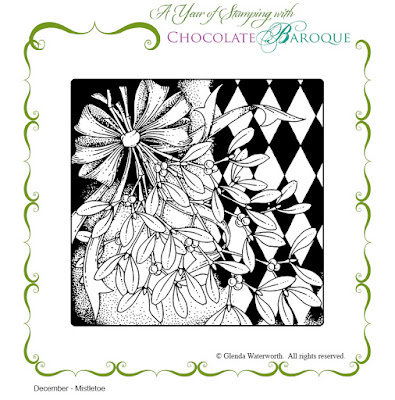
Today we are launching not one but two Year of Stamping stamps, November and December. The reason being that the December stamps depicts a splendid bunch of mistletoe so we reckoned that releasing it Christmas week was perhaps a touch too late!

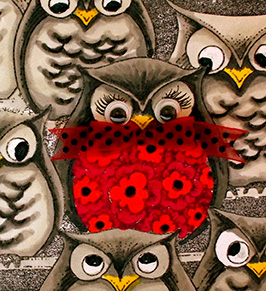
So what can you expect from these last two stamps. Well November's offering is a wonderful collection of owls who seem to have a stranger in their midst.


I know you are going to have so much fun with this stamp and I do like Sue's humour in giving the big owl a flowery chest.

December's stamp is a gorgeous design celebrating the wonderful mistletoe plant which is tied with a very elaborate bow of ribbon. This cries out for colour and bling and the Design Team girls have come up trumps again with some wonderful festive projects.


Of course two stamps means two magazines and the final issues are filled with inspiration, offers and technique articles that will have you sitting down with several cups of tea whilst you enjoy some cracking great reads. Here are a couple of sneaky peaks of what is inside.


If you have just landed on this page for the first time and don't know what the 'Year of Stamping' is all about then please click here to find out how you can enjoy this fabulous stamping excursion.

Sadly, these are the last two stamps for this year, I hope you have enjoyed each month's release and that you will join us for more stamping fun next year, you never know what we have in store for you!.


Wednesday, 18 November 2015

Guest Post - Spring in November by Shilpa Nagaonkar

On a cold and very dark November day it gives me such please to welcome our Guest designer Shilpa, back again this week with a beautiful canvas that is a real ray of sunshine and guaranteed to blow away the wintery looking skies. Over to you Shilpa.


Hello everyone, I am back with my second GD post. Thank you so much for the lovely comments for my previous project Altered Oval Plaque.

Today, I would like to share with you a canvas, for which I've used Chocolate Baroque Spring Bird Tulip stamp set.

Here is how I made it:

  • On the canvas I adhered Tim Holtz tissue paper and applied Mustard Seed and Mermaid Lagoon Distress Paints and then heat set it
  • Through a net stencil I spritzed Abandoned Coral Distress Stain randomly on the surface.
  • I stamped texture using one of the images from the Chocolate Baroque Abstract Fragments stamp set and archival inks.
  • On another watercolour paper I stamped the Spring Bird and Tulips with Jet black Archival ink and coloured them with Sakura watercolour markers. Cut them in circles and adhered on canvas.


And my canvas was ready.

Hope you liked my project today with the lovely Spring Bird stamp set.

Thanks so much for your visit, I'll be here next Wednesday with another mixed media project.

Shilpa

I hope you all agree this is a terrific way of interpretting the Spring Bird Tulip set and thank you for bringng us something to smile about Shilpa. Look forward to seeing what she has in store for us next week and keep dropping by for more design from our wonderful team.