Pin It button on image hover

Thursday, 27 March 2014

Introducing Patchwork Landscape and new edges


We have some beautiful new stamps for you this month - classic Chocolate Baroque designs from the pen of our very talented artist, Sue.

Our stamp of the month is Patchwork Landscape, a large A4 set full of intricate doodles and landscape elements.
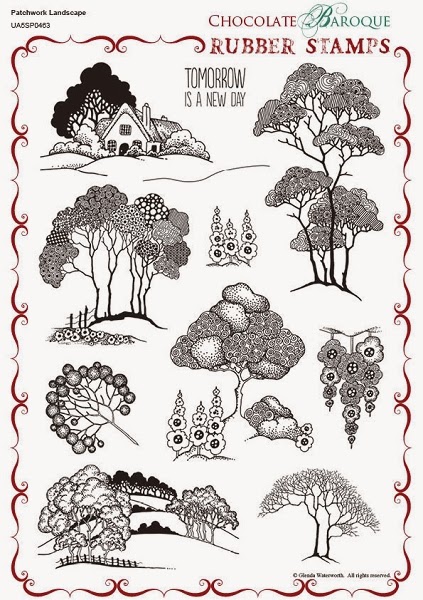
http://www.chocolatebaroque.com/Patchwork-Landscape-Unmounted-Rubber-stamp-sheet--A4_p_5999.html


Then we have two new A5 sets of edges - Springtime Edges with primulas, snowdrops and daffodils

http://www.chocolatebaroque.com/Springtime-Edges-Unmounted-Rubber-stamp-sheet--A5_p_6000.html

 and Elegant Edges with a lovely mix of more exotic leaves and flowers.
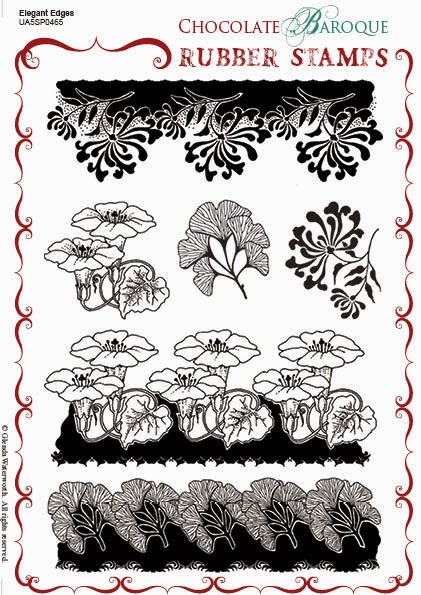
http://www.chocolatebaroque.com/Elegant-Edges-Unmounted-Rubber-stamp-sheet--A5_p_6001.html

The edges are also available as a multibuy.
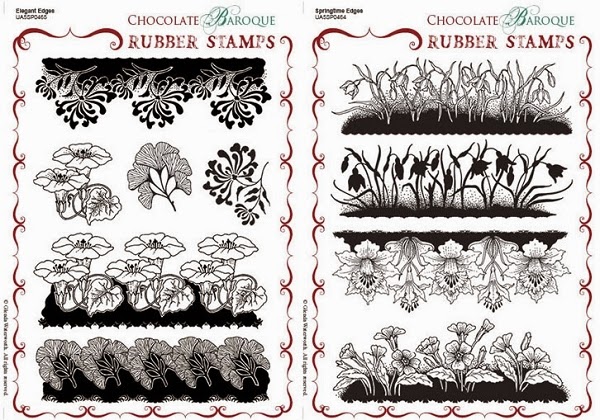
http://www.chocolatebaroque.com/Springtime-EdgesElegant-Edges-Unmounted-Rubber-stamps-Multi-buy--A5-_p_6002.html#

I have a couple of cards to show you with these stamps - the first uses PanPastels.


I created a background landscape using masking tissue to mask off the sun and make some hill shapes, but kept all the colours very soft so there are no very hard edges.  I stamped the little house and coloured it with Coloursoft pencils, then stamped the snowdrop edge along the bottom and coloured with pencils and a white sharpie.

This next card is a very simple, one layer resist card with the honeysuckle edge stamped in Versamark and embossed with clear embossing powder.  I sponged Lilac Posies and Rose Bud Memento inks at the bottom and Canteloupe at the top, then stamped the sentiment from Amazing Birthday. 


If you've never tried resist before, it's wonderful to watch your stamped image emerge as you add colour over it.  When you've finished, wipe over the embossing lightly with a baby wipe to clean the ink off the embossed areas and make the design really stand out.

As always, our new stamps have special prices for their first month, so do take advantage while they're on offer.  You'll always find details of our latest stamps in our New Stamps department over at the Chocolate Baroque shop.

You're in for a real treat this month with artwork from all of our superstar Design Team so watch this space for lots of inspiration. And at some point early in April, Shirley will be announcing which of our lovely commenter's from March has won our monthly gift voucher - it's our way of saying thank you for leaving comments, we all appreciate you taking the time.

Happy crafting!


Monday, 24 March 2014

Sprinkled with Fairy Dust (posted by Claire)

Good morning, Claire here with another sample using the beautiful Spring Fairy stamps and the Fairyland Words which complement them perfectly.


I began by brayering the scene by masking the moon and using torn paper masks and Memento Inks in Pear Tart and Elderberry. I love memento inks for brayer work, the colours are lovely (they are on offer at the minute too, you can find them here). I wanted to create a distressed look to the scene so I splashed on some water and blotted it off with kitchen roll and then set to with a Crafters Workshop Harlequin stencil and Memento Tuxedo Black ink. Next I stamped the images, again with Memento Tuxedo Black and added some colour with Graph'It Markers. For a little sparkle, I stamped the images again on acetate and embossed with black EP and glittered the back. Once the wings were dry I added them with a little silicone glue for dimension.

The sentiment was stamped on white card using Memento Elderberry ink. I then brushed Matte medium over the image, sprinkled with glitter and popped the acrylic tag on the medium while it was still wet. Once it was dry I trimmed the excess card and added a little green ribbon.


To finish off I've matted on white, lilac and then black card and added some green silk ribbon and a lilac paper rose.

Thanks for visiting today
Claire xx

Sunday, 23 March 2014

Spring Fairy and Flowers (posted by Shirley)

Hello everyone, I hope you are enjoying the weekend.

I have a design today using the gorgeous new Spring Fairy Collection.  


The background is a sheet that I printed from the beautiful Leafy Brocade Printable Papers.   The  May Fairy was stamped on water colour paper with Cobalt Archival ink, coloured with Tom Bow markers and cut out.   I added holograph glitter to parts of her dress.  I coloured the die cut flowers with Distress Inks.

Dies:  Crealie Creative Flowers CL CF 20 & CL CF 19 and Memory Box - Pierson Corner.


Thanks for your visit and have a great week,
Shirley

Thursday, 20 March 2014

Magical Birthday Card (by Debbie)

Good Morning. I have another card using the Fairy Castles stamps, Alcohol pens and Distress Inks.
 
 
I cut two pieces of white card and stamped the castle and coloured the trees and the castle walls with pens. Next, I stamped the castle on a post it and drew a circle for the moon. I cut it out and laid over the top of the already stamped castle. I used Broken China for the sky and Peeled Paint for the hills. The clouds were stamped using the Broken China for a subtle addition. Before mounting onto the black I marked two dots on the larger piece of white card so I knew where to colour for the sky and hills. I mounted both pieces and stamped the sentiment.
 
Thank you for visiting
Debbie
xx

Wednesday, 19 March 2014

Into every life a little rain must fall .... (posted by Claire)

Good morning, Claire here with another sample using the beautiful Fantasy Castles, I love this castle image I combined it with the cloud stamps from Magical Landscapes to create a rainy scene.


I coloured the image with distress markers and used Walnut Stain distress ink around the edges of the image. I matted it up on some dark brown card and layered it up over square of card with a brick effect made using a Crafters Workshop Template and distress inks. Again I matted on brown card and layered up over a more muted background made with more distress inks and a brick stamp from Abstract Fragments. The sentiment is on of my all time favourites and is from Loving Sentiments. To finish of I've added a little seam binding bow and an umbrella charm from my stash.

Thanks for visiting today
Claire xx

Tuesday, 18 March 2014

Fantasy Castle with Blue and Green (by Shirley)

Hello everyone, I hope all is well.

I have another design today using the new beautiful Fantasy Castles set.   These castles have so much wonderful detail, I enjoy colouring them with pencils.


The background behind the castle is Broken China and Mowed Lawn Distress Inks using an acrylic block and water.  I coloured the clouds from Magical Landscapes and castle from Fantasy Castles with Prisma pencils which I used Cobalt Archival ink to stamp.   I added glitter to the rain and water fall.

The larger background was created with Salty Ocean and Mowed Lawn Distress Inks again with an acrylic block.   I stamped Wisteria from Wisteria Lane and the trees from Magical Landscape with Mowed Lawn DI ink.   I stamped the brick work using a fragment from Abstact Fragments with Salty Ocean Distress Ink.

Thanks for stopping by and have a fabulous day,
Shirley

Saturday, 15 March 2014

Eastern Adventure (posted by Judith)

Hi Folks, I wanted to show the versatility of the new MagicalLandscapes/Fantasy Castles Multibuy stamp set and made a card with a bit of an Eastern flavour which I am showing you today.

I created a wrinkle free Distress background , and then stamped a large paisley stamp from Indian Elephant using the same colour Distress Ink. I used a palm tree stamp from Peace on Earth showing that Christmas stamps can be used all year round, not just at Christmas! The sentiment is from the Artistic Affirmations stamp set.

I stamped the main image onto a piece of white card using gold embossing powder, and coloured the image with Distress Markers, sticking to the blue and orange theme of the card as much as possible. Finally, I swirled some blue and orange Distress Ink around the edge of the card to soften the white background. I used some Versamark around the edges of the main background card, and added some gold embossing powder, which I heated to melt. Some dark blue card to mat the layers completed the card.


Thanks for stopping by, Judith xx

Thursday, 13 March 2014

Magical Landscape (by Shirley)

Hello everyone, I hope your week is going well.

I have a castle design to show today from the beautiful new Magical Landscape set.


I created the background with watercolour paints wet on wet.   I have a tutorial using this technique at my blog here.   I sprinkled a little salt over the paint while it was wet which created small watermarks.

I stamped the images with Cobalt Archival ink.   The fairy from May Fairy was stamped on separate paper and decoupaged.   I coloured the castle with Prisma pencils as well as the fairy's dress and wings.  I added lots of glitter on the moon and water, but it's hard to see in the photo. The sentiment is from Fairyland Words.

Thanks for your visit and have a great day,
Shirley

Wednesday, 12 March 2014

Fairy Friends (posted by Claire)

Good morning, Claire here with a sunny card made using the beautiful new Spring Fairy stamps. I love to work with sunny spring colours so I really enjoyed making this card.


I stamped the fairy (from May Fairy) and the bird on the grass (from April Fairy) and coloured them with Graph'It markers, adding the grass by flicking the markers. I used PanPastels to add the sky to the little scene. 


The background was made using distress inks in shades of yellow and green. I used the acrylic block technique and then stencilled over them using the same inks with the Crafters Workshop Punchinella Template. I stamped the delicate flourish from March Fairy around the edges. I added a some lace, gingham ribbon, paper flowers and a little bee charm from my stash to finish off and popped my design on a scalloped card blank.

I hope you're enjoying some sunshine after all the rain we've had here in the UK
Claire xx

Tuesday, 11 March 2014

Have a Fairy Happy Birthday! (posted by Judith)

Hi Folks, here's a project for you using stamps from the new Spring Fairy Collection stamp set combined with some older favourites. I wanted to create a gift set that comprised of a card, gift tag and matching wrapping paper, using soft pastel tones. I picked five shades of Memento Ink, and created a background on my tag, and a large piece of white card. I stamped the fairies and butterflies using Versafine Onyx Black Ink. The extra fairies and buterflies are from the Winter Fairy and Autumn Fairy stamp sets.

For the tag, I added a sprinkling of glitter on the butterfly wings and the trail of stars. The sentiment comes from the Fairyland Words clear stamp set. For the card, I added some clouds from the Magical Landscapes/Fantasy Castles Multibuy stamp set and a flower from the Decadent Brocade stamp set, which has been decoupaged. I have added some die cut leaves, and a sentiment as before.The wrapping paper was created using the same stamps as the tag, stamped with each of the ink colours, graduating across the paper.


Thanks for stopping by, Judith xx

Monday, 10 March 2014

Flying High Fairy (by Debbie)

The weather here yesterday was beautiful and perfect for a little tidying in the garden. The spring bulbs can be shown in their glory with all the fallen leaves swept away. I'm looking forward to seeing sunsets this year when the sky changes to a to a rainbow of colours and sitting in the garden crafting.
I started by stamping the castle with black ink and then cut masks for the sun and the landscape. The sun was placed over the castle and the landscape laid over the bottom third. For the sky I used Dried Marigold, Victorian Velvet and Broken China Distress Inks blending each into the next to avoid lines. With the sun still in place I removed the landscape mask and covered the sky and blended Peeled Paint for the hills then tore and moved the mask to create the small hills. The grass at the sides of the scene are from Eastern Grass, this is one of my go to sets as it is so handy. The flying Fairy is from the January set of Fairies and I searched my stash for Shrink Plastic. I stamped her with Black Archival ink, cut her shape out and I'm proud to say when heating she didn't curl and stick. I attached the fairy and stamped the sentiment in the top corner then matted onto black card and trimmed a border around. Many thanks for visiting, Debbie xx

Saturday, 8 March 2014

Magical Spring Fairy (by Shirley)

Hello Everyone, I hope you are doing well.    I'm dreaming of Spring......but we still have 2 to 4  feet of snow on the ground and it hasn't been mild enough to melt much of it.    

I have two cards to show today using stamps from the beautiful new Spring Fairy Collection.   This first one features the beautiful March Fairy.


The background was created with London Blue, Cut Grass and White Linen Dylusions inks.   To create the water marks, I sprinkled sea salt while it was still wet and when dry, brushed it off.    I stamped the fairy from March Fairy & beautiful sentiment from Fairyland Words with Deep Purple Archival ink (it looks blue in the photo).   I stamped the Winter Aconites from Spring is in the Air with Mowed Lawn Distress Ink.   I coloured the images with my Prisma pencils.    I added glitter to the fairy wings and some tiny pearl flowers that I found in my stash.

I also have a CAS design, that was quick to create.  


I cut a circle in card stock and used the negative for a mask.  I blended Squeezed Lemonade and Peacock Feathers Distress Ink inside the circle.  I stamped 'Spring' from March Fairy and the pretty little Robin from April Fairy with Cobalt Archival Ink and coloured it with my Prisma pencils.  I also added some glitter to the foliage and bird. 


Thanks for your visit and have a great weekend,
Shirley

Friday, 7 March 2014

Introducing our new Design Team members

I must start by giving a huge shout of thanks to our current Design Team members, Judith, Debbie, Miranda, Claire and Shirley who have brought you such wonderful inspiration over the last three years.  I'm delighted to say they will all be remaining a part of the team and I'm sure they will join me in giving a warm welcome to our newest members, Maria, Doreen, Asha and Florence.

I'd like to thank everyone who took the time and had the courage to apply to join the design team and I'm just sorry we couldn't take everyone.

Once our new team members got over the shock (and joy) of being selected, I asked them all a few questions to get to know them all a bit better and find out what kind of stamps they like.  Here's what they had to say.

Maria Bellekens


Visit Maria's blog
marjasknutsel.blogspot.com

My first Chocolate Baroque stamp sets were Pretty birdcage and Home sweet Home.

My favourites are the flower and nature stamp sets.  I find my inspiration in nature and also from other blogs, but I never create anything  that already exists, I look at the blogs and something very different comes out of my mind.

On my wishlist, there are still some nature stamps (flowers, branches) that I don't have in my collection.

I am a nice, absent-mind, creative person who loves colours a lot!!!

Doreen O'Brien


 Visit Doreen's blog
 doreensdream.blogspot.com

Rose Stem Script was my first Chocolate Baroque stamp and I just can't pick a favorite I love them all!

I get inspiration from other crafters, Pinterest and the products I work with.

There's at least 25 items on my wishlist - I have just treated myself to the Magical Landscapes stamp set.

I'm shy, thoughtful and put 101% into all I do.

Asha Martins


Visit Asha's blog
sunnysummercrafts.blogspot.com

I bought my first CB stamp set in September 2012 and it is called "The Gift of Christmas".  It's still my favourite  and the stamp I love most from that set is the silhouette of a cat and dog looking at the Christmas tree. It is my most treasured memory of Christmas at home, immortalised in a stamp - irreplaceable.

My inspiration comes from all over the place. I have a wild and vivid imagination!

On my CB wishlist are most of the Christmas sets and these truly are some of the BEST festive stamps.

Meticulous, methodical perfectionist by day; creative, spirited foodie by night.

Florence Langley


Visit Florence's blog
florenceandfreddie.wordpress.com

My first stamps were wood mounted stamps from Elusive Images - an Egyptian set and a teddy bear Mandala. My first Chocolate Baroque stamps were Eccentric Edwardian (which I love for masculine projects, together with Steampunkery) and Flora and Fauna.

For feminine cards my favourites are anything with flowers, butterflies or birds and the Haberdashery set. The fragment stamps are becoming a favourite for art journaling and mixed media projects.

Antiques and artifacts have always been a main source on inspiration for my crafting.  On line sources such as museums and auction houses provide a huge selection of resource material. I also find inspiration from vintage style advertising and travel posters, especially the Art Deco style ones.

I am a complete choc-a-boc-a-holic so the stamps on my wish list will always be the next new release.  Therefore, I have my eye on the newly released Magical Landscapes  and Fantasy Castles.

I'm a 40 something, noodle eating, pyjama wearing, compulsive crafter.


Our new members are already cooking up ideas for the stamps we will be releasing in April, but while you wait,  you can take a look at their own blogs or join our Facebook group to see lots more beautiful Chocolate Baroque artwork.

Welcome aboard ladies!


Thursday, 6 March 2014

Make a Wish (posted by Judith)

Hi Folks, I hope that you are enjoying some Spring sunshine wherever you are. My card today uses some of the stamps from the Magical Landscapes/Fantasy Castles Multibuy stamp set. I stamped the castle and masked this off by stamping a second image onto masking paper and covering the image. I then added some trees from this set, Country Views and English Cottages before colouring the background with Pan Pastels. I added some rain clouds and extra colour with the Pan Pastels, and then completed the background with a rainbow, using the Pan Pastels, blending the colours into each other for a softened effect.

I coloured the stamped images with Distress Markers and a waterbrush, and added a sentiment from the Fairyland Words clear stamp set.


Thanks for stopping by, Judith xx

Wednesday, 5 March 2014

Mermaid Landscape (posted by Claire)

Good morning, Claire here with  a card created using the beautiful new stamps 'Magical Landscapes', such a beautiful selection of images and although they'll work perfectly with all the lovely fairy stamps as soon as I saw this image I knew I wanted to use it with this mermaid from Underwater Kingdom


The background was made using distress inks, tumbled glass, shabby shutters, salty ocean and mowed lawn. I also used some of the ink from my craft mat to colour the ribbon. I overstamped the background with one of the stamps from Abstract Fragments and embossed with white embossing powder.

The image was stamped with Memento Tuxedo Black and coloured with Graph'It Markers, I added some 'waves' with a white sharpie pen and glitter. I also used the Crafters Workshop Tile Texture stencil with clear gel medium and once that was dry I inked with more Tumbled Glass and Broken China distress ink.


I've distressed all the edges with my craft knife and added shells, pearls and cheescloth from my stash to finish off.

I hope you're enjoying all the inspiration with this months gorgeous new stamps
Claire xx

Tuesday, 4 March 2014

Dream castle by Miranda......


Hi there,

Today my creation with one of the lovely new castles from the 'Fantasy Castles'. These stamps are great to colour and to visualize your own 'magical' place! I've made this one on soft blue Basic Grey scrap paper.
I've stamped with shades of blue and green Memento inks and coloured with my Derwent Soft Colour and added gold accents on the minarets with Viva Maya gold paint.


And of course there are lots of great CB sheets which matches perfectly with these stamps. So to frame this lovely castle I've used also 'Wisteria Lane' and Spring Foliage and my favorite feathered leaf from the 'September Fairy'.

Well, hope to have inspired you and appealed to your imagination to create your own 'magical' place with these stamps.

Thanks for your visit, your comment is always appreciated and hope to see you next time.


Monday, 3 March 2014

Butterfly Fairy (posted by Judith)

Hi Folks, my mind turns to Spring at this time of year, as the tulips and bluebells start to push their green shoots up through the surface of my garden borders. There seems to be a flurry of activity in the air, and a bright day seems to bring the promise of better weather.

The new Spring Fairy stamps were just the ticket to create a Spring scene that seemed to echo those feelings. I created a background using paper masks and Memento inks in soft greens and lilacs. I added some foliage from the Spring is in the Air/Spring Foliage Multibuy stamp set, again using Memento inks. I painted the flower heads with bleach, before colouring them with pencils.

I stamped the fairy, and the large butterfly from Patchwork Butterfly and coloured them with pencils. I stamped the antennae of the butterfly onto the background. I cut off the fairy wings, and the butterfly body  before adding them to the background.

Thanks for stopping by, Judith xx

Sunday, 2 March 2014

Fairy Castle Card (by Debbie)

Happy Sunday to everyone. I was so excited when Glenda sent the new Fantasy Castles and Magical Landscapes stamps which work beautifully with the Fairy Stamps. The Fairy I have used is from the December Fairies stamp set.
I started by stamping the Castle onto white card with Black Versafine and stamped again onto copier paper to make a mask. I also cut a circle for the sun. As these are Fantasy Castles I chose to colour the sky with Worn Lipstick Distress Ink. The clouds are from the Magical Landscapes and I shaded with Cut and Dry foam as I wanted the castle to stand in the foreground. Stickles was added to the waterfall. The Fairy was stamped with clear Versamark Ink and embossed with Black Glint WOW Powder then trimmed. I mounted the Castle onto blue and placed onto the centre of the square card then added the sentiment and a few black pearls. I love this Fairy as she looks so relaxed leaning slightly against the frame. Thanks for visiting, there's lots more inspiration coming during the month. Debbie xx

Saturday, 1 March 2014

Fantasy Castle (by Shirley)

Hello everyone, I hope you are having a great weekend.  It's still very cold with piles of snow here in Ontario, Canada.  We are looking forward to Spring, it's been a very long, cold winter, the toughest that I can remember.    However the sun has been shining a lot in the last month which always feels good.

I have a design today featuring a castle and clouds from the gorgeous new Fantasy Castles.  I love the details in all the new designs they are quite beautiful.  I wanted to create a true fantasy with a castle in the sky surrounded by clouds.   


I used Teal & Cut Grass Dylusions Inks to create the smaller background.   Next I stamped the castle and clouds with Cobalt Archival Ink.    I bleached the ink away from the clouds and painted them with Midnight Dylusions Ink (using my craft mat, water & brush).   I coloured the castle with Prisma pencils and added glitter to highlight some areas.  

The larger background was created with Peacock Feathers Distress Ink using an acrylic block.   I stamped with a decorative textile stamp from Indian Textiles using Shaded Lilac Distress Ink. 

I distressed all the edges and added a little Chipped Sapphire Distress Ink.   I added a strip of background between the layers that I had cut away from the smaller background.

To see who won February's commentor prize  please see this post here :)

I hope you can come back often to see what my talented teammates have created using the new stamps.

Thanks for your visit and have a great day,
Shirley

February Blog Comments Winner

We appreciate the time you take to leave us kind comments here at the Design Team Blog.  

Each comment in February was assigned a number and we used Random Org to draw a winner :) 

Congratulations to jackiescrafts  you have won a £20.00 voucher to spend on Chocolate Baroque stamps!    Please send a quick email here to confirm your email address and Glenda will send you your gift certificate.

Glenda is giving away another £20.00 voucher this month.  Another lucky commenter will be drawn again from all of March's comments.  

Thank you for all your visits and Good luck from the Design Team!

Thursday, 27 February 2014

New stamps: Fantasy Castles and Magical Landscapes (by Glenda)

If you've checked the New Stamps section of the website this week, you may already have spotted our gorgeous new stamps.

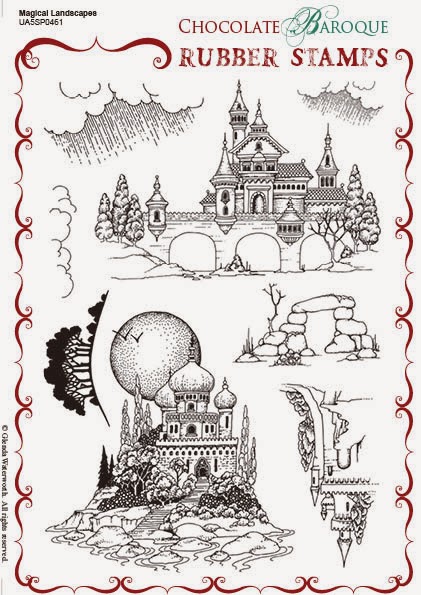
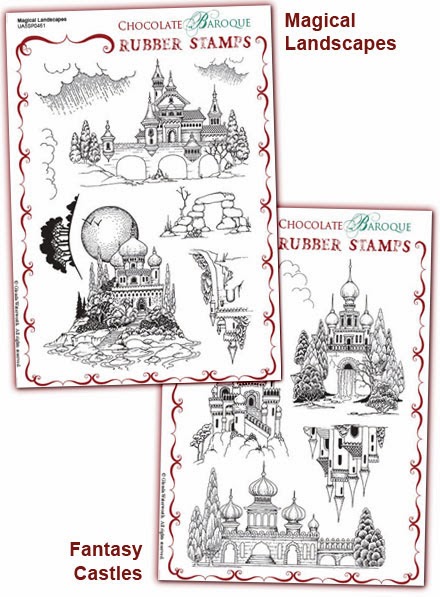
Firstly we have Magical Landscapes

http://www.chocolatebaroque.com/Magical-Landscapes-Unmounted-Rubber-stamp-sheet--A5-_p_5873.html

which go perfectly with Fantasy Castles

http://www.chocolatebaroque.com/Fantasy-Castles-Unmounted-Rubber-stamp-sheet--A5_p_5874.html

and of course we have a multibuy

http://www.chocolatebaroque.com/Magical-LandscapesFantasy-Castles-Unmounted-Rubber-stamps-Multi-buy--A5-_p_5875.html


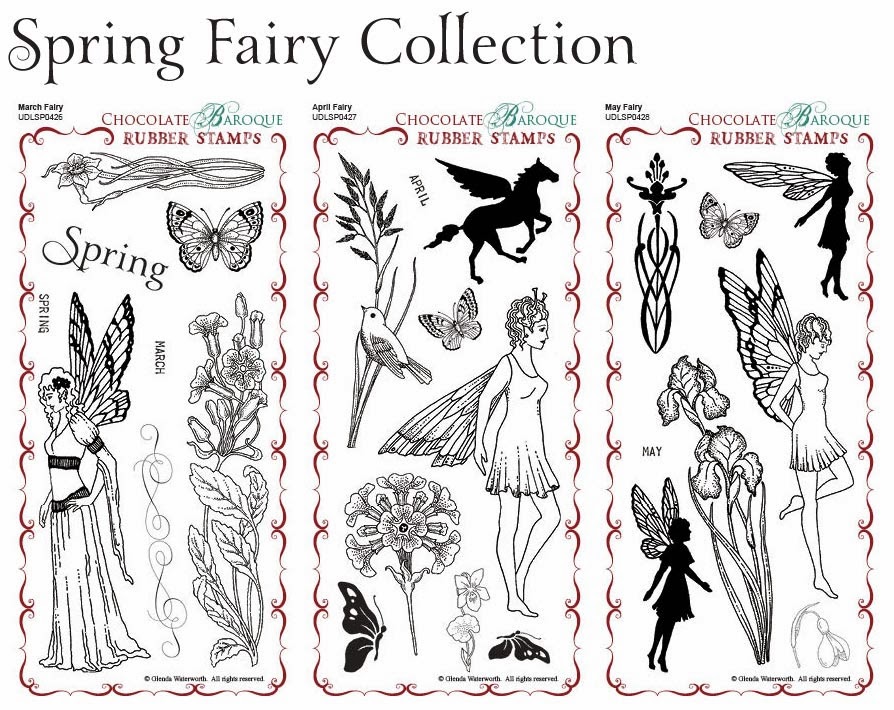
We are also launching our Spring fairy stamps comprising March, April and May, available individually or as a multi-buy.  

http://www.chocolatebaroque.com/Spring-Fairy-Collection-Unmounted-Rubber-Stamps-Multi-buy--DL-_p_5553.html


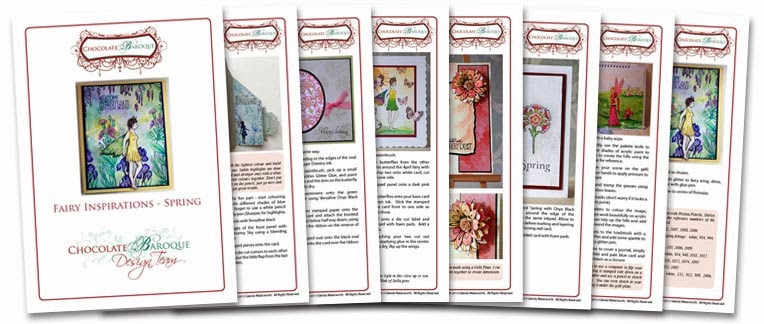
As with our previous Autumn and Winter fairy collections, we've put together a Fairy Inspirations Leaflet which is free for a limited time when you purchase the Spring Fairy Collection.


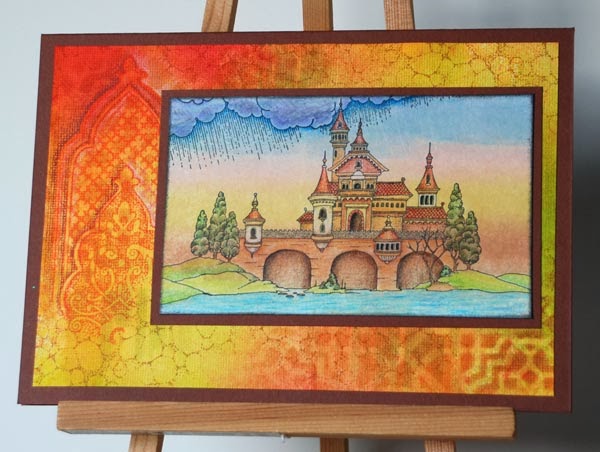
The card above has been stamped onto a brayered background using a home made kaleidacolour inkpad (I inked the strips with Distress Reinkers) and I brayered onto a matte card rather than the usual glossy or silk.  After stamping the image, I continued some of the lines of the hills out to the edge of the card, then masked off the roof and stamped the clouds.

There are two sets of clouds on Magical Landscapes with rain going in different directions, so I simply rotated the small one and stamped it so the angle of the rain is the same as the large.  The scene is coloured with Coloursoft pencils.

The background is Dylusions sprays with a little stencilling and stamping and I've used a nutmeg brown card for the base and layer.

At the moment you can find all these stamps in our New Stamps department and until the end of March, they are all at fantastic introductory prices.

I can see lots of possibilities for these stamps and you'll be delighted with what the DT come up with over the next month so stay tuned.

And if you don't already know, we reward our loyal commenters each month with a Chocolate Baroque gift voucher, and the more often you comment, the more chances you have of winning, so why not leave a kind word or two for the girls - it means a lot.


PS - talking of Design Team, yes we have selected our new team members and we will be introducing them in a couple of weeks once they've settled in!

Wednesday, 26 February 2014

Glittered Rose (posted by Claire)

Good morning, Claire here with a card made using the beautiful Mackintosh Windows stamp set. 


I've made a distress ink background and overstamped with one of the stamps from Mackintosh Windows and then matted on some black card. I stamped the focal image on acetate and embossed with black embossing powder. I coloured the image on the reverse with Graph'It markers and then added some double sided adhesive sheet. Next I peeled the backing off the adhesive sheet and applied Rock Candy gliltter. I layered the glittered image on a die cut square and added a strip of faux gems along the side of the image.

Thanks for visiting today
Claire xx

Tuesday, 25 February 2014

Mackintosh Windows (by Shirley)

Hello everyone, I hope you are doing well.

I have one more design featuring stamps from the new Mackintosh Windows and Mackintosh Beauty sets.    


The background is design paper from my stash.  The windows were stamped with black Archival ink and coloured with Prisma Pencils.   I popped them up on a black mat but it's hard to see that in the photo. 

I'm looking forward to more play with the fabulous Mackintosh stamp sets.

Thanks for your visit and have a great day!
Shirley

Thursday, 20 February 2014

Mackintosh Windows (posted by Claire)

Good morning, Claire here to share a card made using the beautiful new stamps Mackintosh Windows and fantasy film/fibre (you can find the new stamps here). Like a lot of us I have a box full of Fantasy Film and Fibre that I never seem to use and also have a bag of scraps and off cuts so I thought I'd use some up to give this lovely lady a bit of bling.


The background is made with distresss inks (Peacock Feathers, Everngreen Bough and Seedless Preserves) applied to my craft mat, misted with water and then by swooshing some white card stock through the inky puddle several time. 
The focal image was stamped with Memento Tuxedo black and coloured with Graph'It Markers, inked around the edges and matted on white and then black card. 
I made the film/fibre embellishments by taking a small piece of Fantasy Film layering up lots of little scraps of film/fibre and then holding that in place with another layer of film. I inked the stamp up with Black stazon, put the film/fibre 'sandwich' on top of that and then a layer of baking parchment. Lastly I ironed it on a medium heat. I don't have a craft iron so I use my ordinary iron with the steam turned off.

To finish off I've stamped the sentiment from Mackintosh Sentiments and added some gems and a little bow. Thanks for visiting today
Claire xx

Tuesday, 18 February 2014

Best Wishes (by Shirley)

Hello everyone, I hope you are doing well.

I have another design today that features a stamp from the beautiful Mackintosh Windows A5 set.   


The background is Evergreen Bough Distress Ink using an Acrylic Block.  I over stamped using a fragment from Texture Fragments with the same ink.   The Mackintosh window was embossed with black and coloured with Picked Raspberry & Evergreen Distress Inks (using a craft mat, water & brush).

I cut thin strips of black card stock and placed them randomly behind the main image.  My original plan was to place them straight, but I bumped the card which caused them to move and I liked how they placed themselves :)   I popped up the window over top.   'Best Wishes' is from Loving Sentiments. 

Thanks for stopping by and have a great day,
Shirley

Saturday, 15 February 2014

Vellum Bride (posted by Claire)

Good morning, Claire here with another sample using this gorgeous stamp from Mackintosh Beauty as the focal point of the card. I think she makes a beautiful bride. 


I've stamped her on vellum, added some colour on the reverse and then embossed with a ball tool to give some white highlights. I've layered the image up on some black card using some crystal brads to secure the image. The background was made by stamping and embossing the images and again adding some colour with Graph'Its. I've added a black seam binding bow and a pink ribbon rose.

Thanks for visiting today, do keep popping back as my teamies have created some stunning projects with these beautiful new stamps
Claire xx


Friday, 14 February 2014

A single Mackintosh Flower (by Debbie)

Hello. I love the elegance of these Mackintosh Beauty Stamps. His style is so popular being recreated in cross stitch, furniture, glass and many other home furnishing. I don't think it will ever go out of fashion.
I've made an A5 card and I wanted to extend the design to fill the card so stamped the flower panel onto white card and coloured with pens. I mounted onto red card and fixed to the card. With a ruler and fine tip black pen and laid the ruler across the stamped panel then drew the lines. I echoed the design on the white card. Many thanks for stopping by Debbie

Thursday, 13 February 2014

Mackintosh Flower Girl (by Debbie)

The Girl was the first stamp I inked up from the Mackintosh Beauty set. Like the other girls from the Design Team we have all loved working with them.
I stamped her with Memento Tuxedo Black and coloured her with a selection of Alcohol pens. I used a darker blue along the folds to give a little dimension to her dress.
I mounted the girl image onto blue and silver card then cut six Spellbinders corners and arranged them onto the base card. This is another card that's going into my box of cards with no sentiment on, that I can dip into. Thanks for stopping by Debbie

Wednesday, 12 February 2014

Pink Lady (posted by Judith)

I have always been a fan of Rennie Mackintosh, and so I have really been enjoying working with this month's stamps. The designs are just so reminiscent of that period.

I have made a card using the Mini Echoes template from Crafter's Workshop. I coloured some texture paste with acrylic paint, before spreading it over the template onto black card. Once it was dry, I added a deeper colour to create some shadows. I stamped the main image onto a die cut, which I have actually used upside down because it fits the design perfectly this way! I have coloured the image with pencils. I have added a sentiment from the Mackintosh sentiments clear stamp set.


Like me, I am sure that you are enjoying these gorgeous new stamps, and the fabulous artwork that my Team mates have been showing you. Thanks for stopping by, Judith xx

Tuesday, 11 February 2014

Pink and Black Stained Glass (by Shirley)

Hello everyone, I hope you are doing well.

I have a design today from the new Mackintosh Windows A5 set.  I've had a lot of fun working with these new beautiful designs.


The background was created using Seedless Preserves Distress Ink with an Acrylic Block.   I embossed all the images with black, cut them out and coloured with Distress Inks (on my craft mat with water and brush).   I added little strips of black card stock to the background before attaching the window images.

Thanks for visiting and have a great day,
Shirley

Monday, 10 February 2014

Mackintosh Flower Panels (by Debbie)

For my card today I used one of the panels from this months Mackintosh Windows stamps.
This is a 6 by 6 card and was an easy, quick card to make. I started by stamping onto white card with Versafine then heat embossed with clear powder. The flower heads were coloured red with Alcohol pens, trimmed and mounted onto black. I didn't think that ribbon added the effect I wanted to the base card so I cut strips of black card and cut a few squares to add to the corner. I didn't add a sentiment as I thought I could give it to my hubby for Valentine's Day or his birthday. Many thanks for visiting, Debbie

Sunday, 9 February 2014

Foiled Rose Panel (posted by Judith)

Hi Folks, I have created a card for you with the Mackintosh Windows stamp set using some metal foil to create a focal panel. I stamped the image with Stazon Ink, and drew over the lines with an embossing tool. I rubbed black acrylic paint onto the panel, and then wiped the excess off, leaving black paint in the crevices. I added some coloured metallic wax to the leaves and flowers.

I stamped some matching roses onto a piece of background from my stash, that I had made ages ago. I simply added a piece of ribbon and a sentiment from the Mackintosh Sentiments stamp set to finish.


Thanks for stopping by, Judith xx