Pin It button on image hover

Thursday, 23 April 2015

Lady's slipper orchid (posted by Claire)

Good morning folks, my card today features this gorgeous individual stamp, called Lady's Slipper Orchid. I've actually coloured it to represent a an Iris for my card, I adore the rich colours of irises, they are so beautiful.


I've used a distress ink background created using Chipped Sapphire, Dusty Concord and Seedless preserves inks. The image has been layerd up three times. the first layer was stamped and embossed with Gold EP. Next came the script background, stamped in brown on cream card. 

Lastly I stamped the flower on white card,coloured with Graph'It markers and cut out before layering the image up on 3d foam pads. I've added lace, pearls, ribbon and a button topped with a twine bow to finish off.

Thanks for popping by today
Claire xx


Wednesday, 22 April 2015

Awesome Orchids - 10 min card by Florence

Hi everyone

Thank you for calling in.  

Always great to have your company.

Today, I have a really quick and easy card to share with you.

For this card, I have used one of the flower heads and the sentiment from the Awesome Orchids set.


For my main piece, I stamped the flower head randomly onto a piece of coated card stock using Orange Blossom Archival Ink and trimmed the piece to size.
Using a hole punch, I punched out half circles on both sides of the stamped piece.
I wrapped a piece of gold thread around the card, using the punched out half circles to hold the thread in place and then secured it on the reverse with some tape.
I cut out a small tag and stamped onto it the sentiment. 
I attached the tag to the thread using a little jump ring and secured the tag to my stamped piece using a foam tab.
I then made up the card as seen.

Happy Stamping
Florence x

Tuesday, 21 April 2015

Butterfly Dress in the meadows (by Debbie)

Good morning.
I think the warmer weather has helped wake my creative spirit up. The Design Team have new stamps that I've been playing with over the weekend and they are a delight.


I also had a play with the Butterfly Dress stamp and Briar Rose, Harebell, Thistle and Honeysuckle Butterfly Quartet stamps. I started with stamping the Butterfly Dress lady then cut a mask so I could then stamp the foliage around her. When the ink was dry I cut a moon and placed it over the lady mask. With soft brushes I added Peeled Paint and Broken China with a horizontal movement. The flowers and butterflies were coloured with alcohol pens and I covered the bodice of the dress with Waterfall Stickles that is blue tones and on the photograph looks yellows and greens. I chose purple from the dress to mount the scene and added to and 8 x8 card.
 
 Thanks for visiting
Debbie

Monday, 20 April 2015

Butterfly Door Hanger (by Julie)

Good morning! Hope your week has got off to a good start....but if not then you have plenty of time to give it another go. I thought I would have another go with the Butterfly Dress cling mounted stamp that seems so popular at the moment, but instead of using the stamp as the main image I decided to concentrate on the fabulous detail that is in the dress.


The wooden hanger I had in my stash is slightly different to the website version but you can see a selection of wooden surfaces to decorate here.

I started by painting the hanger with a mint chalk paint, but gesso would work just as well, and then stamped the Butterfly Dress over the top of the dried paint, using Barn Door Distress paint. Afterwards I sprayed some red and green Dylusions ink  and when dry added some Mustard Seed and Vintage Photo Distress ink.
The decorative pieces were created by melting ordinary silver embossing powder with clear embossing powder in a melt pot and then pouring into metal cookie cutters  placed onto the rubber stamp. Before each pouring of the molten embossing liquid I inked the stamp with black Staz-On and to get the red or green colour I added a little bit of a Gelato crayon just before pouring. I have highlighted the texture by very lightly, dry brushing white acrylic paint across the pieces and painted all of the edges with black acrylic paint before gluing to the hanger.
If you don't have a melt pot you can still give this technique a try by melting the embossing powder in a metal cake wrapper with a heat gun.

Many thanks for looking and if you would like to see some of these pieces turned into jewellery then please pop over to my blog, but most importantly don't forget to call back tomorrow for some more Designer inspiration.

Sunday, 19 April 2015

All Tiled Up (by Asha)

Good morning fellow crafters! Inspired by tiles, I made 2 cards, both featuring the Awesome Orchids stamp set, but with different results.

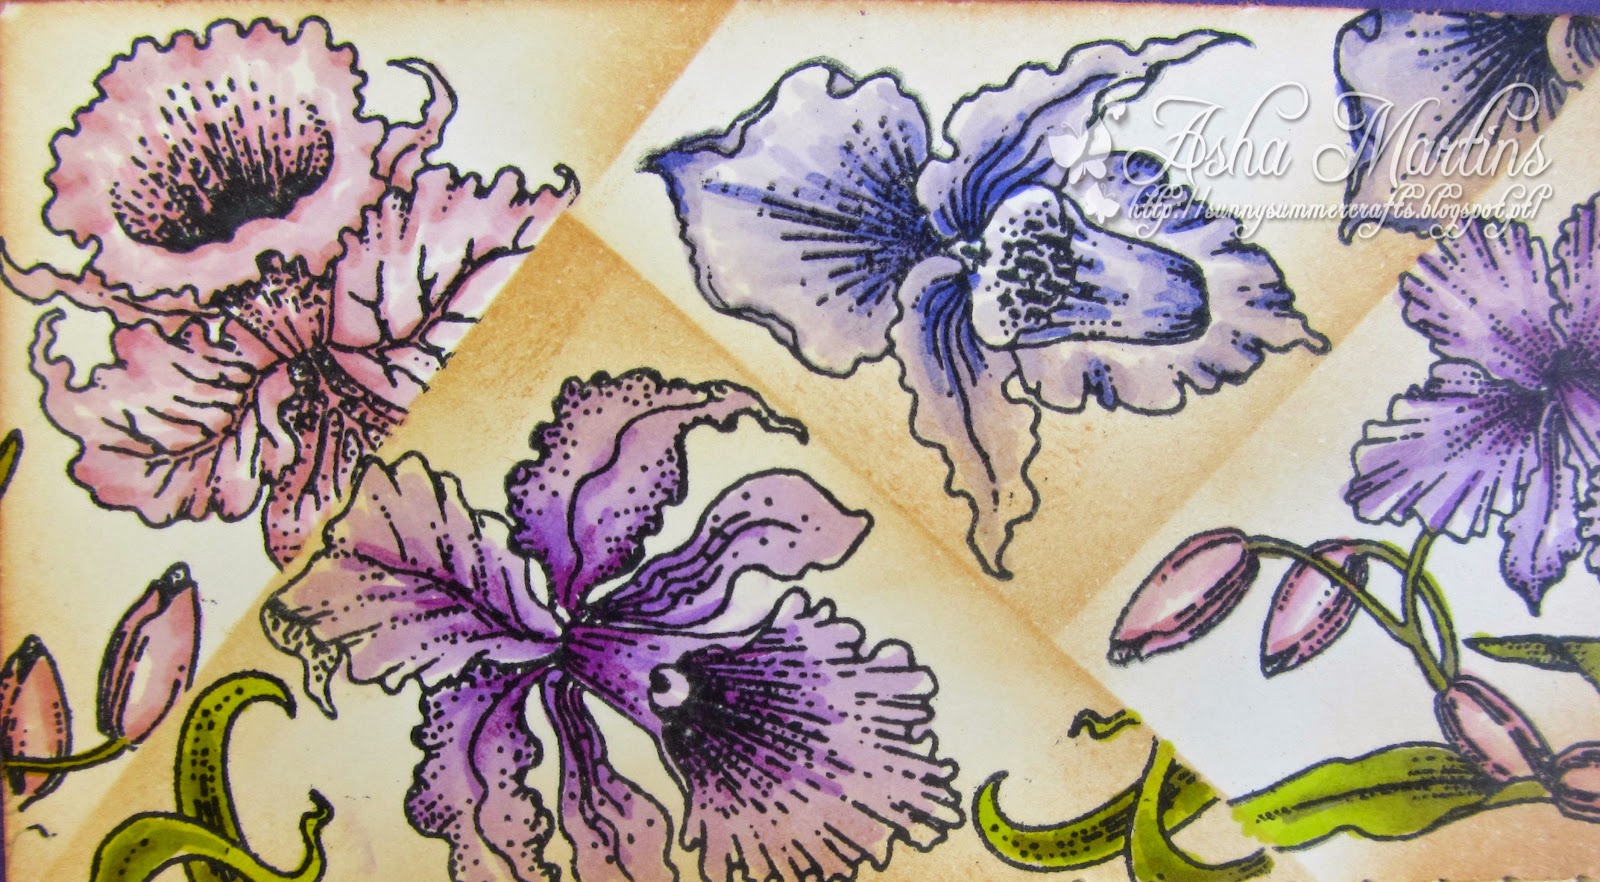
My first card is influenced by the Dutch Delftware - the distinguished blue on white pottery renowned for its simple elegance.  I started by scoring a piece of white heavy weight watercolour paper into equal rectangles before stamping the flower heads with Memento Ink. With a fine brush and water I pushed the colour into the flowers, taking care not to blur the outlines. I inked the edges of each tile with distress ink and drew a line through the score lines with a white gel pen for a grouted finish.  


Here's another fun way to incorporate tiles into your card project. This time I'm using bright bold mosaic inspired background to showcase the Awesome Orchid stamp. I started by colouring a piece of heavy weight watercolour paper with Gelatos and cutting it up into little squares. Then I put them back together on a piece of white card stock before adhering the fussy cut orchid on the finished background. With a little Glossy Accent on each tile we get the perfect finish for these tiles.


Thank you for stopping by today. I hope you are having fun with your new stamps. As always, details of tools and products used are available on my blog. Don't forget to swing by often for more exciting ideas from the rest of the design team. Have a beautiful Sunday!

Beijinhos,
Asha 

Saturday, 18 April 2015

Orchid Trio by Glenda

Hello everyone - I've got a quick card to show you today, inspired by Lesley's recent card (which you can see here).

I have used the clear Awesome Orchids set to create a card in sepia tones.


I stamped the flower heads first, then carefully placed the stems to connect up with the flowers.  I used Adirondack Espresso ink on watercolour paper and just touched a wet paintbrush to the image in the areas where I wanted some shading.

I cut each flower to the same size and layered each one onto dark brown card.  The card background is stencilled with a delicate stencil (called North Star) using the same Espresso inkpad and a large stencil brush.

I stuck the stamped panels on to the ivory card base with foam pads and stamped the sentiment with Versafine Vintage Sepia ink at the bottom.

Not all inks will react with water like this so you need to know which of your inks bleed and which don't.  Adirondack and Distress will definitely give up their colour even after they have dried.  Memento will bleed a little if you do it straight away, but the longer you leave it, the more fixed the colour becomes.  Archival doesn't work at all, and Versafine is also waterproof once dry.

If you find inks confusing, why not make some little swatch card and test each one out.  You need to try it on different types of paper or card because that can make a big difference too. 


Hope you're enjoying the blog, the team are certainly cooking up some gorgeous projects for you, aren't they!  Don't forget to check out our Shop Blog too where you'll find even more to inspire you.

Happy creating!


Friday, 17 April 2015

I love flowers and colours too! (by Maria)


Hello everybody, today I have some colourful examples for you, just the way I like them.


I have made a card to show you and four ATC's. I took some watercolour paper and my favorite Dylusions ink. I sprayed some water over my paper and then took some green and pink Dylusions sprays and sprayed them over the paper. For the card I used the pink and green part of the paper, for the ATC it was only the green area. The final ATC has a bit of blue too. Then I sprayed some salt, here and there and let everything air dry. When the paper was dry, I stamped the flower from the Awesome Orchids stamp set first, masked it and then stamped the stalk. I stamped the flowers again on some other paper that I had coloured with Dylusions ink and cut them out. With some 3D foam I placed them on the stamped flower on the card.

For the ATCs I did the same with the bottom two, but on the top two, I took away the colour with some bleach and coloured them again with alcoholic markers.
I hope you like my samples, and try out the techniques some time, it was real fun!

Greetings,
Maria

Thursday, 16 April 2015

Lucky Butterflies (posted by Judith)

Hello everyone, I have another card using the beautiful Butterfly Dress cling mounted stamp to show you today. I decided to incorporate a bit of an Irish theme into my card, so used a palette of mainly greens to create my card.

I started my background, by adding some colour to a piece of scrapbook paper through a Prima Mask, and then added some script using a stamp from the Mini Scripts stamp set. I stamped the main image onto a die cut oval, and again onto a spare piece of scrapbook paper, and coloured the images with pencils. I decoupaged the butterflies from the spare image onto the main image. I added some of the flowers, along with some shamrock style die cuts to a sentiment taken from the Patchwork Butterfly stamp set.


Thanks for stopping by, Judith xx

Wednesday, 15 April 2015

Ladys Slipper Orchid with Lace (by Shirley)

Hello everyone, I hope you are doing well.

I have a design today featuring the gorgeous new cling single - Ladys Slipper Orchid.


The larger background was created with Evergreen and Pistachio Distress Stain Sprays.   I over stamped using a fragment from Lace Fragments with Evergreen Distress Ink.  When dry I embossed a lace stamp with white across the top and bottom, also from Lace Fragments.    I coloured the Orchid with pencils.   The ribbon is purple which looks very dark in the photo.

Thanks for stopping by and have a great day,
Shirleyx

Tuesday, 14 April 2015

Brusho Birdcage Collage (posted by Claire)

Good morning folks, have you seen the gorgeous new individual stamps released this month? Goodness me they are stunning and the perfect price for a crafty treat without breaking the bank too.

This one is called 'Bird Cage Collage' and is a gorgeous image and I really enjoyed colouring it.


I began by having a play with my Brushos and water colour card which I used to create my background. I stamped the image with brown ink and distressed with Tumbled Glass distrss ink. Next I stamped the image with versamark and embossed with gold ep before cutting out and colouring with distress inks. I stamped the focal image with Memento Tuxedo Black ink, coloured with my Graph'It markers and carefully cut out before popping up on 3d foam pads.

I've used purple card for matting and layering and simply adding some gems to the corner to finish off.

Thanks for visiting today
Claire xx

Monday, 13 April 2015

Ladys Slipper Orchid - By Florence

Hi everyone

Thank you for stopping by. 

I hope you have had a great weekend.

If, this is your first visit to the Chocolate Baroque blog, then a big warm welcome.  Grab yourself a cup of coffee and have a good look around.  There is a new post every day with inspiring projects and fabulous ideas on how to use the stamps.

Today I would like to share two projects made using the new Ladys Slipper Orchid (Cling Singles) Rubber Stamp. 

There are four new amazing stamps in the Cling Singles Range .
To see the set "Bird Cage" multi-buy offer please click HERE.


My first project is a fridge magnet but with a small alteration this could also be a book cover, a little hanging or an embellishment for a wooden box.


To make this project

Paint a piece of MDF (approx size 9cms x 13 cms) with Gesso.
Apply a coat of purple craft paint and leave to dry.
Apply a coat of cream colored craft paint roughly over the purple and remove some of the cream paint, using a wet wipe, allowing the purple to show through a little.
When the base coat is dry, add a tiny hint of yellow craft paint using a dry brush.
Sand if necessary to give a good smooth stamping surface.
Stamp the image onto the prepared piece using Black Archival Ink.
Color the image with diluted Distress Ink.
 Fix the ink with a spray fixative.
Apply 2 coats of Mod Podge to seal the project.
Edge the piece with gold wax or sponge on some gold craft paint.


Chocolate Baroque have a large selection of MDF and wooden products on their website which are ideal for painting and stamping onto and which can be seen HERE.


My second project is a quick and easy card.


To make this card

Apply some Distress Inks to a piece of white card stock (approx size 9 cm x 13 cm).
Stamp the image using a permanent ink.
Using a damp paint brush, remove some of the Distress Ink from the stamped flower image.
Fix the inks with a spray fixative and (optional) seal with a gel medium.
Make up the card as seen.

Thank you for looking
Have a great week.

Florence x

Sunday, 12 April 2015

Auricular Flower (by Debbie)

 
I have two cards today using the Auricular Script stamp. For a large stamp it gives a great impression.


 I used black ink on both, Memento for the first as I coloured with alcohol pens. Versafine with clear embossing powder for the second and coloured with pencils.
For the first I stamped onto white card and when coloured used Tumbled Glass Distress Ink on the edge to tie in with the embossing on the background card.


I love to stamp onto Kraft card but it definitely need the embossing powder to help the stamp stand out. The pencils I used were quite soft so they gave a really good strong colour. I matted with green and black to frame the stamped image and added to a square card.
 
 
Many thanks for visiting
Debbie

Saturday, 11 April 2015

Butterfly Lady (by Julie)

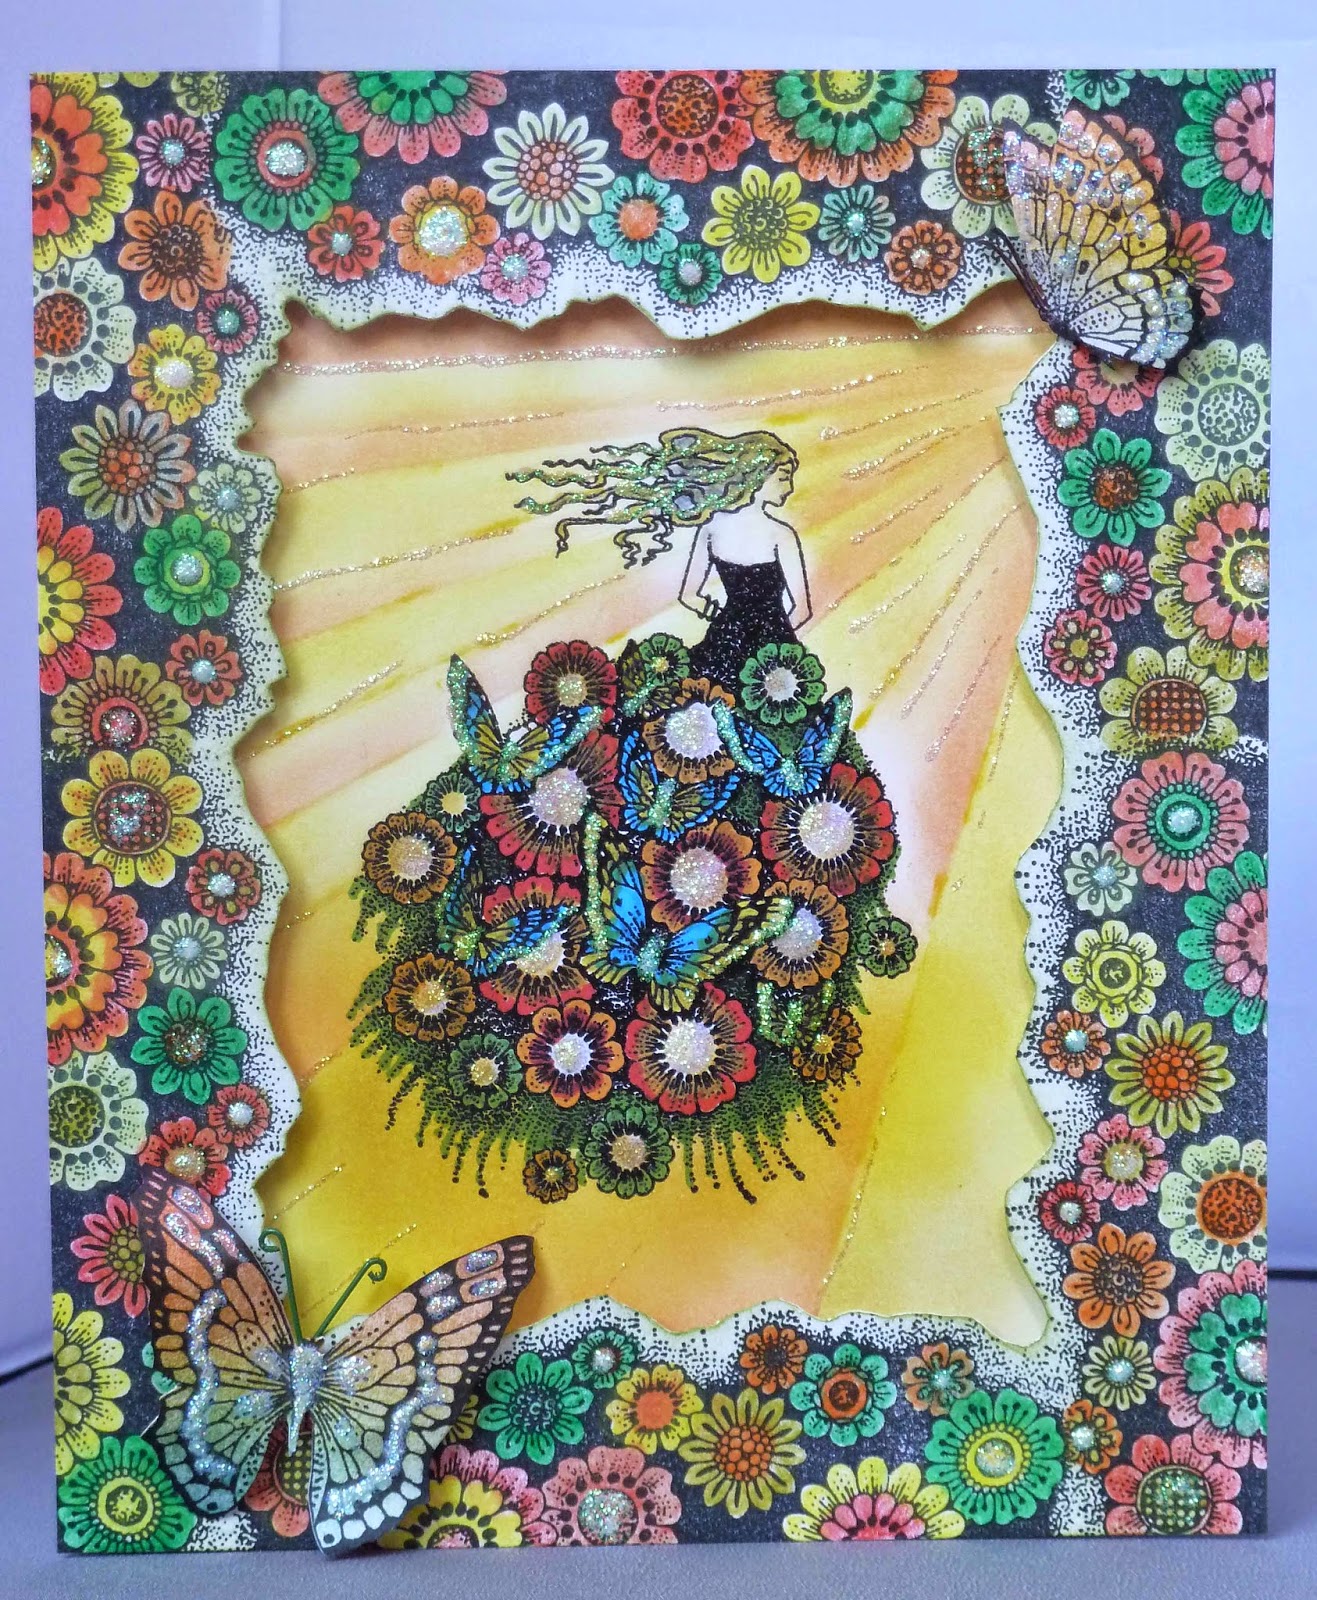
Good morning to you and I hope you are having a lovely weekend. Today I have a card created with three wonderful Chocolate Baroque stamps, but the main image is the very new and very beautiful Butterfly Dress single, cling mounted stamp.

  • This card measures approx 22 cm x 18.5 cm. I started by stamping and embossing the Butterfly Dress with a black sparkle embossing powder and then coloured with a selection of alcohol markers. 
  • The sun rays are created by plotting a few lines with a ruler and a very light pencil, before filling in with Distress ink using a sponge and the edge of a stiff card as a mask. 
  • On a separate sheet of card I stamped the border with one of the Floral Edges rubber stamps, inked up with black Versafine ink. I used masking tape to cover an existing stamped bit of the border so that there was not too much over stamping and mixing of the image.
  • I cut out the centre of the border card, coloured with colouring pencils before mounting onto the base card with silicone glue.
  • To finish I added lots of Crystal Stickles and two stamped butterflies from the Honeysuckle Butterfly set that I coloured with Distress Ink.
Many thanks for looking. If you wish you can see a much simpler version of this card using just the Butterfly Dress stamp over on my blog, but as always please pop back tomorrow when another Design Team member will have a fabulous new project.

Friday, 10 April 2015

Fly Away With Me (by Asha)

Hello and Happy Friday, everyone. Today I want to show you a card I made showcasing the Butterfly Dress individual cling stamp.

I stamped the image onto a piece of bleed-proof paper and coloured it with alcohol markers. The extra sunflowers are from the July Fairy DL stamp sheet. I masked the images to get the flowers to overlap. The sentiment is from the Butterfly Dreams A4 sheet.


Here's a close up of the Butterfly Dress project. With a sharp craft knife I cut around the wings of the butterflies to expose the blue layering card stock below. The butterflies look like they are about to take flight...


Butterfly Dress is undeniably a gorgeous image, which can be worked in so many different ways. I hope you'll find time to play with your stamps this weekend. As always, on my blog you will find more pictures and details of products used.

Have a super crafty weekend!

Beijinhos,
Asha

Thursday, 9 April 2015

Birdcage Collage with Stampbord (posted by Judith)

Hello everyone, I have a project to show you using one of this month's individual stamps, Birdcage Collage.

I started my project by inking up the stamp, and then placing an ATC sized piece of Stampbord onto the stamp to take a partial print of the image. I stamped the image again onto a piece of white card. I coloured the Stampbord image with pencils, and also the areas of the image on the card that would not be covered by the Stampbord image.

I covered the piece of Stampbord with Versamark and sprinkled it with extra thick clear embossing powder, melting it with my heat gun. I added embossing powder twice more while the embossing powder on the Stampbord was still molten. You need to be very quick to do this! Once the Stampbord had cooled down completely, I attached it to the card image, lining up the two images so that they matched each other.

I created the card background using the wrinkle free Distress technique: adding Distress Ink to my craft mat, and spritzing it with water, before dragging my card through the ink. I dried this layer, and then patted the card onto the mat again to pick up some of the left over ink droplets, and dried the card again. I added a second colour and repeated the process. I used a template and Distress Ink to add a trellis effect to two of the corners of my background, and stamped a small berry stamp taken from the Woodland Dreams stamp set onto the other two corners.

I attached the background to an 8" x 8" card blank and added a sentiment from the Card Sentiments clear stamp set.

 
Thanks for stopping by, Judith xx

Wednesday, 8 April 2015

ATCs themed book "FLOWERS" (by Maria)

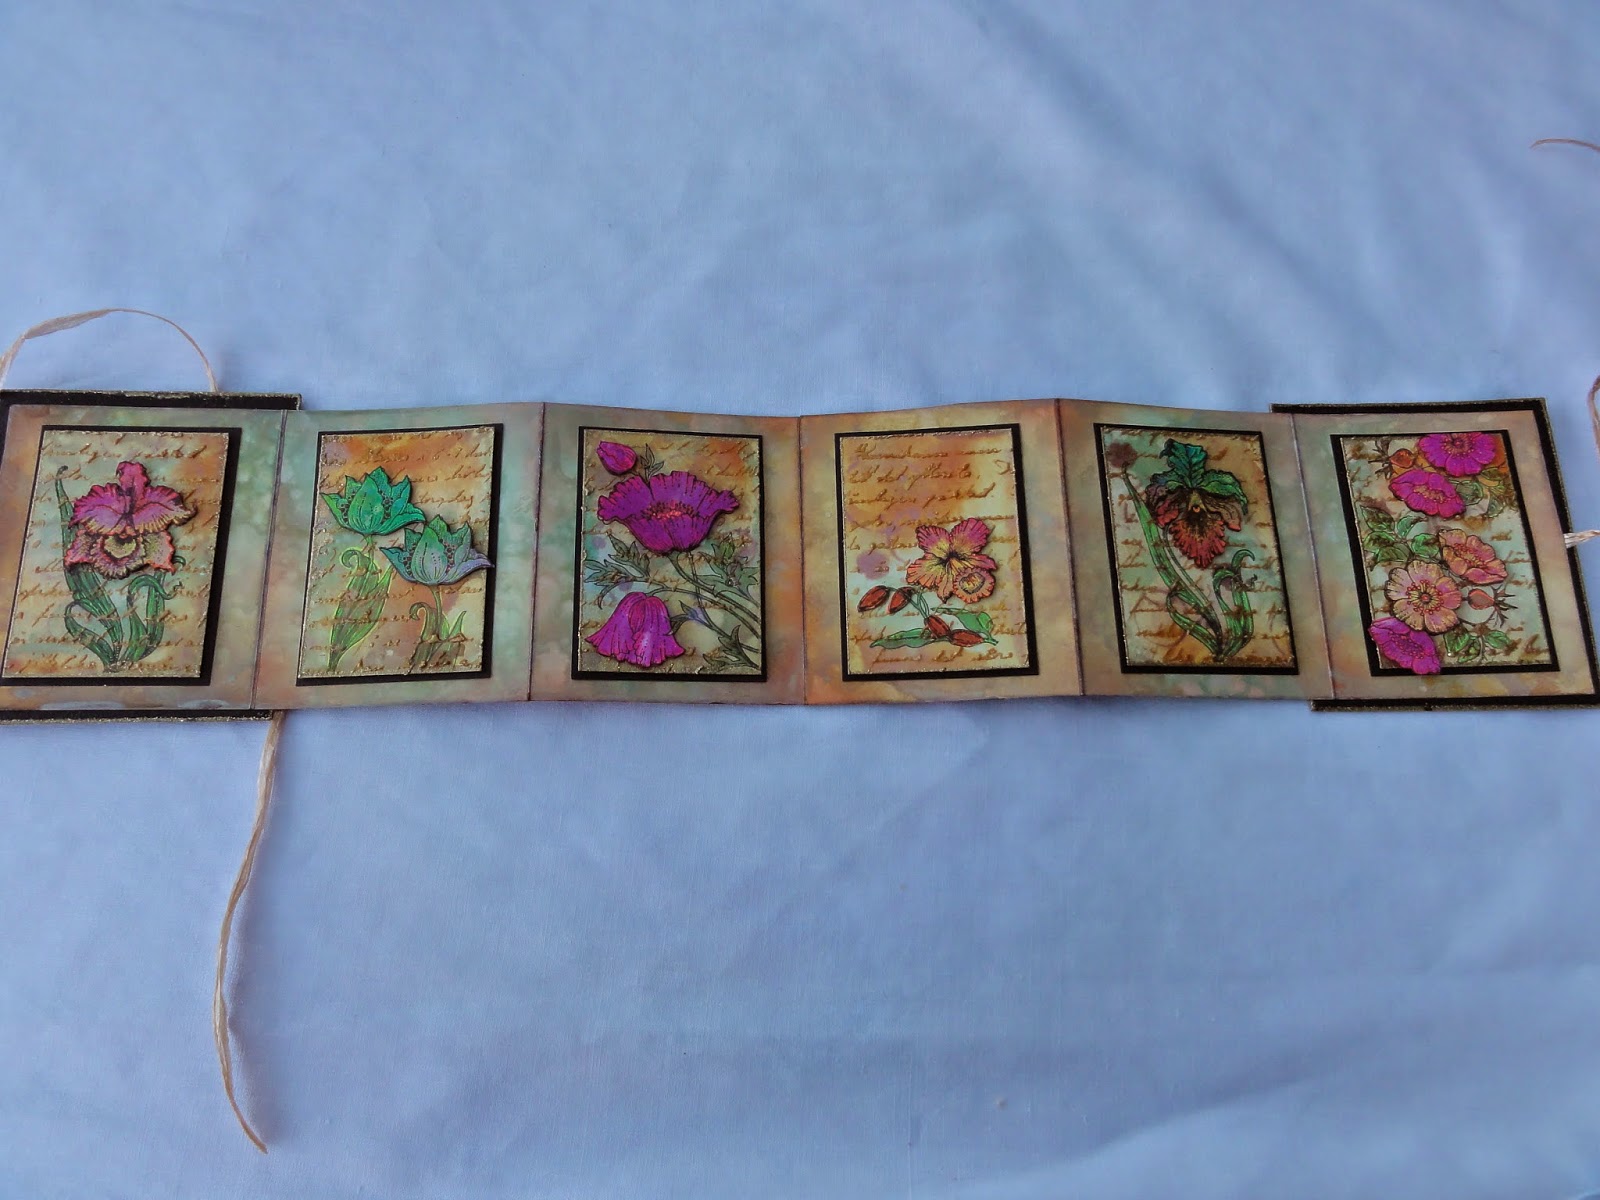
Hello everyone, I hope that you are enjoying the new stamps available on the website. Today I am going to show you how to make an ATC book using both new and old stamps. I hope you will enjoy it.

I made this ATC book with the following stamp sets :
Awesome Orchids clear stamp sheet, Poppy Meadow stamp set, Pretty Birdcage stamp set, Spring is in the air stamp set.


The products I used  are: Distress Paint Antique Linen, Distress Stain Spiced Marmelade and Distress Spray Stain Cracked Pistacchio. For the golden text I used a mask and some metallic gold embossing paste.
The flowers are cut out of a paper that I coloured with Dylusions and metallic spray. I made this paper a long time ago, and so I cannot remember the colours. I added some accents with yellow, orange, rose and green gelly pens.


White paper (10.5cms x 30cms) x4
Golden embossing powder, Versamark and heat tool
Black card stock 6 x (8.9cms x 6.4 cms) for the ATCs
Black acrylic paint

Instructions:
I started with my backgrounds; I put some Distress Paint on my craft sheet and with my Distress Spray Stain I sprayed some green on the paint. I added some orange Distress Stain further down, and I sprayed some water all over it. I took my white paper and went through the paint and the stains, covering my white paper. I sprayed some water over the whole paper while drying it with my heat tool. When everything was dry, I did it again to have more variation on my background.
I did the same with my second paper, so that my colours where almost the same, then I cut out 6 pieces of 8.5cms x 6cms, these pieces became my coloured parts of the ATCs. The two other papers (10.5cms x 30cms) I coloured on both sides in the same way.

Now the ATCs: I first stamped my flowers with black Versafine ink on the ATCs and added some colours. I used a stencil and with some embossing paste I gave some structure to the ATCs. I took the paper that I had coloured with Dylusions and metallic spray and stamped the flowers on the areas where I liked the colours the most. I cut the flowers out and placed them onto the ATCs with some 3D foam.
With some golden embossing powder I made a small border around the ATCs, then I took my gelly pens and added some nice accents here and there. Then I glued the ATCs on the black cardstock with some double sided tape.

Then I started with my book (9cms x10.5cms) x6. I took the two other pieces of coloured paper (green and oranges) and scored at 9cms, 18cms, and 27cms, I did this on both papers. I then glued them together to make a long strip, with one of the left over 3cms, placing it behind the other panel so that the front looked neat. I cut away the second 3cms strip. I took some orange Distress Ink and went around all of the edges, so that everything blended together.

For the covers I took some cardboard (10cms x 11.5cms) x2 and painted them with black acrylic paint. I dried them with my heat tool. I also put some embossing powder on the edges. I placed a ribbon in the middle of my last page on the outside of the book. Both sides of the ribbon were the same length. I did this also at the other end of the book. I placed the book in the middle of the cover, and then added the other cover on the other side of the book. To decorate the front of my book, I made another card (8.5cms x10cms) and placed it on my front cover.

I hope you enjoy making this project, it was a lot of work, but worth the end result.

Have a nice stamping time,
Maria


Tuesday, 7 April 2015

When you need to be quick (by Lesley)

There are times when we want to give a hand made card but time is of the essence and when you are up against the clock is usually when your mojo has gone into hiding! Know that feeling? Me too, I knew that I was scheduled for today's blog post however we were spending a wonderful Easter break with Glenda and Adrian; time was running out.


  • Stamp the Ladys Slipper Orchid with Vintage Photo Distress ink onto smooth white cardstock.
  • Using a fine detail waterbush start brushing the colour from the inked outline of the orchid head. 
  • Work through the whole flower and, if necessary use a heat gun to ensure the image is dry. 
  • Cut around the lace edge and mount onto contrasting card with 3d foam.
  • Stamp the sentiment from the Amazing Birthday clear set with Versafine Vintage Sepia ink.
  • Fold an A4 piece of cream cardstock in half and trim to size. Add the ribbon and attach the topper with double sided adhesive tape.
TIP:  Use a very light touch and a semi dry water brush with this technique (keep a piece of kitchen towel to hand so that you can take off excess water from the brush). By not flooding the image with water you can be more precise in the colouring and shading. Also, start with the head of the flower and work your way down to avoid smudging the leaves.

So the next time you're in a hurry why not give it a try.

Thank you for dropping by today and don't forget you can see new artwork every day created by the wonderful design team.


Monday, 6 April 2015

Awesome Orchids (by Shirley)

Hello everyone, I hope you had a great Easter.

I have a few designs to show today using the beautiful new Awesome Orchids clear stamp set.


I used the new Abandoned Coral along with Picked Raspberry Distress Inks in the background (using an Acrylic Block & water).   Next I added texture with white acrylic paint, a small stencil and a bottle cap.  The little dots were created using the 'snow' stamp from the Frosty Trees set.   I painted the pretty little Orchid with Inktense pencils.

I used the same colour theme below:


I used the same background technique as the first card.  I stamped the Orchid stem & leaf image three times onto the background, and one of the flower heads on separate card stock.   I coloured the leaves and flowers with the same Distress Inks along with Seedless Preserves, cut them out and attached.

And the last design is a quick CAS card:


Using a circle cut from cardstock as a mask, I blended the new Cracked Pistachio and Mustard Seed Distress Inks over top and used a stencil for the texture.  I coloured the image with pencils.

Thanks for stopping by.  I hope you can visit often to see the beautiful designs by my talented teammates.

Shirleyx

Sunday, 5 April 2015

Floral Eggs (posted by Claire)

Good morning folks and a very Happy Easter to you! I hope you have a lovely day with lots of chocolate and of course some crafting too lol. Today's card features the gorgeous new clear stamps from  called 'Floral Eggs'. I've used this beautiful image to make a topper for my card but I think it would be a stunning pendant too.


I began with a distress ink background using Bundled Sage, Tumbled Glass and Scattered Straw distress inks and stamped the corners using one of the stamps from Spring Bird Crocus with black ink, adding faux stitching around the edges. 

I stamped the image onto smooth white card using Memento Tuxedo Black ink and coloured it with my Graph'It markers. I cut the image out and triple embossed it with clear embossing powder.
I layered the image over a pretty heart shaped doily and added a little black bow.

Thanks so much for visiting today
Claire xx


Saturday, 4 April 2015

Awesome Orchids - Cards By Florence

Hi everyone

Thank you for stopping by.

I hope you are enjoying the weekend.

Today I would like to share with you two cards made using the new Awesome Orchids clear stamps.

These stamps are an absolute joy to work with.  

A great little set to cover all occasions.


For the card above, I have teamed the Awesome Orchids Set up with the Wisteria Lane Rubber Stamp Set to create the background.


The beauty of the clear stamps is that it is so easy to position the image exactly where you want it to be stamped which works wonderfully when creating borders or edges.
For the background panel, on the card above, I have used the beautiful Damask Panel from the Cling Singles Range.


Thank you for looking

Happy Stamping
Florence x

Friday, 3 April 2015

Beautiful Butterflies Dress (by Debbie)

Good morning.
The butterfly dress stamp has gone to the top of my love stamp list with a few others. She stamps so well and there's such a lot can be done with the design.


I stamped her with black Memento ink and coloured with a few colours of alcohol pens. I used Glossy Accents on the butterflies, the colour becomes more vibrant. For the background I chose three distress ink colours and blended two of them and stamped with the third. The green from the colouring on the dress and the background was used to matt with.
 
 
Many thanks for visiting
Debbie

March Blog Comments Winner

Hello everyone, we hope you had a great week and have been managing to get some crafty time to yourselves.

Thank so much for your visits and all the comments you have made during last month, we truly appreciate the time you take to let us know your thoughts about our designs.

Each comment made during March was assigned a number and we used Random.org to draw a winner.  Congratulations to Culliesocks you have won a £15.00 voucher to spend on Chocolate Baroque stamps!  Please send a quick email here to confirm your email address and Lesley will send you your gift certificate.

Lesley will be giving a £15 gift voucher next month to another lucky winner drawn from April's comments. The more comments you leave, the better your chances to win.

We hope you enjoy our designs this month featuring the fabulous new individual cling mounted stamps and our latest clear sets Natural Eggs, Floral Eggs and Awesome Orchids.

Good Luck from the Design Team

Thursday, 2 April 2015

Easter Eggs (by Julie)

Good morning. Today I have a trio of  cards created with the new Floral and Natural Egg sets for you so I hope there is one that you like. They were all created using basic stamping and masking so nothing too difficult at all.
  • I masked the edges of this card with ordinary masking tape before stamping the Floral Eggs. I then over stamped them with Distress Ink using the plain egg from the Natural Egg set so they were coloured in one press of a stamp. 
  • To get the shadow I cut a mask, inked up the plain egg using grey Versaink and then stamped the image just to the right. The sky is just blue Distress ink lightly brushed on and I have hand drawn the string and bow. 
  • The foliage stamp is from the Floral Edges set. I added in more grass by inking up the ends of the stamp and filling in the image.
  • After peeling off the masking tape I stamped the speckled and cracked egg designs from the Natural set around the edges and added a white highlighter and some Crystal Stickles to the eggs.

  • As before I masked the edges of the card and used the leaves from the Floral Edges set.
  • I stamped the eggs using the Natural set onto separate card and cut them out so I could arrange them on the main design.
  • The nest is created with a hot glue gun. I squirted the glue onto a non-stick mat and when the glue was set it was easy to peel off. Before gluing to the card I coloured the nest with alcohol pens.
  • I finished the design off by hand drawing an outline around the border.
This last card is just a bit of fun and only if you know the recipient would appreciate a cheesy pun!

  • I started by printing the sentiment from my computer and then stamped the eggs from the Natural set using the mask technique. Shadow under the eggs was added with a grey coloured pencil.
  • The sentiment was masked while I sponged the background with Distress ink and then finished off by stamping the speckled egg around the edges and the sentiment.

There is another egg design on my blog if you wish to take a look, but please pop back tomorrow to see another design team member's wonderful project.

Wednesday, 1 April 2015

Pretty Awesome Orchids! (by Asha)

Good morning, all. Hope you're having fun with the brand new stamps. These orchids are pretty awesome, wouldn't you agree?

I have 2 cards to show you today, both featuring the Awesome Orchids clear stamps and the same vintage inspired colour combos, but with different results.

On the first card, I'm using the orchids to create a background that really stands out. With the partial retiform technique in mind, I masked off segment on a piece of alcohol marker friendly paper with post-its and inked the edges of each segment separately. Then I stamped the orchids in each segment, but making sure there are no overlapping into the neighbouring segments. You will need more post-its to mask the areas. Then I coloured the images with alcohol markers. It looks like bits of patterned paper, cut into random pieces and put together - but it's all done on one piece of card stock.

The greeting is from Birthday Words and I finished the card with a couple of sequins.  


Here's a closer look at the inked segments:


For my second card, I started by dry embossing and inking the background. Then I stamped, coloured and fussy cut several of the flower heads and leaves. I wanted to fill the card base with random clusters of the orchids and that meant some snipping, pruning and training to get the orchids to grow as shown below! :)

The greeting from Loving Sentiments, heat embossed in black on vellum, is a great way to obscure the "modifications" while still allowing the artwork of the stamps to come through.


Thank you for stopping by today. As always details of supplies used for these projects are available on my blog. Happy stamping!

Beijinhos,
Asha


Tuesday, 31 March 2015

Flowers and Butterflies (posted by Judith)

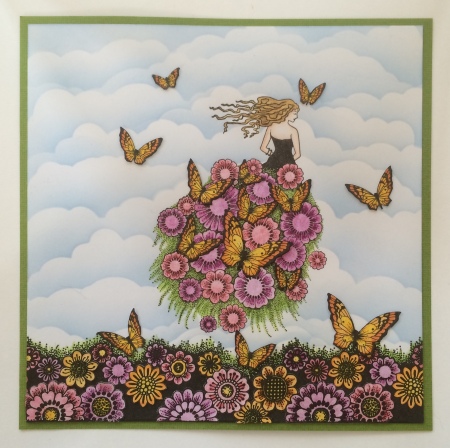
Hello everyone, I have been working with one of the new individual cling mounted stamps currently available on the website, Butterfly Dress. The image is full of my favourite things, flowers and butterflies, and I had great fun creating this card.

I stamped the flower edge from the Floral Edges clear stamp set across the bottom of the piece of smooth white card. I needed to stamp the image twice to fill the space. I stamped the image again onto a piece of spare card a couple of times, so that I could colour some extra flowers to decoupage onto the original image. I stamped the Butterfly Dress image above the flower border, and cut a mask of the image and covered it over. I used a cloud stencil and Memento Summer Sky to create clouds across the background. I stamped the Butterfly Dress image twice more onto a piece of spare card so that I could decoupage the butterflies.

I coloured all of the images with pencils, and cut out the extra flowers and butterflies before adding them to the card. Finally, I added a layer of green card to correspond with the grassy green of the lady's skirt and the grass of the border.


Thanks for stopping by, Judith xx

Monday, 30 March 2015

In the sun (by Maria)

Hello everybody,

I have made some more samples with some of the small stamps from the Spring Birds multi-buy rubber stamp set, and I hope you like them.


To make these cards I first covered  the top and bottom of the card with post-it's. I cut out a small circle from another post-it and placed it where I wanted the sun to be. I took some inks: Adirondack Eggplant, Memento Grape Jelly, Mustard Seed Distress Ink and Ripe Persimmon, and with some brushes and some of the inks I started to create the sky. When I had finished creating the sky I took away the circle post-it and with some Mustard Seed Distress Ink and Ripe Persimmon and the negative side of sun post-it I coloured it! Then I stamped my flowers and with some bleach I took away some of the colours from the flowers and when everything was dry, I coloured them in with some alcoholic markers.
Then I stamped my sentiment with some Versafine ink, and with a very fine black marker I placed some black lines above and below the sky. I hope you like my samples and have fun creating some of your own.

Greetings,
Maria

Sunday, 29 March 2015

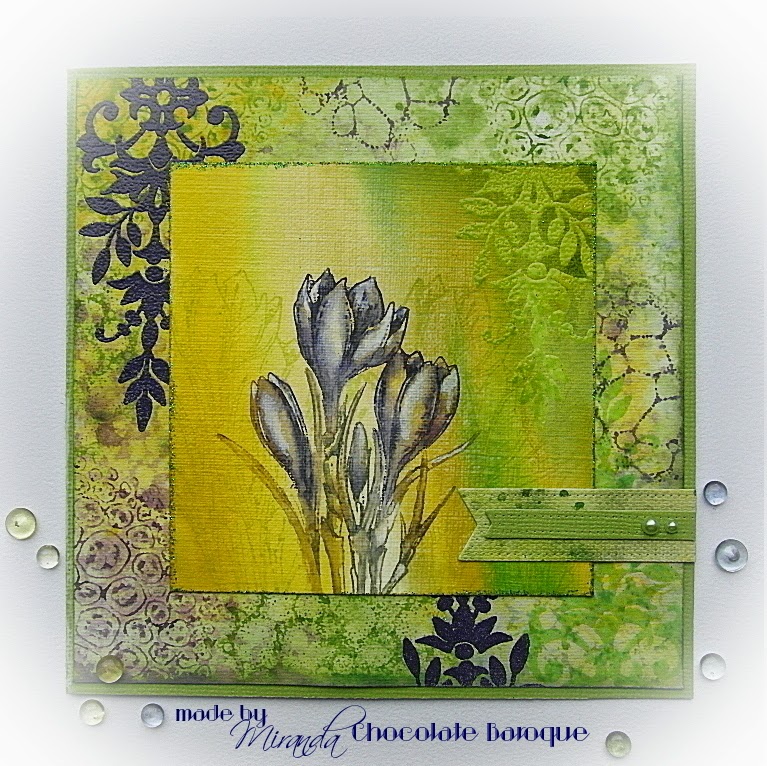
A lovely little Crocus.........by Miranda


Hi there,

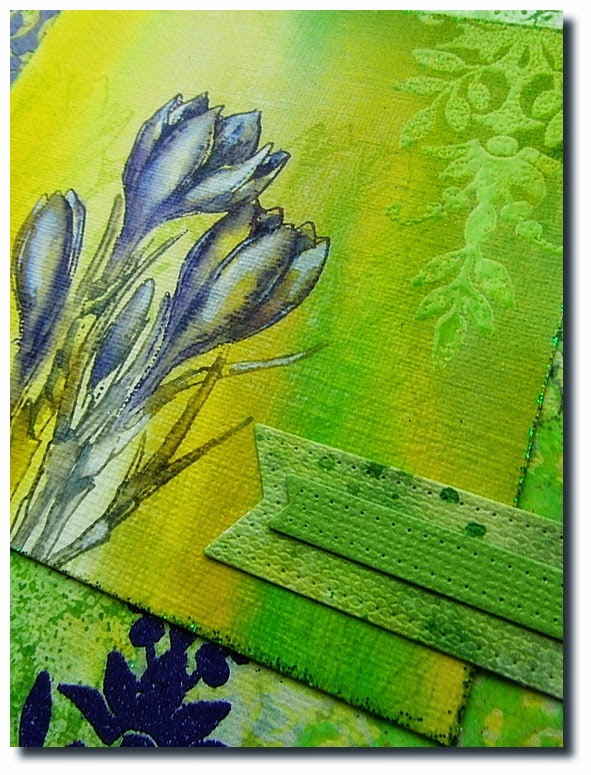
It's my turn again to show you something made with the lovely Spring bird stamps. This time I've used the Spring bird Crocus. I have worked on paper suitable for working with acrylic paints, with a canvas structure. It worked also fine for inks and water. On this paper I have used some fluid inks which are a more bright than the Distress inks.
I have inked directly on the crocus rubber stamp with water based markers, spritzed some water and after stamping I blended the colors with a water brush for a water color effect.

On the background you can see lots of layers. First I have made a background using Distress stains and water.(Mustard Seed/Mowed Lawn and Dusty Concord). Than I have stamped( also with Distress stains)several stamps of the Textured Fragments and finally embossed some ornaments from the Fancy Flourishes clear set using Wow Earthone Grape and Wow Luscious Lime.
The edge of the small card is embossed with Wow Mint Mojito, a sparkling powder.


If you have any questions, feel free to ask! Thanks for visiting and till next time,


Saturday, 28 March 2015

Springtime Bird and Flowers (by Shirley)

Hello everyone, I hope you are having a great weekend.

I have a design to show today featuring the beautiful Spring Bird -Crocus set.   I love all three of the new Spring Bird sets that include so many gorgeous little stamps. 


The background is Distress Inks, including the new Cracked Pistachio. 

I stamped the Daffodil edge from Springtime Edges at the top and bottom and coloured a little along with the main bird image with pencils.  I added die cut flowers that were coloured with Distress Inks and molded uisng a stylus and foam mat. 

Thanks for your visit and have a great day,
Shirleyx