Pin It button on image hover

Tuesday, 20 May 2014

Twenties Tags (posted by Judith)

Hi Folks, I have a couple of tags to show you today, using the stamp of the month stamp sets. I wanted to create a peice of artwork reflecting the fashions of the twenties, when the dresses were often beautiful ombre shades, with fringing and feathers, with lots of decorative elements. So my first tag tries to reflect these style features, using a background of Distress Inks, ranging from pale green to dark blue. I have spritzed the background with a shimmer spray to give the impression of a chiffon overlay.

I stamped a portion of the background with one of the slihouette flower stamps from the Nouveau Lovebirds stamp set, and added some fringing and a large feather. I used a tiny portion of one of the flapper ladies dresses from the Fabulous Flappers stamp set, which I coloured with pencils, and encapsulated it into a Nautical Frame with Dome charm.

My next tag was made using Gelatos on the background. I had this tag lurking in my stash from a while ago, and decided to try and make something with it.I used a mask, and some stamping with gold embossing using a stamp from the Texture Fragments stamp set. I stamped the flowers taken from both of the A5 stamp sets onto self-adhesive labels , and coloured them with alcohol based markers, adding some leaves from the Tangled Garden stamp set. Some funky crackle gems and ribbon complete the tag.

Thanks for stopping by, Judith xx

Monday, 19 May 2014

Fancy Cards!!


Hello everyone,

The new stamps of CB are so beautiful , don't you think? the designer-team just fell in love with them!
For this time, I have made some glitter cards, the CB stamps Fleurs Nouveau just fit. I only used Versamark, embossingpowder (different colours), my heat tool and black cardstock, don't they look fancy???

Have a magical stamping time!!
Greetings
Maria

Sunday, 18 May 2014

Deco creations and ......taking a break by Miranda

Hi there,

This time I've played with a lovely deco bird stamp........ and some other deco flowers from the     Fleurs Nouveau sheet, just see.......I've made a background using 3 Distress ink colors; Mustard seed, Picked Raspberry and Black soot on an acrylic bloc and used some water misting. Than I've used the peacock doily mask positive and negative. Stamped the flowers a few times with black and gave some accents with a white pencil and gemstones. Than embossed one flower and coloured with markers, decoupaged it and attached it to the card. The text is from the Mackintosh sentiments sheet.


The 2nd one has been made with a lovely couple of deco birds. I've used a green yellow Basic Grey scrap paper to work on and used some Memory box dies. The birds are coloured with Derwent soft color pencils. The sentiment is from the Mackintosh sentiments. The border is stamped with one other small deco stamps and I've used a stamp positioned for that.


TIME-OUT

And than I have to tell you that I will be taking a time-out for personal reasons. I know already I will miss you all and your lovely comments and of course the gorgeous designs of CB but it's something I have to do.  And I know when I have sorted things out and I feel ready for it I will pick up the thread  and hope to ' see' you all again! Wishing you all a wonderful Summertime and keep on creating because that is what makes the world more beautiful!

Thanks for your visit! And enjoy the beautiful artwork our DT has made with these gorgeous stamps,


Saturday, 17 May 2014

An elegant Christmas (posted by Claire)

Good morning, today I've got a card featuring the gorgeous new Fabulous Flappers stamps from Chocolate Baroque. These stamps are gorgeous on their own but also will work beautifully with lots of other Chocolate Baroque stamps. My first thought when I say this lovely lady in her elegant coat was that she's look fab with one of my favourite Christmas stamps from The Gift of Christmas. I just love this lovely Christmas tree with the adorable pets silhouetted in front of it and of course its never to early to start those Christmas cards.


I began by stamping the lady and masking her with masking tissue. Next I stamped the tree stamp and masked that, if you find large silhouette stamps difficult to stamp my little trick is to go over the image with a black marker to cover any areas that I haven't stamped properly. I added a die cut circular mask to create the moon and set to work with distress inks and a blending tool to create the sky (I used faded jeans, stormy skies and chipped sapphire). Once the ink was dry I added silver PanPastel to the moon area for a little shimmer.

I removed the masks and coloured the images with Graph'It markers and added some red stickles to the lights on the tree. Once everything was dry I took a white sharpie pen and added lots of snow 


I've layered the card up over some card that I'd stamped with a snowflake stamp and then covered it up with ribbon and lace. To finish off I've added a white bow and a snowflake brad.
I hope you're enjoying all the inspiration from my talented team mates again this month
Thanks for visiting today
Claire xx

Friday, 16 May 2014

Fleurs Nouveau - By Florence

 Hi everyone

Apologies for being missing in action for the last few weeks.  I have been partying, crafting, shopping and holidaying with my two blogging friends Marie and Kylie.  They flew over to see me.   It has been my first holiday (well taking time out) for nearly 20 years!!  Wonderful time.  Mind you, I know you wont tell anyone, they didn't half hog the remote for the tv and the computers!! he he.

I have been popping in now and again, when I have had chance to have a quick peek at the fabulous projects made by the DT and the Guest Designers.  Amazing work ladies.

 Right down to crafting and less of my chat.


For my projects today I have made some cards which are quick and simple in style and not much fru fru.  I hope you like them.


please click on the image to see the detail


I have made all of the cards the same way but used different card stock and colors.

For my first card I used a piece of A5 coated card stock.

I masked off a thin strip using post it notes and then applied some Distressing Inks using a piece of cut n dry foam.

I then used some masks, some builders plastering tape and ink to make some pretty patterns.

*I have used some masks from my own stash but I know that there are so many great masks on the Chocolate Baroque website HERE.

When the ink was dry and leaving the masks on, I used the leaf stamp from the Fleurs Nouveau stamp set and stamped the leaf pattern using black archival ink.

To finish the card, I removed the post-it notes,  stamped the Happy Birthday (from Birthday words A5 Stamp set) sentiment and added some bling.


please click on the image to see the detail

For my second card I used some mat white card from my stash.

I masked and added color in the same way as above and stamped my leaf pattern.

To be honest, when I first added the color to the card stock, it absorbed quite a lot of ink and it looked dark and I wasn't to keen on it but then.....I thought maybe I can take some color out, just where the leaf patterns are.  

All I did to removed the color was to brush on the tiniest (just damp really) amount of water with a small paint brush, just here and there, and then press down onto the damp area with a piece of kitchen paper.  To cut a long story short, this was the result.  A bit of a happy accident really.  I quite like the tie die effect it created.


Please click on image to see the detail


For this card, again I have made it in exactly the same way as the two above, just changing the colors and I used the small little leaf pattern from the Fabulous Flappers.


So for my sentiment, I just stamped Birthday Greetings onto a small square piece of card and attached it to my card using foam pads.

Well I think that is all from me today.

Thank you for calling in.  It is always great to have your company.

Thank you also to everyone for leaving such lovely comments.  We always love to here from you and they are very much appreciated.

Happy Crafting

Florence x

Thursday, 15 May 2014

A spotlight on the Twenties

It's been some time since I contributed one of my designs to the DT blog, however I intend to blog on here every month from now on; so let's start with May's offering.

When I first saw these Fabulous Flapper stamps I knew exactly how I wanted to use this particular image. During the art deco period it was all about shapes and angles and I liked the idea of using a circle to spotlight this lovely lady.

To create the spotlight illusion I stamped the upper part of the image with Tuxedo Black Memento ink onto a self adhesive circular label. I happened to have some in my stash but you could die cut a circle from an A4 single label sheet. I then coloured the image with my alochol markers and set aside to dry.

The card itself is a piece of A4 dark grey pearlised cardstock folded in half from which I trimmed off 1.5" down the side edge. I found a twenties advert amongst my ephemera stash which I glued to a piece of plain card to give it some strength. This was then attached to the front, overhanging the trimmed edge.

The image of the flapper was stamped onto another item from my stash (a Whist scorecard). Once dry I stuck the self adhesive circle over the top, ensuring the images were matched up. This was then matted onto a piece of Old Gold pearlised card and attached as illustrated with 3d foam.

Finally I stamped the words 'Just a Note' from the Mackintosh Sentiments clear stamp set and finished it off with the ribbon.

I have been using self adhesive labels for many years now and find them useful for all sorts of crafty projects. However when it comes to stamping they are an easy way to add an image to a background without having to create a mask. 

I hope you are inspired by all my fellow DT members' beautiful artwork, there are more gorgeous things to follow so please keep watching.


Wednesday, 14 May 2014

Guest Post: Serenity Prayer Card Shaz Brooks

Our guest designer this week is Shaz Brooks who has designed this beautiful card using a variety of our stamps. This is a long and detailed post, but well worth the read. So pull up a chair and take time to enjoy.

(Measurements are in inches, as firstly, I still think that way, and second, my Tim Holtz ruler is in inches!)

One of the wonderful things about Glenda's stamps is how beautifully they mix and match, you are never limited to working just with the stamps in a particular set. For this project, I’ve used stamps from four different Chocolate Baroque sets: Serenity, GothicFragments, Floral Edges and Words of Wisdom. 

I began by taking a piece of white card roughly 6” x 6”.  I sprayed it with a mix of blue and purple; I mixed Distress Re-inkers (Salty Ocean and Seedless Preserves) with water in mini misters, but any spray inks will do the job. After spraying, I blotted the paper with kitchen towel, which left a lovely muted background.

Now I overstamped this piece with a couple of stamps from the Gothic Fragments, one of the Floral Edges and the Wisteria branch from Serenity. So the overstamping stayed soft to match the background, they were all stamped in Salty Ocean, and each time I stamped the image onto scrap before stamping on my background, giving me a paler second generation image.  I sprayed a second piece, roughly 3” x 6”, in the same way, then overstamped with another of the Gothic Fragments, finally inking up the Old English Prayer from the Words of Wisdom set in Versafine Majestic Blue and stamping that over the top.

Next I took another piece of white card, and stamped the Buddha image from Serenity in Memento Tuxedo Black, as I was going to colour it with Promarkers.  Using the ink left on the stamp, I also stamped a post-it note mask for the image. I trimmed the mask on the lines, so I would not get a ‘halo’ effect around my image. The post it mask was placed over the top, so that I could add colour to the ‘sky’ around the image, using Adirondack inks in Aqua, Stonewashed, Sailboat Blue, and just a touch of Denim at the edges, with a Colorbox Stylus tool. You can do this with sponges, an ink applicator or brushes, whatever your preferred method is. The sky took up roughly 2/3 of the image, so the bottom third was coloured for grass, again with Adirondacks in Willow, Citrus and a little Lettuce.

After this was totally dry, I added colour to the image using markers. The final touch was to add gilding flakes to the shrine the Buddha is sitting inside, and to the adornment on the Buddha's head. The background sheet, Buddha and the Prayer were each matted onto dark blue card.

For my base card, I cut two sheets of dark Grey Metallic card to 9”x 7 1/2”. Measuring in 1 1/2” from one short edge on each sheet, I scored a line down the card. At this point I also cut two sheets of white copy paper to make an insert for the greeting later, always wise when using a dark card base. Sandwiching the two white sheets between the two pieces of card, I punched two holes in the narrow section that had been scored. Now I threaded fibres through these holes, and tied together.  You could use twine/ribbon/string,  whatever you like. My ‘fibres’ are actually ‘eyelash wool’. I added a pale purple and pale blue brad top and bottom of the spine to secure it firmly.

Now the background sheet was stuck to the card front using double sided tape, and the Buddha image mounted on top of that, again with tape.  I added little foam pads to the back of the Prayer, to give a little dimension, and mounted it at an angle partly over the Buddha image.The final little embellishment I spotted lying on my desk- a little punched dragonfly. I had some scraps from a project a few weeks ago, using gilding flakes on black card, and had punched a few dragonflies and butterflies from the last bits. I added him with a little blob of silicone glue.

I hope you enjoy this project, and it encourages you to mix up your CB stamps a little. All the inks and tools I have used can be swapped for what you have with no ill effects, you can use Distress Inks instead of Adirondacks, for instance. You can even mix Distress Inks and Adirondacks if you wish.

I’ve really enjoyed doing this, although I have to admit my nerves were a bit frayed at the edges whilst I was doing it, I was sure something was going to go horribly wrong, especially as I got closer to being finished; I had visions of a dropped inkpad ruining everything!

Thank you so much for this Shaz, we have enjoyed having you as a guest designer. And if this post has inspired you why not leave a comment. To see more of Shaz's designs check her blog out here


Tuesday, 13 May 2014

Repeat Stamping (by Debbie)

 
Good morning.
I've really had fun playing working with the Fleurs Nouveau stamps.
For my first card I had great fun colouring the flower with pencils and wanted to keep the colours soft as I used Memento London Fog for stamping as a change to using black ink.
I cut out the flowers with an oval die and blended with Victorian Velvet Distress Ink.
I stamped around the oval with words from the Amazing Birthday words. These are clear stamps and they will bend beautifully and you can see where you're stamping. The flower oval was attached with foam pads and I mounted onto a pale pink.


The mathematical side of my brain was very happy doing the repeat stamping for the background of this card. The stamp is from the Nouveau Lovebirds set. I love symmetrical things like fabrics and wall paper.
I stamped with a pale green and because there is a lot of detail in the background decided a sentiment on a label shape would be sufficient as a topper.


Thanks for stopping by
Debbie


Monday, 12 May 2014

Green Elegance by Doreen

Hello.I am back sharing another Fabulous Flapper  from the May releases

I have stamped the image onto white card with Black Versafine and coloured her with distress inks.For the backing I have cut a square of green card and cut an oval aperture then using a stencil run it through the Big shot,placed the image behind and framed her.

The urn is also on the stamp sheet and I have stamped and clear embossed this before fussy cutting and distressing it. It is finished off with with feathers and gems.

Sunday, 11 May 2014

Evening Stroll (by Shirley)

Hello everyone I hope you are doing well.

I have another design today using the beautiful new Fabulous Flappers set.


I started with a piece of mixed media paper and adhered a die cut clock with a Gel medium and then brushed Gesso over everything.   When dry I painted a few colours of Acrylic glaze over top and spritzed with water to blend and added the painted die cut hands to the clock.    I used the top of a tree from Patchwork Landscape around the outside edge.

The pretty lady was stamped with Cobalt Archival ink, coloured with Intense pencils, cut out and popped up on the background.  I added lots of glitter around her shawl's trim, a little difficult to see in the photos.
 

Thanks for your visit and have a great day,
Shirley    

Saturday, 10 May 2014

Nouveau Lovebirds (by Asha)

Good morning, friends! Are you having fun with your new stamps? Today I want to show you a couple of cards made with stamps from the Nouveau Lovebirds set. They are so versatile and that they can be funky or elegant ... the choice is yours!

*********

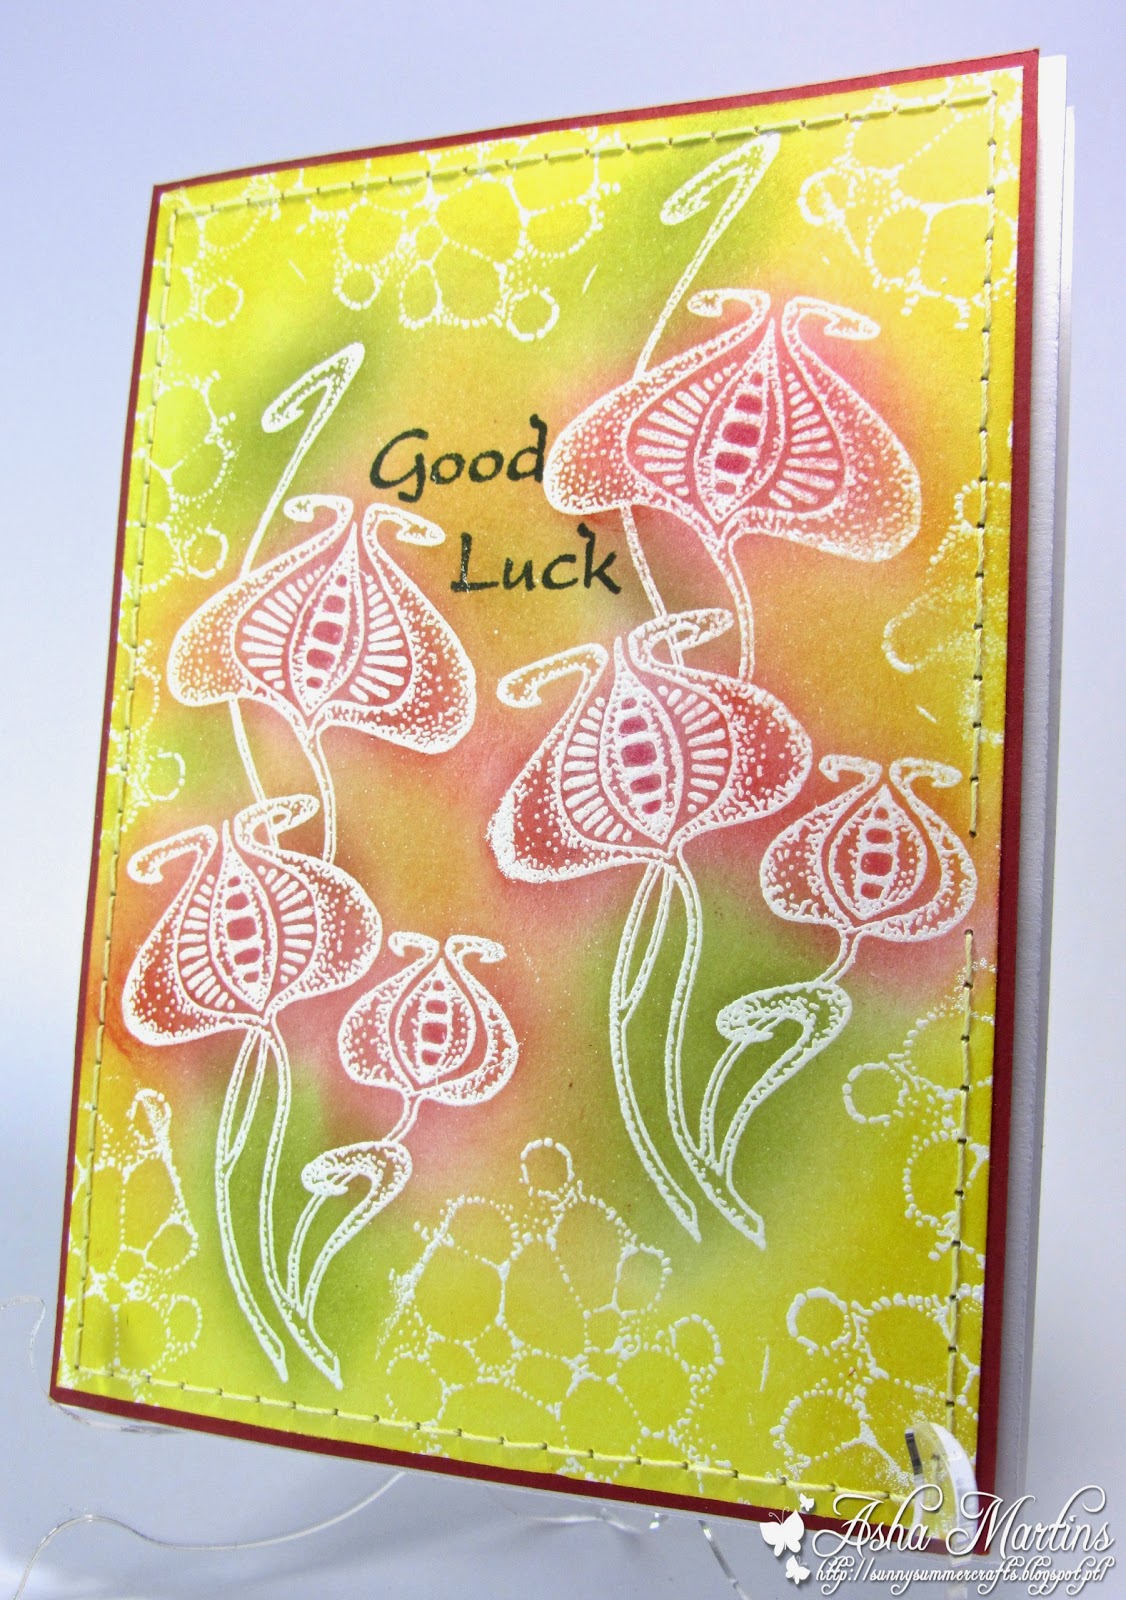
My first card is a bright and bubbly good luck card featuring the stylised flowers from the Nouveau Lovebirds stamp set. Added bonus: quick and easy to make.

I started by heat embossing the images using white embossing powder. For the background I blended Distress Inks in yellows and greens with some reds for the floral buds. The greeting is from Words of Comfort and Cheer.


Here's a closer look at the card. Just to fill some of the space, I also heat embossed an image from the Texture Fragments set.


*********

My second card is not so loud and boisterous. This elegant card features the lovebirds after which the stamp set is named (that's my guess!). The front of the card has a layer of vellum that allows you to barely see through to the top half of the inside.  I used one of the smaller stamps from the Nouveau Lovebirds to make the background. This card would make a lovely engagement, wedding or anniversary card. 


Here's a closer look at the image of the lovebirds. I coloured it with alcohol markers, fussy cut it and adhered it directly onto the vellum layer. You can just about see the background stamping on the bottom half of the card front.

*********

You've seen two contracting styles using stamps from the Nouveau Lovebirds set .... and you have to agree they are anything but arty! These images are so versatile and lend themselves to any design style. The rest of the design team will be posting more inspirational work. Come back soon!

Beijinhos, 
Asha

Friday, 9 May 2014

Birds of a Feather (posted by Judith)

Hi Folks, I have a couple of bird related samples for you today using the stamp of the month stamps from Chocolate Baroque.

For my first sample, I created a couple of backgrounds using Distress paints and water. I used some smooth watercolour paper, as I wanted to add lots of water to the paints to create a watery feel to the backgrounds. I have used Seedless Preserves, Crushed Olive and Antique Linen as my colour palette. On the larger background, I stamped a border using a tree stamp from the Woodland Dreams stamp set using gold embossing powder. On the smaller background I have used one of the lovely Lalique style birds, which I have coloured using Distress Markers. I simply matted the backgrounds with plum card, and added some ruffled ribbon.

My second project is a little altered notelet box, using Weathered Wood Crackling Medium and acrylic paint from my stash. I painted the little box using navy and and pale blue paint, applying the crackling medium in between the two layers. I used very cheap acrylic paint, so it works very effectively. I stamped the bird onto tissue paper using silver embossing powder, and coloured it with Distress Markers.


I used a sentiment from the Mackintosh Sentiments clear stamp set to stamp along a piece of ribbon to embellish the sides of the box. I added a couple of Crealie flowers to complete my project.
Thanks for stopping by, Judith xx


Thursday, 8 May 2014

Other tags with the gorgeous new CB stamps!! (posted by Maria)


Hey everyone,

And here are some other tags samples with the new Fleurs Nouveau and Nouveau Lovebirds stamps. I 've made them the same way as I made the ladies tags, with distress ink, but here I just used some stencils for the backgrounds. I stamped the images than I masked them and put a stencil over them to make the special backgrounds, I also finished them with a golden frame round the edge and again I used some panpastels and fragment stamps for the finishing touch. I hope you like them and I give you some inspiration.

Have a great day !!
Maria