Hello
Today I am sharing a couple of tags I have made using the Blueprint range of stamps.
The first one is from the Sweetpeas Blueprint set and is on a mount board tag. I painted the tag with a copper metallic paint and then added a white crackle paint over part of it before stamping in Memento ink and colouring with alcohol markers.
My second tag uses the Wild Cornflower Blueprint set. Again it is another mount board piece which this time has been coloured with Distress Inks. I then stamped with VersaMark and embossed in gold. The flowers were then coloured with marker pens.
Thanks for looking and stay safe
Sandra x
Sunday, 10 May 2020
Friday, 8 May 2020
Repeat stamping and some pottery by Rachel
Hello there! Rachel here today with some samples from the April shows. These samples include some repeat stamping to create a border in the first card and more to create the whole thing on the second card...
In this first one I used a gelli print made using inks and then added the stamping of the butterflies and the small bud from the freesia blueorint set. I coloured both of these in water colour pencils.
This next card was again onto a gelli print - but this was a second generation print that was really pale. To creat this I stamped the sigle Cala lily first at 12 o clock, then turned my card 90 degrees to repeat the stamping at 3 o clock, then 6 o clock and then 9 o clock. Once I had got these in place I added the extra two in between each stamped image. Finally I coloured the flowers in using ink which I also splattered on to the corners of the card. Finally I added a sentiment!
Finally a piece of pottery - this was stamped in ink and then coloured in glaze as usual.
I hope you have enjoyed reading about my pieces.
I hope to see you again later in the month.
Big hugs
Rachel xx
Thursday, 7 May 2020
Butterfly Waltz ( by Magda)
Hello and nice to meet you again.
This time I have been inspired by Brian Crain's calm melody "Butterfly Waltz".
The pictures of a quick step by step will help you to create something similar on a gessoed page.
1. Just Butterflies and Music Fanfare stamped with Versafine on very light paper and glued
2. Tim Holtz Distress Crayons set 2, scribbled and blended with baby wipe
3. Stencil
4. Mesh
5. Decoupage of Just Butterflies coloured with water color pencils
6. Glue n'seal
This time I have been inspired by Brian Crain's calm melody "Butterfly Waltz".
The pictures of a quick step by step will help you to create something similar on a gessoed page.
1. Just Butterflies and Music Fanfare stamped with Versafine on very light paper and glued
2. Tim Holtz Distress Crayons set 2, scribbled and blended with baby wipe
3. Stencil
4. Mesh
5. Decoupage of Just Butterflies coloured with water color pencils
6. Glue n'seal
Crackled background Tag
For this tag I used the Large Crackle Background stamp, colored the decoupage flower and leaves of Sketchy Doodle Landscape with Distress Ink Pad and used the sentiment of Butterfly Flourish
Thank you for passing by, hugs
Magda
Tuesday, 5 May 2020
sweetpea heart (by Veronica)
This card uses a mix of stamps from the sweet pea blueprint and cornflower blueprint stamp sets.
I started by using the heart stamp from the artist trading heart set to create a mask and sponged round it with victorian velvet and dusty concord distress inks, then added more victorian velvet into the centre of the heart.
I stamped the blueprint from the cornflower set using the dusty concord ink, and then the smaller sweet pea image and the sentiment using versafine black. The flowers were coloured with watercolour pencils. The mat was white card coloured with alcohol marker to match the background.
My second card is from an earlier set of stamps, using the lovely magnolia from happy flowers day.
The background was created on a gelli plate, using distress oxide inks and brusho powders - I ended up with rather more water than I had intended on the plate, but thought the splodges went with April showers....
The magnolia was stamped using black versafine and clear embossed, then coloured with watercolours.
trimmed down to fit a white 6" square card blank and edged with alcohol marker.
I left it without a sentiment for now, as it will have one added when I need a card in a hurry.
I do hope you are all managing to keep well and cheerful in these strange times, I find all the facebook live craft videos are great - though if I watch them all I would never get anything done!- though I do make an effort to watch Lesley and David at 1.30 each weekday on the Chocolate Baroque facebook group page, there have been some great demos and inspiration, and Lesley is currently doing a series talking about the varieties of ink pads available.
I started by using the heart stamp from the artist trading heart set to create a mask and sponged round it with victorian velvet and dusty concord distress inks, then added more victorian velvet into the centre of the heart.
I stamped the blueprint from the cornflower set using the dusty concord ink, and then the smaller sweet pea image and the sentiment using versafine black. The flowers were coloured with watercolour pencils. The mat was white card coloured with alcohol marker to match the background.
My second card is from an earlier set of stamps, using the lovely magnolia from happy flowers day.
The background was created on a gelli plate, using distress oxide inks and brusho powders - I ended up with rather more water than I had intended on the plate, but thought the splodges went with April showers....
The magnolia was stamped using black versafine and clear embossed, then coloured with watercolours.
trimmed down to fit a white 6" square card blank and edged with alcohol marker.
I left it without a sentiment for now, as it will have one added when I need a card in a hurry.
I do hope you are all managing to keep well and cheerful in these strange times, I find all the facebook live craft videos are great - though if I watch them all I would never get anything done!- though I do make an effort to watch Lesley and David at 1.30 each weekday on the Chocolate Baroque facebook group page, there have been some great demos and inspiration, and Lesley is currently doing a series talking about the varieties of ink pads available.
Sunday, 3 May 2020
Sweetpea Blueprint and Heartfelt Bouquet by Penny
Goodly morning peeps, I hope that you are all still keeping fit and well, and coping with lockdown! I think the lovely weather last month helped, let's hope it comes back soon. Meanwhile I'm here with my first post of May, a couple of simple, pretty cards using the same stamp set - Sweetpeas Blueprint.
Sweetpea Blueprint.
As well as the beautiful stamps I have used Versamark ink, silver EP, blue Versafine Claire ink, and alcohol pens from my stash.
On a piece of dark blue card I stamped the technical images and embossed them in silver. I used a silver pen around the edges of the card then stamped and embossed a sentiment onto the card.
I took a piece of smooth white colouring card and stamped the floral blueprint image in blue ink. I then coloured the image with pens and cut it out. I took a white base card and stamped a leafy image repeatedly down one edge in blue ink. I attached the coloured image to the background panel then attached the panel to the base card.
Heartfelt Bouquet.
For this project I have used blue Versafine ink, Distress inks, and a sentiment from the Words to Dazzle and Sparkle stamp set.
On a piece of Drawing Cartridge I stamped the spray of Sweetpeas in blue ink then masked it and stamped twice more. I removed the masks and used DIs to watercolour the images. I blended some ink around the edges of the panel then matted it onto dark blue card. On another piece of white card I stamped a leafy image repeatedly in blue ink. I created a bow with the card, using a template from my stash.
I used the blue ink to stamp a sentiment onto the focal panel, then attached it to a white base card.
Thank you for dropping in today, I hope you've enjoyed my post. I'll be back later in the month with more crafty samples.
Until then keep healthy, stay safe, and keep crafting!
x x Penny x x
Saturday, 2 May 2020
April's Blog Comment Winner
Hello and welcome to the Chocolate Baroque Design
Team Blog.
We hope that you are all safe and well.
We truly appreciate the time you take to let us
know your thoughts about our designs, so each and every comment is very important
to us.
Each comment in April was assigned a number and we
used Random Org to draw a winner.
Congratulations to TRACY WELHAM you have won this month's £15.00 voucher to spend on
Chocolate Baroque stamps.
To claim your prize, please email here to
confirm your email address and Lesley will send your gift certificate.
Lesley will be giving another £15 gift voucher to
another lucky winner drawn from May's comments.
The more comments you leave, the better your
chances of being the winner.
Thank you so much for all the kind comments you
leave.
Good luck from all on the Design Team

Labels:
Blog Winner
Friday, 1 May 2020
Shades of Green and Orange (by Judith)
Hello everyone, our unusual lockdown life seems to be rather normal these days. Crowds and large gatherings almost feel out of place and it will be strange to go back to a life where we can meet up and see friends once again. Hopefully you have been able to catch Lesley's daily Butterfly Tree Facebook Live get togethers and have been getting lots of inspiration from her demos and tips. Maybe you have made new friends through these virtual gatherings, and do not feel so isolated being able to share in the chat and crafty experience.
I am sharing a couple of cards today featuring stamps used from last month's TV shows on Hochanda. I actually made these cards a little while ago, but never blogged them, so decided to show them to you this time around instead. The first card features the Bokeh technique on the background, and is a bright, zingy card, sure to brighten anyone's day. It would be great for any occasion, and you could add a sentiment to suit the situation.
I created a background using Brushos, and chose a palette of greens and blues, making sure that I covered the background really well. I dried the background, and then using a range of circle stencils, and white ink, starting with the largest stencil, I stencilled over the background. I added enough of the largest circle until I was happy, then moved onto the medium circle, overlapping some of the larger circles, then added the smaller circle, again overlapping some of the other circles.
The Bokeh technique is used to recreate a photographic effect which looks like an out of focus blur on a photograph. It is great for backgrounds, to then add something sharper in the foreground. I chose to add some of the butterflies from Butterfly Mind. I stamped them onto some card that I had coloured with orange Brushos for a really great contrast of colour, and cut them out. I omitted the stamens. I stamped the butterflies once more directly onto the background, and layered the cut out butterflies over the top. I added a sentiment from the same stamp set.
For my second card, I created a gelli print background using Distress Inks. I stamped the large film strip butterflies directly onto the gelli print and stamped the butterflies again onto a piece of coloured card, and decoupaged them onto the background. I added the splatter image around the edge of the background to complete the card.
Take care everyone and stay safe, thanks for stopping by,
Judith xx
I am sharing a couple of cards today featuring stamps used from last month's TV shows on Hochanda. I actually made these cards a little while ago, but never blogged them, so decided to show them to you this time around instead. The first card features the Bokeh technique on the background, and is a bright, zingy card, sure to brighten anyone's day. It would be great for any occasion, and you could add a sentiment to suit the situation.
I created a background using Brushos, and chose a palette of greens and blues, making sure that I covered the background really well. I dried the background, and then using a range of circle stencils, and white ink, starting with the largest stencil, I stencilled over the background. I added enough of the largest circle until I was happy, then moved onto the medium circle, overlapping some of the larger circles, then added the smaller circle, again overlapping some of the other circles.
The Bokeh technique is used to recreate a photographic effect which looks like an out of focus blur on a photograph. It is great for backgrounds, to then add something sharper in the foreground. I chose to add some of the butterflies from Butterfly Mind. I stamped them onto some card that I had coloured with orange Brushos for a really great contrast of colour, and cut them out. I omitted the stamens. I stamped the butterflies once more directly onto the background, and layered the cut out butterflies over the top. I added a sentiment from the same stamp set.
For my second card, I created a gelli print background using Distress Inks. I stamped the large film strip butterflies directly onto the gelli print and stamped the butterflies again onto a piece of coloured card, and decoupaged them onto the background. I added the splatter image around the edge of the background to complete the card.
Take care everyone and stay safe, thanks for stopping by,
Judith xx
Thursday, 30 April 2020
Florals and Marks (by Sandra)
Hello
I am sharing some more of my cards made for the March shows on Hochanda.
My first card is a clean and simple card using stamps from the Make Your Mark set. These are stamps that I would normally use in mixed media, but it just goes to show how versatile and fun these stamps are. I stamped with Archival Ink and masked each circle off with Masking Tissue.
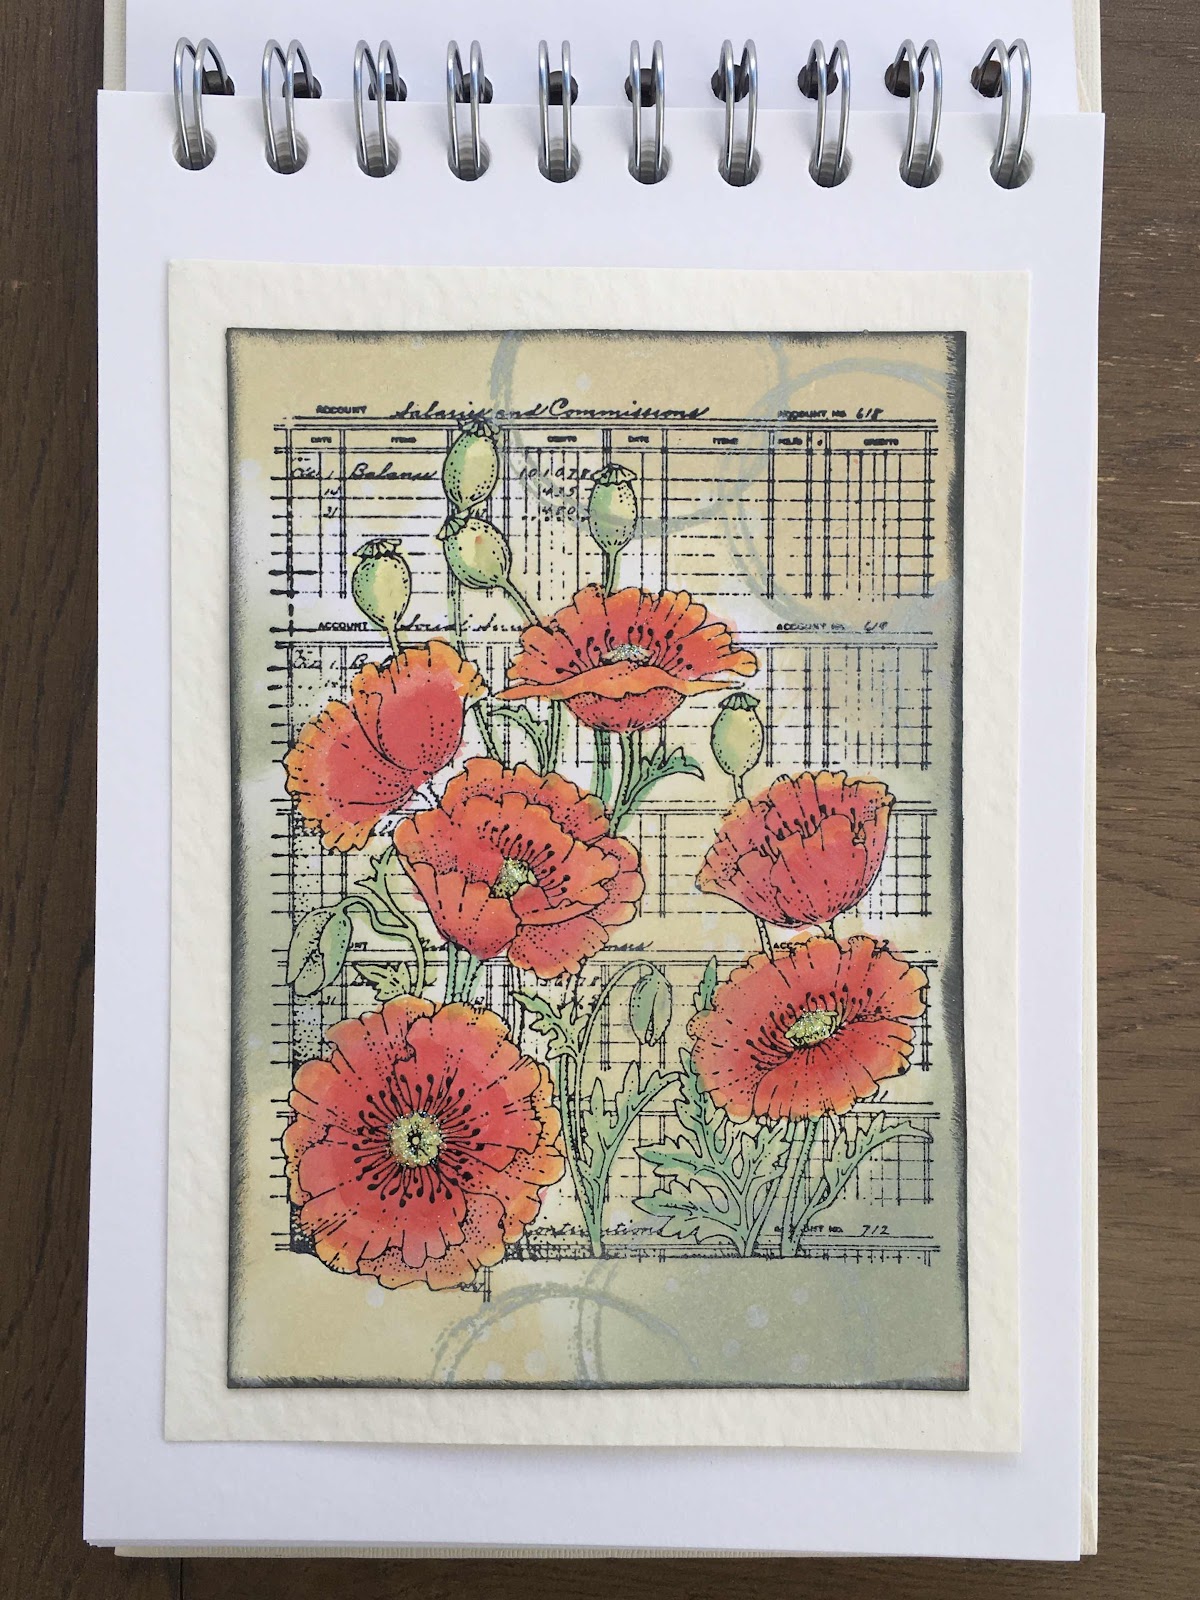
This is the beautiful Poppy Ledger set. I love how the fresh poppies work so well with the old ledger background. The background is made with Distress Inks and the poppies are coloured with watercolour pens.
Here, I have cut a section of the Poppy Ledger with a scalloped die and layered up onto some card. I have made a background using the small stamp from Make Your Mark which Lesley made from sticky tape!
Thanks for looking
Sandra x
I am sharing some more of my cards made for the March shows on Hochanda.
My first card is a clean and simple card using stamps from the Make Your Mark set. These are stamps that I would normally use in mixed media, but it just goes to show how versatile and fun these stamps are. I stamped with Archival Ink and masked each circle off with Masking Tissue.
This is the beautiful Poppy Ledger set. I love how the fresh poppies work so well with the old ledger background. The background is made with Distress Inks and the poppies are coloured with watercolour pens.
Here, I have cut a section of the Poppy Ledger with a scalloped die and layered up onto some card. I have made a background using the small stamp from Make Your Mark which Lesley made from sticky tape!
My last card is the Floral Study set. I stamped in Versafine Clair ink and used Distress Inks to colour in the flowers.
Sandra x
Tuesday, 28 April 2020
Flower Power by Rachel
Hello there - Rachel here today with some more samples from the March shows - this time using the poppy ledger and floral study stamp sets.
In this one I stamped in versafine on white card then heat set in black embossing powder. I coloured the flowers in using water colour pencils then mounted on black card and added the words.
In this one I stamped in versa mark onto some of the papers from the January shows heat set it with white embossing power. I then repeated this on another piece of paper and fussy cut the flower heads. I also used the dotty stencil on the backing card.
In this one I used the poppy ledger stamp onto a pre coloured inky background and painted the flowers using luscious powders. In the background I used the dotty stencil and a stamp from the make your mark set.
I hope you have a good day.
Hugs
Rachel x
Sunday, 26 April 2020
First Stamps -- (by Magda)
Hello,
Which are your first stamps you bought from Chocolate Baroque ?
I am fond of mine "Serenity and " Gothic Fragments" both bought in 2011 and that I use every time with a particular sense of respect.
I propose you today a card and a page of my Journaling Book, in oder to arrive soon at the last page of it and I can start a new one.
Serenity , Gothic Fragments, Archival Jet Black, Distress Ink Pad, stencil
Gothic Fragments, Words to Dazzle and Sparkle, Archival Jet Black, Distress Ink Pad, stencil
Which are your first stamps you bought from Chocolate Baroque ?
I am fond of mine "Serenity and " Gothic Fragments" both bought in 2011 and that I use every time with a particular sense of respect.
I propose you today a card and a page of my Journaling Book, in oder to arrive soon at the last page of it and I can start a new one.
Serenity , Gothic Fragments, Archival Jet Black, Distress Ink Pad, stencil
Gothic Fragments, Words to Dazzle and Sparkle, Archival Jet Black, Distress Ink Pad, stencil
Thank you for passing by, and see you next month again.
Magda.
Saturday, 25 April 2020
gelli seedheads (by Veronica)
Good morning everyone - today I am sharing some of the samples using the seed heads image from the glorious set of stamps. I loved this large stamp - my samples were done using a 7" square card base, to give an idea of the size - and it was the perfect image to go with a stack of backgrounds I had. The backgrounds were all made using inks and brusho powders on a gelli plate - I really liked the random nature of the results, even using the same colour combinations gave totally differing results.For my first card I used an autumn colour background, stamped the complete image using versafine onto the background and again on white card and clear embossed this one. I coloured the spare one with alcohol markers, cut the seed heads out and glued over the original image. I also added glossy accents to the front image to make it stand out a little.
The second background was more spring tones,and I stamped the words and the cracks from make your mark in grey ink round the edges before stamping the seedheads in black ink and clear embossing them. Seed heads coloured with alcohol markers - the centre of the background was light enough that the markers covered it quite well. Again i added glossy accents to the front image.Here I added the circles and cracks from make your mark, and the words from both of the main images of glorious randomly across the background. Seed heads stamped in black and clear embossed onto spare card, coloured with alcohol markers, cut out and glued in place.
This version I stamped the image and words in black ink, onto another gelli plate background, clear embossed, then used bleach on the seed heads. I used similar shades of distress ink to create a background for the base card using random stamps from make your mark.
When I cut the stamps out, I carefully cut between the main images and the words, so I could use the words separately if I wanted, but still line them up with the image as they were originally.....a tip from Judith that really works, it's a bit hair-raising the first time you do it though!
Wednesday, 22 April 2020
Steampunk Scene (by Kim)
Hello everyone, today sees the last post this month from our Guest Design Team member Kim. She has created a fabulous Steampunk themed project to inspire you.
Kim writes:
Hi there everyone, one of my loves is Steam Punk and what better to use than Chocolate Baroque's Steam Punk stamps.
Punky Flowers & Steampunk Funky Fish
I first brushed Vintage Photo through a stencil then stamped my images onto separate pieces of card. With the Seahorse I also masked him and extended his wing with adding a leaf from one of the punky flowers. The main punky image was stamped onto the flat image. I then stamped the image again onto the card - coloured them in - carefully cut them out - edged with more Vintage Photo. I did the same for the flower heads.
I then put the card together - foam mounting the seahorse, the flower heads and the focal image of the main punky flower.
Lastly, I die cut some cogs.
Then the last finishing touches mounted on to gold mirror card and on to my base card. Voila!
Hope you are all keeping well
Kim x
Kim writes:
Hi there everyone, one of my loves is Steam Punk and what better to use than Chocolate Baroque's Steam Punk stamps.
Punky Flowers & Steampunk Funky Fish
I first brushed Vintage Photo through a stencil then stamped my images onto separate pieces of card. With the Seahorse I also masked him and extended his wing with adding a leaf from one of the punky flowers. The main punky image was stamped onto the flat image. I then stamped the image again onto the card - coloured them in - carefully cut them out - edged with more Vintage Photo. I did the same for the flower heads.
I then put the card together - foam mounting the seahorse, the flower heads and the focal image of the main punky flower.
Lastly, I die cut some cogs.
Then the last finishing touches mounted on to gold mirror card and on to my base card. Voila!
Hope you are all keeping well
Kim x
Tuesday, 21 April 2020
Fabulous Floral and Beautiful Seedheads by Penny
Goodly morning everyone, I hope you are all still keeping well and having lots of crafty fun while at home. I'm here with my second post this month and I have a couple of quick designs for you today.
Fabulous Floral.
I have used stamps from the Glorious, Honey Bee, and Make your Mark sets; Distress Inks, black Versafine ink, clear EP, white paint pen, CB Textured Art Card, and a previously made background from my stash.
I took another of the backgrounds that I had made on a CB Craftalong, created with a Gelli plate and acrylic paints. This one was a lovely mixture of yellows and oranges I felt it only needed black, white and a touch of green. I stamped and embossed the large floral image and a sentiment onto the background and a couple of leaves on a spare piece of card. I used a white paint pen to colour the tiny flowers and painted the leaves with green DI before cutting them out and attaching them to the flower.
I trimmed the background panel and added black pen around the edges. I took a piece of CB Art Texture card which I had made into a base card and stamped two images from the Make Your Mark set using DIs around the edges. I stamped and embossed a large Bee image, coloured it and cut it out, then attached it to the card.
Beautiful Seedheads.
For my second project I have used stamps from the Glorious and Make Your Mark sets; Distress Inks, alcohol markers, sepia Versafine ink, clear EP, and a CB stencil from my stash.
I began by stamping and embossing the seedheads, masking them and repeating the step.
I then coloured the images with alcohol pens. I used DIs to stamp and stencil a background, then blended ink around the edges of the panel. I matted the focal panel onto black card, and created a sentiment panel in the same way
I took a white base card and stamped the seedheads in DI on one side. I used a brush and water to colour the image then attached the focal panel and sentiment panel.
Thanks for dropping in, I hope you've enjoyed this post and maybe got some ideas to try yourself! I'll be back next month with some more craftiness.
Take care everyone and stay safe,
x x Penny x x
Sunday, 19 April 2020
Book Making and Making Marks (by Judith)
Hello everyone, I have a few more projects to share with you today showcasing the fabulous stamps that we brought to last month's TV shows on Hochanda. The collection of stamps had a little bit of something for everyone, and I enjoyed working with them so much. I am sure that you will love them too!
My first project is a handmade book, I love books, and used to buy so many of them. Nowadays, I like to make my own, from simple accordian books, to fabric covered books that I have stitched together and used more complicated bookbinding techniques. This project uses a corrugated cardboard envelope that I received from a mail order company, and I have simply taken advantage of the fold of the envelope to create the spine of the book. I folded twelve pieces of drawing cartridge in half, splitting them into three groups, and these became the signatures of my book. I popped the pieces inside each other, so that I had four pieces of drawing cartridge sitting neatly inside each other, in groups of three. I made three holes up the fold of each group of paper.
I cut the cardboard envelope to make a cover so that it was slightly larger than the drawing cartridge, and made three lots of three holes in the spine, which would enable me to sew each signature into the cover in a simple bookbinding method. There are lots of You Tube tutorials for this, just do a search online for 'simple bookbinding', and you will find lots of help. If I were to make another one of these books, I do think that I would put washi tape on the spine for added strengthening, but I am not intending to put this book through a lot of tough use, so it will probably be okay.
I used bookbinding thread to sew the signatures into the book, but you can used dental floss if you do not have any specialist supplies.
I used black card as a matting layer, this really sets off the zingy colours that I chose for my masterboard background. I used Distress Inks to blend across some drawing cartridge, and added tone on tone stamping using the bubble wrap effect stamp from Make Your Mark stamp set. I added the cracked stamp and circles in grey ink, and some of the word clusters to build up the background. To finish, I stamped the large circle using black ink onto a piece of scrap card, added the words once more, and matted it onto black card, to create a topper. I felt that these words were perfect for a journal, and especially in these uncertain times, they can remind us that life is not so bad after all.
You could create lots of these masterboard backgrounds and cut them up to make cards, bookmarks, book covers, all sorts of projects, it just goes to show that these mark making stamps can be the stars of the show and not just for backgrounds.
For my next project, I created a background of soft greens, and added leaves and a word cluster from the Glorious stamp set using a darker green ink. I stamped the Floral Study onto a smaller piece of card, and coloured the image using watercolour pencils. I edged both pieces of card with Seedless Preserves Distress Ink.
The background on this card contains a bit of everything! I coloured the drawing cartridge using Distress Ink, and added some stamping using the Large Crackle Background stamp. The circles,words and bubble wrap image are from the Glorious stamp set, and I have used the Chocolate Baroque Strip Stencil set. I have stamped and embossed the Poppy Ledger image onto kraft card using white embossing powder, and coloured it using Koh-I-Noor paints.
Finally, a super quick little masculine card using kraft card once more. I used the tape image from Make Your Mark and three different colours of ink; red, brown and white. I then stamped the sentiment onto one of the strips, which is something that Lesley had always envisaged with this strip image. You could change the colours, as some of the other Team members have done, and make really colourful versions of this type of design.
Thanks for stopping by,
Judith xx
My first project is a handmade book, I love books, and used to buy so many of them. Nowadays, I like to make my own, from simple accordian books, to fabric covered books that I have stitched together and used more complicated bookbinding techniques. This project uses a corrugated cardboard envelope that I received from a mail order company, and I have simply taken advantage of the fold of the envelope to create the spine of the book. I folded twelve pieces of drawing cartridge in half, splitting them into three groups, and these became the signatures of my book. I popped the pieces inside each other, so that I had four pieces of drawing cartridge sitting neatly inside each other, in groups of three. I made three holes up the fold of each group of paper.
I cut the cardboard envelope to make a cover so that it was slightly larger than the drawing cartridge, and made three lots of three holes in the spine, which would enable me to sew each signature into the cover in a simple bookbinding method. There are lots of You Tube tutorials for this, just do a search online for 'simple bookbinding', and you will find lots of help. If I were to make another one of these books, I do think that I would put washi tape on the spine for added strengthening, but I am not intending to put this book through a lot of tough use, so it will probably be okay.
I used bookbinding thread to sew the signatures into the book, but you can used dental floss if you do not have any specialist supplies.
I used black card as a matting layer, this really sets off the zingy colours that I chose for my masterboard background. I used Distress Inks to blend across some drawing cartridge, and added tone on tone stamping using the bubble wrap effect stamp from Make Your Mark stamp set. I added the cracked stamp and circles in grey ink, and some of the word clusters to build up the background. To finish, I stamped the large circle using black ink onto a piece of scrap card, added the words once more, and matted it onto black card, to create a topper. I felt that these words were perfect for a journal, and especially in these uncertain times, they can remind us that life is not so bad after all.
You could create lots of these masterboard backgrounds and cut them up to make cards, bookmarks, book covers, all sorts of projects, it just goes to show that these mark making stamps can be the stars of the show and not just for backgrounds.
For my next project, I created a background of soft greens, and added leaves and a word cluster from the Glorious stamp set using a darker green ink. I stamped the Floral Study onto a smaller piece of card, and coloured the image using watercolour pencils. I edged both pieces of card with Seedless Preserves Distress Ink.
The background on this card contains a bit of everything! I coloured the drawing cartridge using Distress Ink, and added some stamping using the Large Crackle Background stamp. The circles,words and bubble wrap image are from the Glorious stamp set, and I have used the Chocolate Baroque Strip Stencil set. I have stamped and embossed the Poppy Ledger image onto kraft card using white embossing powder, and coloured it using Koh-I-Noor paints.
Finally, a super quick little masculine card using kraft card once more. I used the tape image from Make Your Mark and three different colours of ink; red, brown and white. I then stamped the sentiment onto one of the strips, which is something that Lesley had always envisaged with this strip image. You could change the colours, as some of the other Team members have done, and make really colourful versions of this type of design.
Thanks for stopping by,
Judith xx
Saturday, 18 April 2020
Journal page by Zoe
Good morning once again Lovelies.

Sorry it’s only one to show, hope it was worth a look lol.
I’ve scheduled this post so I’m unaware if we are still in lockdown or not? Hoping we’re not, but by the way things were sounding this was going to be a while.
I do hope you’re all managing to keep well, active and occupied, by now I imagine it’ll be almost second nature, let’s hope it changes soon and life can get back to some sort of normality.
I was sadly unable to make samples for the Hochanda shows when these amazing stamps were launched.
I have had a little play and created a journal page which I used Oxide to create my background and colour in plus a bit of Watercolour markers to brighten the colours a bit more, some glitter glue in the centres and Voila! I incorporated the amazing “make your mark” stamp set into the background, I love this set, so versatile.
Sorry it’s only one to show, hope it was worth a look lol.
Take care and stay safe, big virtual hugs xx Zoe xx
Thursday, 16 April 2020
Colour bursts by Brenda
Hello everyone, I never make any secret of the fact I love using colour in my work and today I have a collection of vibrancy to share.
Starting with the Whiteboard tag at the top which I treated to generous amounts of acrylic pain and gesso added with a brayer, pattern added using the square mask from Strip Stencils and random patterns using Make your Mark. Next I stamped seed heads from Glorious, sentiments and flicks of white pen.
The background was the brayer 'waste' from making the above tag and the same stencil set used to add some patterns, I like to apply paint or ink or in this case gesso to the stencil, dampen with water and then place onto the background and gently rub to release the patterns. The flower is from Glorious and some added background using Make your Mark. The sentiment is stamped onto a lolly stick which I painted with gesso to bring down the colour.
A Whiteboard Tag inked with Oxides and stamped with Floral Study coloured with watercolour pens. Again I have used the Strip Stencils in the background. I added some seam binding and a few sequins.
The seed heads from Glorious stamped onto a Gelli Plate background, coloured with pencils and stamps from Make your Mark around the edge. As with one of my cards earlier in the month the strip across the bottom is a scrap of pea netting from the garden, I rather like the organic feel it gives.
And finally there had to be another using the lovely Poppy Ledger which I stamped with Versafine Claire, coloured with Distress Markers and used a die set to create the card.
Stay safe and well everyone.
Subscribe to:
Posts (Atom)