Pin It button on image hover

Thursday, 15 December 2011

Springtime Stamps

I know, I know, Christmas isn't even here and we're already releasing stamps with a definite springtime theme.

Well I wanted to get these on the website before our Christmas break, so here they are, two new A5 stamp sets:


Pretty Birdcage

Honey Bee


Main image coloured with prismacolour pencils
The team have come up with some really lovely ideas for these stamps and over the Christmas break we'll be scheduling some posts featuring their gorgeous artwork.

In the meantime I have one of each set to give away so leave a comment to be in with a chance of winning.  I'll pick winners in a week (Wednesday 21st December) so I can get the prizes sent out before Christmas.


PS - if you think these stamps would make an ideal addition to your Christmas stocking, check out this article on my blog about the Amazon Universal Wish List button - it's such a neat idea!

Tuesday, 13 December 2011

Green and Copper Squares


This is one of my samples from the fascinating Texture Fragments plate. This stamp set really encourages play. I started by using my stamp positioner to help me get an overall background pattern by piecing the small stamp together. Working on green pearlescent card, I used black perfect medium to help me see where I had stamped before I embossed. I find this a really useful ink to have. I embossed in copper powder.

I used small and one larger square of Stampbord, inked with green ink. I edged the tiles with a black marker pen. When fully dry I then embossed in more copper powder. I positioned all the tiles onto the background, added large square brads to the layout and matted the whole thing on a black 6 x 6 card.

Hope you are enjoying the amazing artwork from the team.

Elaine 

Saturday, 10 December 2011

Faux kraft resist tag

Hi there, I really enjoyed making this tag with the Texture Fragment stamps. I love creating backgrounds and these stamps are perfect for so many styles. I decided to have a go at making a kraft resist effect by layering up some of the stamps from this themeplate but it doesn't show up too well in the pic


I stamped the filigree panel stamp in pumice stone and then overstamped with the same stamp in tea dye distress ink, using a brick effect to overlap the stamps. The gorgeous border was stamped with black versafine and embossed with clear EP. Next I stamped the texture stamp  around the edges with versamark and embossed with clear EP before adding lots of vintage photo and a little black soot distress ink.

I stamped the sentiment from 'Home Sweet Home' and again embossed with clear EP. The main image is also from 'Home Sweet Home', painted with distress inks and framed with a diecut frame that I embossed with black soot distress embossing powder. To finish off I've added some ribbon from my stash, coloured with vintage photo distress ink and a little brass effect brad.

I hope you are enjoying all the inspiration from the DT this week
hugs
Claire xx


Friday, 9 December 2011

Woodland forest with texture fragments.......


Hi there,

Today I want to show you these two cards using the woodland forest and texture fragments stamps. These textures are really fun playing with. They are very versatile! I wanted to do 'winter' cards so I used a lot of cool blues and greys.
I also cut the Crealies petals(Petal no.5) and flowers(flower no.18) on waterbased paper and coloured them with Distress inks.(on both cards) This Petal and flower matches together perfect.
On the first card I've used the trees from the Woodland forest sheet and a stamp of the Texture fragments. I've also used a mask as you can see on the left side and used some self made glimmer mist.(a teaspoon of perfect pearls and some water in a spray bottle). I gave some accents in the textures with white pencil as also in the trees.
On the second card I've used also the leaf from the Woodland forest sheet and the window and textures from the Texture fragments sheet. This time I've embossed the textures with silver EP.  On the right side you see the branches of a tree which I've made using a mask.(Crafters workshop template)

Hope you get inspired and wishing you a nice day,

Thursday, 8 December 2011

ATCs on a Canvas

When the Textured Fragment stamps arrived I immediately thought playtime. These stamps are so useful and fun to use not only with paper and card. I've decorated beads, buttons and used with air drying clay.
I started my project by cutting my ATCs and chose a selection of Distress Inks. I coloured the cards and then stamped the main images from my selection of stamps that are firm favourites.
Dawn Chorus Wise Owl Teeny Weeny Trees

Our Design Team Buddy Judith regularily posts on her blog to encourage using stamps from your stash.


I used Jet Black Archival Ink as I wanted the image to stand out. I had fun stamping the fragments around the edge of the card. I mounted each of the ATCs onto black card as the backs were rather messy when I'd finished colouring. I took advice from Lesley W as I wanted to show them off to there best and she suggested putting them together, big thanks Lesley.
I had a canvas that had been painted at least 6 times. I covered the center with paper from Echoes of Italy paper pack. The longest part of this project was arranging the ATCs as I kept changing my mind where each one should be.
I have a selection of ATCs that are dotted around my room and I'm planning on creating a couple more canvas's to display them.

I certainly can see the benefit of having these stamps in my stash and hope you can take some inspiration from the DTs ideas.

Debbie

Wednesday, 7 December 2011

Crocodile Shoes

I was a little unsure where to start when I received the Texture Fragments stamps but  once you start playing with these stamps you just can't stop. They are really versatile stamps and lend themselves to so many different techniques.


 I thought that one of the stamps looked a little bit like a crocodile print and set to with alcohol inks on glossy card and them over stamped with the texture stamp using Rich Cocoa memento dye ink.  The gorgeous swirly corners are from Christmas Angel of Light stamp sheet, stamped in versamark and embossed with brown EP.

To create the shoe I used the free Paper Shoe Template and more of the glossy card coloured with alcohol inks. This time I stamped the texture in versamark and  again embossed with brown EP. I trimmed the shoe with ribbon and lace and added a Vintage Trinkets metal flower.

To finish off I've added some paper flowers and die cut leaves (Crealies shapes 11) and a die cut happy birthday sentiment.

Thanks for popping by
Claire xx

Tuesday, 6 December 2011

Alcohol ink resist church window (posted by Judith)

Hi folks, I'd like to show you another project that I made using the 'Background Texture' stamp plate.

As soon as I saw the stamp plate, the window stamp caught my eye, and I wanted to create a stained glass effect with this stamp. I decided to create a canvas, and use the stamp as the central image. I painted the canvas with a stone coloured acrylic paint, adding some of the other background stamps for interest. I used a mixture of acrylic paint, and archival inks to achieve this.

I then created the acetate panel using alcohol inks and archival ink. I used toning card to cut some Crealie flowers, which I layered around the edge of the canvas, and added some black leaves in keeping with the general colour scheme. I wanted to give the feel of ivy creeping up a church wall.
This stamp plate has made me experiment with colour schemes that I might not normally think of using, and I am really enjoying the opportunity to try new ideas. Keep checking back for more samples from my Design Team members using these really versatile stamps. Thanks for stopping by, Judith xx

Saturday, 3 December 2011

Peacock Texture Card (posted by Judith)

When I received the 'Background Texture' stamps from Glenda, I was quite excited, because I could see lots of possibilities with these stamps. It is a really useful stamp plate, giving lots of options for texture and layers in backgrounds, and a chance to experiment with things like clay and UTEE, that we perhaps don't use very much.

For my first project, I started off fairly safely using one of the background stamps to recreate the look of the salt backgrounds that I like to make so much. I coloured a piece of watercolour paper with Ecoline ink, and then embossed the stamp using a copper embossing powder.

I then took three domino sized pieces of Stampbord, which I taped together with masking tape, and coloured with inks, before stamping with another one of the texture stamps. This one reminded me of the markings on a peacock's feather, and so I used a toning backing paper from the Artylicious Peacock Summer Party CD to finish off my card.

As I put my card together, I added a sentiment from the Artistic Affirmations set, and used some copper card and teal ribbon to bring the whole thing together. I edged the Stampbord pieces with a Krylon pen, and split them up slightly.

Keep checking back to see what else my team mates have made using this fabulous stamp plate over the next few days. Thanks for stopping by, Judith xx

Wednesday, 30 November 2011

Videos now uploaded

Firstly I must apologise to anyone who viewed the blog yesterday - I'd put the wrong picture in for Country Views and it was also wrong on the website.  Both are correct now, but for the record, here is an image of both - Sunburst Scenes on the left, Country Views on the right.  Also available as a multi-buy special offer.

There are also three videos on YouTube and I am going to try to embed them here for you.


If you can't see the videos here for any reason, try visiting my YouTube channel.

Altered Book (posted by Judith)

When Glenda sent me the new Country Views stamp set, I fell in love with the little folly stamp on the plate, and wanted to make this a focal point of a project. I have made altered books before, and decided to make one for a Design Team piece.

Now for those of you that are horrified at my alteration of a good book, I will tell you where I get my books from! I buy my books from charity shops, so the proceeds always go to a good cause, and I choose books that have seen a better life, and have therefore outlived their usefulness.

Once I had cut a circle in the front cover of my book with my trusty Tim Holtz Tonic scissors, I painted the book first with gesso, then a couple of coats of acrylic paint. I mixed the colour myself, using a couple of colours, to achieve the shade that I wanted. I then dry brushed a darker colour around the edges. I embossed one if the fabulous new Texture stamps onto the book with gold embossing powder. I tore a loose circle shape out of the first few pages, creating a niche, and then stamped the folly stamp onto a spare piece of card. I coloured the image with Polychromos pencils, and blended the colours, adding extra shading where necessary. I then inked around the image with Distress Inks, before fixing the card into the book.

I wanted to add some flowers, and was undecided as to which colour to use, so I looked at a colour wheel for inspiration. The opposite colour to the zingy green that I had chosen for my book, was a lovely plummy pink colour, so I went with that, and added some ribbon in a similar shade as the closure for the book. I stamped and cut out some leaves from the 'Woodland Dreams' stamp plate to go with the flowers, as I love the leaf on this stamp plate, it is a firm favourite of mine. I also added the sentiment from the same stamp plate.


These stamps are so much fun to work with, and I really enjoyed creating this project. Keep checking back to see what the other members of the Design Team have come up with over the next few days. Thanks for stopping by, Judith xx

Tuesday, 29 November 2011

Texture Fragments and other new stamps

Brace yourselves for a flurry of eye candy coming your way - we have new stamps!  Not only new stamps, but new web videos showing you some great ideas for them.


We have three new sets, starting with a full sheet A4 set called Texture Fragments.


As the name suggests, these are superb for creating texture, whether that is in polymer clay, air drying clay, embossing enamel, friendly plastic, shrink plastic, wax or any other medium you can think of.  Your textured pieces can be used to adorn bigger projects - a box maybe or a canvas, or you can use cookie cutters to make smaller items like jewellery.


Several of the images were designed with 1x3 inch microscope slides in mind - I was actually thinking about Suze Weinberg's technique of pouring molten UTEE onto a stamp with a Ranger memory frame on top to contain it.

Aside from all the wonderful possibilities with texture, they can also be used for other cool techniques including kiss stamping and one I think I just made up - "Faketangle".  You'll have to watch the video to see what I'm talking about.

The other two sets came about after the immense popularity of our Home Sweet Home stamp set that we launched earlier in the year.  You loved it so much, it's been one of our best sellers this year, so I hope you will like the follow ups.

Here is Sunburst Scenes

and here is Country Views


Not only will these coordinate with Home Sweet Home, but each set alone will give you a huge range of options for creating pretty landscapes.  Mix the two together and the number of permutations grows so you never need create the same landscape twice.

Here's a card featuring a UTEE piece made with Stained Glass Christmas, layered onto a stamp from Texture Fragments, embossed in clear on a coloured background, then rubbed with Distress Stains.


The DT admitted the Texture Fragments stamps pushed them out of their comfort zone at first, but I think you will find they rose to the challenge magnificently.  Watch out for their artwork coming along over the next couple of weeks.


Meanwhile, the White Christmas Challenge is still open until December 15th.  The prize fund is growing and you can now see my own response to the challenge on my blog. 


You can check out the videos on my YouTube channel here: www.youtube.com/user/glendawww

Thursday, 17 November 2011

Woodland Dreams tag card

It's been a while since I posted any of my own artwork here, so here's a simple birthday card which I've made two weeks before I actually need to send it - unheard of! 

I used a kraft tag and stamped the tree from Woodland Dreams with Memento inks and coloured with Prismacolour pencils.  I added some shading around the edge of the tag then mounted onto a piece of card which I had previously used to cut out a Nestability shape.  I liked the curved edge, so centred the tag on it and trimmed it to fit.  It's matted onto a lime green layer and stuck onto an 8x8inch card with backing papers from the Essence of Nature CD.  The sentiment is from Craftwork Cards and the gold leaves are cut with a Crealies shapes die.

I love the combination of chocolate and lime, but then I love chocolate with anything really!

Saturday, 5 November 2011

Reflections

Hi there, today I'm sharing a card made with stamps from  Echoes of Italy themeplate. I wanted to create a reflection of the beautiful image as a kind of visual echo and it took a bit of experimentation and a happy accident or two along the way.


I've brayered the sky  and the lake on glossy card and created the hills with promarkers and added lots of blender pen which has created a mottled effect. I was quite surprised at the result but I quite like the effect as it looks a little like hedges and shrubs .

The stamped image is also coloured with promarkers  and I added the reflected image using my brayer. This is a large stamp so I had to do this in two parts and it was very tricky so my tip would probably be to stamp the image on acetate to transfer it to the card.

I didn't want to add a lot of embellishments so to finish off I added some ribbon and gorgeous glitter leaves. I created the flower using  clear film from the Studio 490 Art Parts Sample Pack. I stamped the  huge flower from Decadent Brocade themeplate onto the film with Teal Blue stazon, cut it out and then heated it. Once you've heated the film it softens and you can give your flower loads of dimension. Its a lot of fun to work with too and if you don't like the result you can just reheat and try again.

I've really enjoyed working with these stamps, and I've got loads more ideas from the other DT members gorgeous projects. I hope you have too
Claire xx


Monday, 31 October 2011

Full moon over the vineyard

My card today was inspired by a friend talking about her wedding in Italy. She was married last year and had always wanted to marry there, her husbands family are from Italy. I made her invitations and wish I'd had this stamp set then. They married in the town square the violins playing and then walked with the guests to the hotel which is set in it's own grounds. Their photographs are amazing. I'm thinking of making them an anniversary card using these stamps.


I stamped the image with tuxedo black memento ink onto white card and coloured with copics and distress inks. Then stamped again to decoupaged the wall and trees. The main image is mounted onto card that has variagated leaf on the edge of it. I used paper from the Echoes of Italy pack and stamped the corners using the long ivy corners from Wedding Belle.

Thank you for stopping by

Debbie

Sunday, 30 October 2011

Another Italian view (posted by Judith)

Hi folks, I wanted to show you another sample that I made using the fabulous 'Echoes of Italy' stamp plate that Glenda has just released over on Chocolate Baroque My previous sample reflected the very bright colours around the Lake Garda area, but for this project, I wanted to incorporate some softer hues. I first called this project' From Senate to Ruins', as the border reminded me very much of a Roman senator's toga, and the arch was the remains of a grand building centuries later.

I stamped the arch, and masked it, using Eclipse tape, then formed the hills using torn paper, and inking against the edges. I used softer colours the further away from the front of the view I went. Purples and greys always work well to suggest distance. I then stamped some trees from one of the larger villa stamps either side of the arch. I coloured the arch using Polychromos pencils.


I quite like the main picture off centre on the card, for an unusual change in style. These stamps have been a real pleasure to work with.Keep checking back for more samples from my team mates this week. Thanks for stopping by, Judith xx

Saturday, 29 October 2011

Fairy Door

Hi there, my project today uses a stamp from the new themeplate 'Echoes of Italy' but theres a lot more to these stamps that just scenery. As soon as I saw this stamp I thought of a Fairy Door and decided to create a small canvas combining the beautiful gate with some of my old favourite stamps.


I made the background with acrylic paints, using pink and yellow for the background and then adding clouds with white and pearl paint applied with scrunched up kitchen roll. I then stamped some foliage  stamps from Autumn Hedgerow and embossed some with silver embossing powder and some with pink embossing powder.

To create the scene in the foreground I used the unicorn and fairy stamps from Gossamer Wings and the mushrooms from Nature Table, masked them with Eclipse Masking Tape  and  then stamped the arch from Echoes of Italy . I coloured the scene with Derwent Coloursoft pencils, added a little glitter and then cut it out, cutting the gate section out of the arch. I then stamped the gate on acetate and embossed with black embossing powder to create a wrought iron effect and attached it to the reverse of the scene. 

To give the project some depth, I curved the scene and used silicone glue to attach it. As a finishing touch I added some lace and braid around the bottom and a little braid to hang the canvas, attached at the back with double sided tape. To cover the back I painted a piece of card with some acrylic paint and attached it again using double sided tape.

I hope you're enjoying all the inspiration from the DT this week
Claire xx

Friday, 28 October 2011

Autumn's lovely Smile

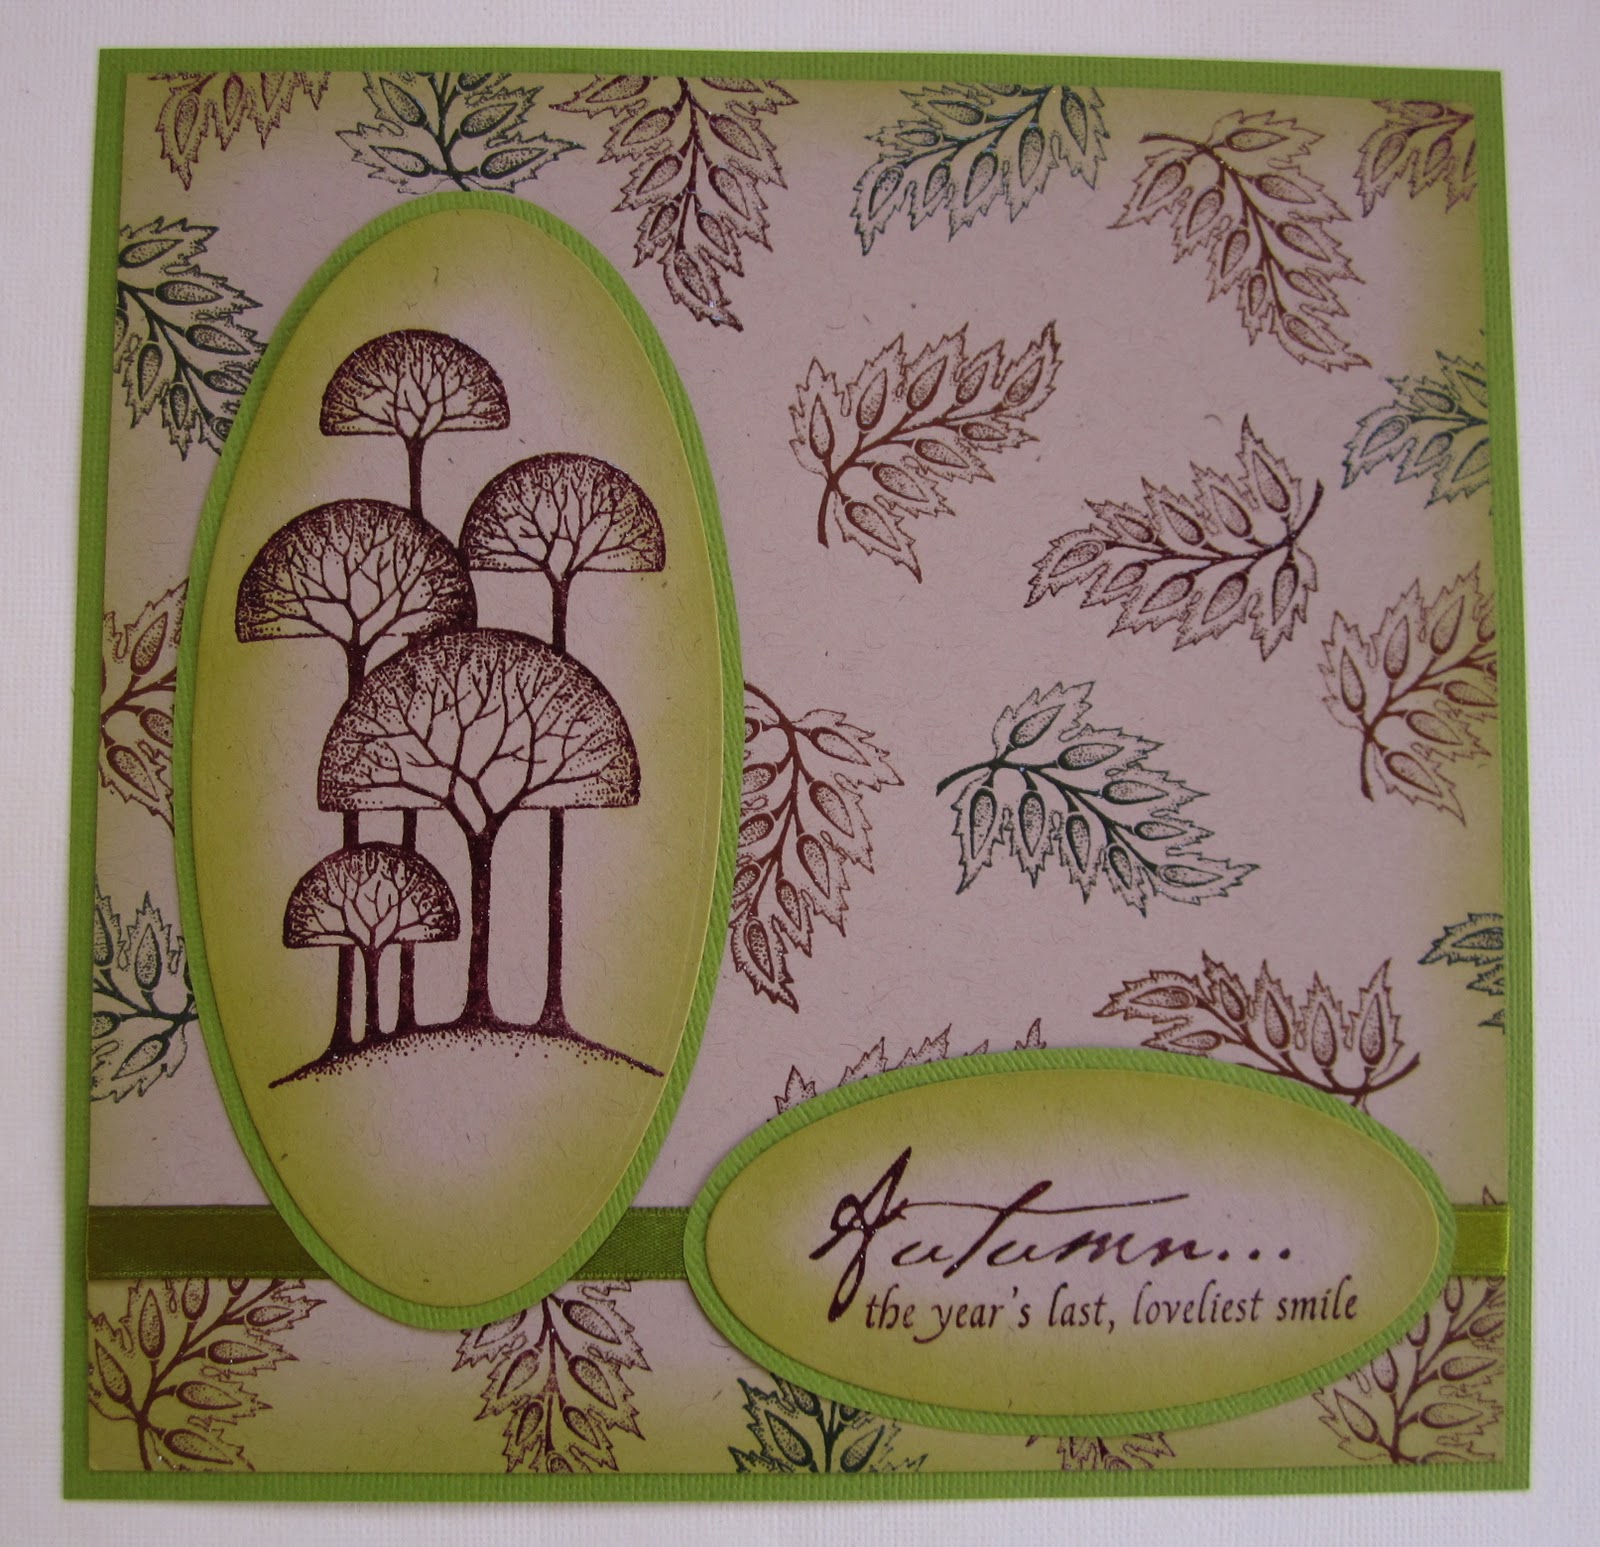
At this time of year, I love all of the different shades of brown and red around on the leaves, and I wanted to reflect that when I used these lovely new stamps from the 'Woodland Dreams' stamp plate. I chose to stamp my images onto Kraft card, to create a muted background, and used clear embossing over all of the images. I used a green ink to add shading around the edges, to correspond with the ribbon that I used. Lastly I used a sentiment that I am very fond of from the 'Nature's Peace' stamp plate, which just went with this card perfectly.


There are some fabulous images on this stamp plate, as you will have seen from Glenda's introduction. Keep checking back for more samples this week from the Design Team. Judith xx

Thursday, 27 October 2011

A leafy frame (posted by Elaine)

I am pleased to post a project using the new Woodland Dreams plate. I loved the leaf stamp, in fact this plate was made for me as I love nature themed projects.


First of all I cut an oval aperture in a piece of medium brown card and then I stamped the leaf randomly around it in russet archival ink. I added a little shading with a brown pencil. Then I overstamped with gold Brilliance ink. I wanted to create the effect of vintage fabric. I heat embossed the leaf in gold and then carefully cut out and mounted the leaves to frame the aperture. I heat embossed the tree in gold onto a large piece of dark brown card and then mounted the frame on top.

There are some delicious stamps on this new plate and you can find it on the Chocolate Baroque website here

There will be more design ideas to come this week from my fellow teamies.

Elaine

Wednesday, 26 October 2011

A Taste of Italy in a Scrapbook page!

I was very excited when I heard that Glenda was introducing some Italian themed stamps, as I regularly go to Italy on holiday. I have just come back from a trip to Lake Garda, and couldn't resist using the opportunity to blend the stamps and my holiday together. I decided to make a scrapbook page. I am not a natural scrapbooker, but I really enjoyed making this project.

I used a lovely Prima mask, which is available from Chocolate Baroque, and coloured my background paper with several colours of Distress Ink. I then used the fabulous crackle stamp to create an aged plaster feel to the whole page. I stamped the two large images onto watercolour paper, and coloured them in with Polychromos pencils, adding a mount behind them. I used two holiday photographs which reminded me of some of the lovely places we had seen, and then made some brightly coloured flowers, using a Crealie die and some vellum. Everywhere we went, the flowers were growing in abundance, and the colours were really vivid, just like these.


I hope that I have given you just a little taste of Italy in my scrapbook page, and that you can see how lovely these stamps are. Keep checking back all week for more samples from the Design Team. Thanks for stopping by, Judith xx

Tuesday, 25 October 2011

Echoes of Italy and Woodland Dreams

The girls are ahead of me here - I've been without a working computer at home for over a week and I had real problems with Blogger too, but the computer is back and things seem to be working fine now.

So, October's new stamps are two new A4 sets packed with beautiful images. 


Echoes of Italy has been in the pipeline a long time and I'm sure the images will seem familar to anyone who has visited Tuscany, though they could equally be from Provence or other rural mediterranean areas.

Woodland Dreams is a much more stylised and decorative interpretation of trees and woodland and makes really striking contemporary cards.  The simple shapes are easy to mask out, so lots of potential for using them with interesting background techniques.

The girls will be adding more of their artwork to the blog over the next week or two, so do keep coming back for more eye candy!