Pin It button on image hover

Wednesday, 15 December 2021

Colourful Garden (by Julia)

Hello everyone,

For this project I have used stamps from The Folk Art Garden stamp set.

Stamp flower heads and sprigs using black Versafine Clair ink onto white card, then cut out.

Paint flowers with yellow and orange water colour, paint sprigs with green.

Stamp large stamp from The Toadstool Garden stamp set, then cut out Toadstools and one paisley shape.

Paint with water colours.

Using a seven-inch square base card, cut a black mat slightly smaller than base, then cut a white mat slightly smaller again.

Paint edges using yellow watercolour.

Cut another white mat slightly smaller again, edge with black.

Glue all mats to base card.

Glue toadstools to top left hand corner, glue flowers and sprigs around the edges of the card.

Stamp the sentiment from The Toadstool Garden onto white card, cut out and edge with black, then mat onto yellow card, and also edge yellow card with black. 

Glue sentiment to centre of card, add paisley shape and another sprig.


Happy crafting.

Julia x


Monday, 13 December 2021

woodlland memories

Today I am sharing samples using the remembrance tree and the trees a crowd stamp sets.


The first one is the remembrance tree , simply stamped in black versafine onto an inky background, although i did cut down the remembrance to remember!
The background was sponged in wild honey distress oxide ink, and images from the polygon poppies stamp set were randomly stamped using the same ink pad. I used a circular mask behind the tree and sponged over it to create a moon, then added a narrow black mat to finish

Using the harmony tree and trees a crowd set as well I created a concertina book from a sheet of A4 card. The background was sponged with distress oxide inks using peeled paint and broken china, with some fairly random stencilling and stamping. 
 

The first spread used the remembrance tree , with two of the words stamped onto spare card, cut out and glued in a slghtly different place and edged with black charcoal pencil.
The harmony tree this time, but only the words on the right of the stam


Two  tree stamps from trees a crowd this time, with the lines of the stamp in the background extended behind the larger tree - sentiment from same set.


Two more stamps from trees a crowd to finish the last page


A bit back to front, this was the outer pages of the concertina, with the leaf spray from  from nature 1 stamped in blue and random words from harmony tree cut out and edged with charcoal pencil


Sunday, 12 December 2021

Beautiful Trees (by Sandra)

 Hello, I'm sharing some more of my cards from the November show on the Craft Store.

My first card uses Trees a Crowd. I started with a 18cm piece of card and using a stencil I blended Distress Oxides to create my background scene and moon. I spritzed the background with some water and blotted it to give me a snowy effect. I added some sparkle to the moon, but unfortunately it doesn't show on the photo. I then stamped the main bare tree stamp 3 times at different heights. I stamped out a sentiment and mat and layered my pieces onto a 20cm card base,


For my next card I used a roller to apply Versafine Clair ink to my Inky Plate. I cut a strip of card that was as wide as my card base, but narrower and pulled the print. I then used a scrap of copy paper to make a hill and applied ink with a blending brush. I stamped the trees in Archival ink and adhered to my card base. I added the sentiment which was stamped onto a piece of card with a torn edge.


My next card uses the Harmony Tree, Small Graph Paper and Artist Trading Heart stamp sets.

I started by stamping the heart onto a piece of card and masking off the outside. I blended Distress Inks to make my background and then stamped the tree. I used colouring pencils for the tree. I removed the mask and added the chain  as a hanger and added a shadow on the edge of the heart. I finished by adding the sentiment and layering onto a 15cm card base.


My last card today uses the Remembrance Tree stamp set. I used a small piece of watercolour card stock and sprinkled with Brushos which I then sprayed with water. Amazes me every time! Once it was dry I stamped the tree in the lower part and added the words from Remembrance Tree and Harmony Tree.  


Thanks for looking

Sandra x

Saturday, 11 December 2021

Festive Trees (by Judith)

Hello everyone, I hope that you are keeping well. I have a couple of Christmas projects to share with you today. These projects feature stamps that aired on our November TV shows on The Craft Store.

My first project was created on kraft card.  I stamped the large heart from Artist Trading Heart, and masked the outside. I added trees from Trees a Crowd, and some scenery lines with a fineliner pen, using torn paper. Keeping the paper in place, I added some shading with white ink and a stencil brush. I used a white gel pen to add some highlights to the trees and dots in the sky for snowflakes.

I added a sentiment from Let's Get Festive to finish.

My second project consists of two little CAS cards stamped straight on 4" x 4" cards. I used two colours of ink and stamped straight onto the card blanks. These were really quick cards to make. I chose images from Frosty Trees for both the sentiments and main images. The teal and purple colour scheme is not traditional, but would suit someone with a modern home decor. You could choose any colour palette; black and gold, red and green, blue and silver, whatever combination you like, and use black card if you opt for metallic colours for even more drama. I added a little bit of glitter glue on the tree, you can click on the photo for a close up look.

I will be back later in the month with some more projects to share with you, thanks for stopping by, Judith xx


Friday, 10 December 2021

For The Love Of Trees

 For The Love Of Trees

Hello everyone well December already and the days to Christmas are flying by. I am nowhere near ready and not quite sure I will be, but I dare say by hook or by crook I will get there somehow.

Today I would like to share some of my samples using the fabulous variety of Tree stamps featured in the November shows. I have to admit tree stamps are a huge weakness of mine, so versatile and useful in all sorts of different ways.

The first card shown below uses 

Frosty Trees

Versafine Clair Acorn and Pine Cone.

 A White Gel pen.

Masking Tissue.

Country Views

After stamping the Cottage and the Trees using Masking Tissue to give added depth the colour added was applies using soft brushes. The White Gel Pen was used to give the illusion of snow on the roof and in the air. The sentiment was stamped and applied to the card using double sided tape.

This is so simple, it uses stamps from the 

                                    Trees a Crowd Rubber Stamp sheet

MDF plaque and stand, Masking Tissue, White Gesso, Grey Inkpad, apart from the stamping all inks were applied with a soft brush gradually building up the colour.


This sample is rescued from the bin, simply stamped using Versafine Inkpads and a gold gel pen to add a little sparkle and mounted onto Kraft Card.


The next sample is fairly easy to achieve it just takes a little thought before stamping. I have used just an Archival Colbalt Blue plus a Promarker and Ruler.


This next sample uses a Plywood Postcard Stamped and enhanced with Pyrography and inks to colour.


This sample is not difficult and again uses the stamps from the Trees a Crowd stamps. I used a light pencil to help with the designing of this. Two different shades of green to stamp and a fine liner to draw the circles around the images. A green pencil has been used to ground the image in the centre of the card.


Thanks for looking in today 

Love Doreen 


Thursday, 9 December 2021

Hearts and flowers by Rachel

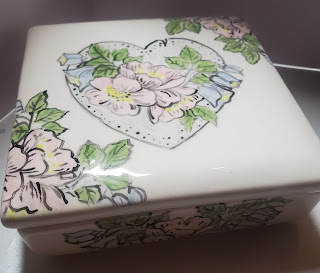
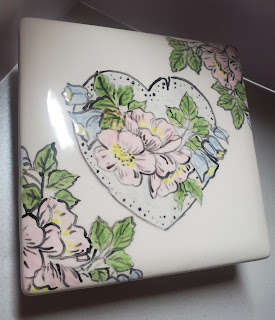
 Hello there! Rachel here today with the first of my monthly visits. These are samples made for the November shows although my ceramic piece never made it to the show - I decided to keep this one! 

To make this I used the stamp set A heart full of love and overpainted the stamped image in glaze before adding to the kiln and firing.  


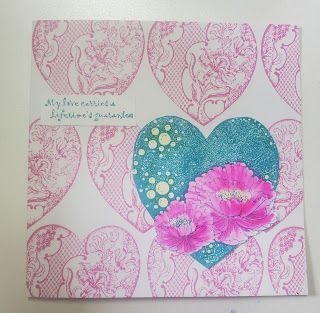
I used the same stamp set in this second piece - a card that I made by repeat stamping in the background and adding a coloured image on top - I coloured the image using watercolour pens.


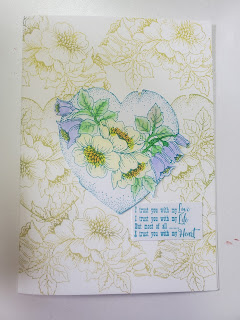
In this final sample I used the same ideas but different stamps from the same set in the background and as the main image.


It really is a beautiful stamp set and I hope I have given you some inspiration in using your set.
Have a great day!
Hugs
Rachel x


Wednesday, 8 December 2021

Mini Envelope and Card (by Julia)

For today's post I have made a 'mini' envelope and card.


I die cut an envelope using double sided card.

You could also use a template or ready made small envelope.

I then measured and cut a piece of white card to fit inside the envelope.

I stamped the large stamp from The Folk Art Garden set using Black Versafine Clair ink pad.

I then cut the card around the butterfly to fit on the front of the envelope.

I used a corner rounder on both pieces of card.

Using Antique Linen Distress Oxide and a spritz of water on a mat I mopped up with both cards.

I coloured the stamped image keeping to sepia tones and then edged with a walnut stain, then glued it to the front of the envelope.

On the plain card insert I used a vintage photo ink and inked different areas of the stamp to give a collage effect.

Edge the card with walnut stain ink.

I then stamped the sentiment onto an oval of card, edge again with the walnut stain and glue onto the oval card, add gold gems and a couple of small flowers to finish.

I hope you enjoy using a large stamp in a different way.

Happy crafting.

Julia x


Tuesday, 7 December 2021

Stamp & Cut (by Magda) - The Folk Art Garden, The Christmas Garden

Hi everyone,                                                                                                                                                  the "Stamp & Cut" Technique gives me each time the opportunity of thinking, increasing my creativity and obtaining something different. Here below I want to show you the result I had using two stamps plates of Chocolate Baroque "The Christmas Garden"and "The Folk Art Garden that I stamped with Archival Jet Black and colored with watercolors. The background of the tags are dabbed or stenciled with Distress Ink Pad


Have a go and have fun with "Stamp & Cut",  hugs
Magda


Monday, 6 December 2021

Change your point of view by Natalie


This project is all about looking at designs differently. It is easy to be lulled into the security of thinking "Oh its a tree stamp, and that means roots/ground is at the bottom and the tip is at the top". However, we can stretch our stamps further by rotating, cropping and even joining them together. This project focuses on this exact concept.

We are going to use the swirl tree from Frosty Trees as a decorative border rather than as it was originally designed. This piece is ideal for multiple uses; you could join it together with a copy of itself and mask the centre for a monogram; or why not press it into enamelled embossing to form a decorative hinge. It is even ideal for paper moulding.

For this example though, simply use a slimline blank and stamp it twice rotating it 180º. You can do this using a stamp platform or using a stamp block. I drew a pencil guideline to help me align the stamp as they should be placed above the central line.

The central decal is then built up with shaped, stamped holly leaves and decoupaged berries which were topped with red glitter for extra shine and sparkle. 

The sentiment was then stamped with gold ink onto red cardstock, then mounted onto gold glitter cardstock. I used the same red to add a panel onto my card blank and decorated it with a green strip to match the holly and tree images. Finally, add the sentiment strip and add two gems/sequins where the sentiment would join the green strip.

Sunday, 5 December 2021

Rainbows & Reflections (By Tracy Thompson)

 I would like to share a couple of creations I did for the November Craft Store shows


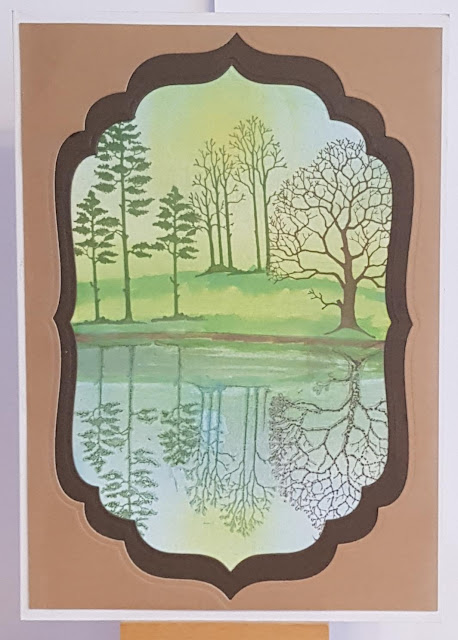
My first creation is all about reflection. I took the Trees A Crowd stamp set and selected some of the trees, I did a waterline so I could line my trees up, I used a gel plate to make the reflections, then I just built up the colouring creating the scene.  I die cut some frames to put around my images in contrasting colours.


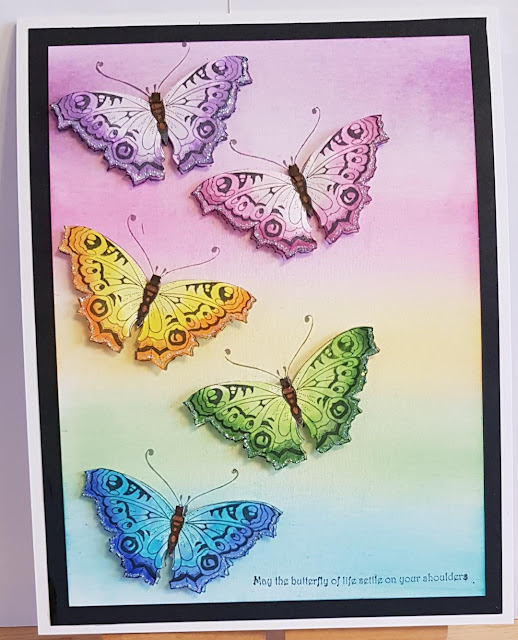
I loved creating this card, now I know it's not for everyone but I have to say I find fussy cutting relaxing.  So to start I chose five colours of Distress inks and then applied them with stencil brushes in  rainbow stripes.  I stamped five butterflies from the stamp set Happy flower's day, and cut them out.  Always cut your image before colouring it as the ink weakens the card and you don't get as crisper cut.  For each butterfly I took the colour from the background so for instance for the pink one I used Kitsch Flamingo, I then picked two other co-ordinating colours, Spun Sugar and Picked Raspberry to shade and colour the butterfly.  I then proceeded to do the other butterflies in the same way.
I stamped the butterfly image on the background where I wanted the butterflies positioned, then glued the cut out butterflies over the top with the wings free and shaped.  All I did then was added a sentiment from the set.

I hope to see you later in the month for some more of my samples from the shows.

Happy crafting
Tracy x

Saturday, 4 December 2021

frosty trees

this stamp set is definitely appropriate at the moment, my part of the country has got away lightly so far with the weather, but it is still very cold. Hopefully those who lost their electricity during the recent storm will all be re-connected by now and gradually thawing out.

My first sample uses one of the snowy stamps to create a sheet of gift wrap. This was just a sheet of copy paper with the stamp repeat stamped using a multicolour ink pad. It is a solid stamp, and quite easy to line up the images - any squiffy ones probably won't be noticeable once you have wrapped something up, especially with any ribbon decoration -I didn't have any ribbon, so used some silver cord.  I also made a matching gift tag, using the sentiment from the same set.

The next samples are very similiar, using the triangular tree and a stamping platform to create a star. The first one I used the same blue inkpad as before, keeping the lighter ink to the top of the tree . The sentiment in the centre was stamped in versamark and gold embossed, The mat is actually silver mirri card
For this version I used a grey ink pad - I didn't have a silver one - and the sentiment was inked with the blue inkpad. The mat was white card sponged in blue using the darker part of the inkpad.
 

Friday, 3 December 2021

Hearts and Flowers (by Sandra)

Hello, I'm sharing some of my cards from the November show on The Craft Store.

My first card uses the beautiful Magnolia stamp from Happy Flower's Day. I stamped the magnolia in Memento ink onto smooth white cardstock and coloured with alcohol markers. I added a sentiment from the same set and some splatters from Numerology. 


My next card uses the Artist Trading Heart stamp set.  I stamped the heart with archival ink and carefully cut it out. I then stamped the butterfly from Happy Flower's Day into the heart and coloured with pencils. I blended some Distress Ink around the edges of the heart, going lighter towards the centre. I made a few light pencil marks on the card base where the heart would be placed and used the small leafy stamps from Filigree Trading Hearts to create a border around the heart. I added the number stamp and sentiment and then adhered the heart to the card with foam pads.

My next card uses A Heart Full of Love stamp set. I stamped this pretty image in Memento Ink and coloured with alcohol markers. I added a sentiment from Artist Trading Heart as I thought it very apt.


My last card to share today. I stamped this corner stamp from A Heart Full of Love using my stamping platform and Archival Ink. I then coloured with water colour pencils. I stamped the sentiment onto a die cut and mat and layered all pieces onto a 8x8 card base.

Thanks for looking

Sandra x

Thursday, 2 December 2021

Blog Comment Winner for November


Hello and welcome to the Chocolate Baroque Design Team Blog.


We truly appreciate the time you take to let us know your thoughts about our designs, so each and every comment is very important to us.


Each comment in November was assigned a number and we used Random Org to draw a winner.


Congratulations to GWEN you have won this month's £15.00 voucher to spend on Chocolate Baroque stamps.

To claim your prize, please email here to confirm your email address and Lesley will send your gift certificate.


Lesley will be giving a £15 gift voucher to another lucky winner drawn from the December comments.


The more comments you leave, the better your chances of being the winner.


Thank you so much for all the kind comments you leave.


Good luck from all on the Design Team


Here is another chance to see the beautiful creation by Tracey.


.


Wednesday, 1 December 2021

Happy December (by Judith)

Hello everyone, I hope you are keeping well. Many of you have been experiencing the cold weather lately, and it really feels like Winter has set in, doesn't it? I have just come back from a trip to Mexico, where it was lovely and warm, and the sunshine was very uplifting. I wanted to share a feeling of that sunshine with you with the colours that I have used in some of my projects today. I cannot promise to make you feel any warmer, but perhaps the cheery colours will brighten your day.

My first project was created by blending some Distress Ink onto a piece of Drawing Cartridge. I chose shades of blue and yellow throughout the whole project for continuity. I added some stencilling and stamped segments of the Small Graph Paper stamp using the stamp in my hand, not on an acrylic block, so that I could curve the stamp, to get smaller sections on the background. I also stamped the butterfly definition from the Happy Flower's Day stamp set on the background.

I stamped the large butterfly from the same stamp set first onto the background twice, and then again onto a piece of spare smooth white card. I coloured the images on the spare card using pencils, cut them out, and attached them to the background.

For my second project, I chose a piece of patterned paper and stamped the magnolia from Happy Flower's Day twice, masking the image as I went along. I added the flower definition and the main sentiment in the background. I coloured the image with pencils. I attached the panel to a chipboard panel using matte medium. When the adhesive was dry, I sanded the edges to give a white edge. 

My third project was created by placing Distress Oxides onto a craft mat and spritzing them with water. I placed the Drawing Cartridge onto the mat and picked up the colour. I used a whiteboard heart to do the same with the remaining colour on the craft mat, giving a paler version.

I stamped the flower definition over the background, and the fritillary flower and sentiment onto the heart. I picked up a bit of the Distress Oxide colour from the craft mat and painted the flower with a water brush.

For my final project, I chose to use grey card for a completely different look. I stamped the floral sprig from A Heart Full of Love around the edge of the background, and then added the floral heart in the middle. I coloured the images with pencils. I used white pencil first on the flowers, and added the other colours afterwards, this really helps on darker coloured card.

It's actually my Birthday today, and I would like to wish you all the best of days today. I will be back later in the month with more projects to share with you, take care, and thanks for stopping by,

Judith xx

Tuesday, 30 November 2021

Masking Ideas by Natalie

Sketchy, textured or broken image stamps all look fantastic when combined with masking techniques. There are a number of masking products you can use to achieve this but I tend to stick to paper based products when working with inks. There are two approaches: positive and negative we shall call them.

Positive Masking


This is where most beginners start with paper masks. You can stamp your image onto masking paper, tissue or tape and then cut it out to create your mask. You should trim slightly inside the image to prevent a halo when apply another image or ink to your design. The resulting mask then masks the original image so you can ink outside of the image for background techniques, glows or shadows. It is also how we can build scenes using multiple stamps. 

Using From Nature 1, stamp and cut out the mask of your chosen leaf image. Depending on your material, you may want to allow the paper to dry before cutting out to save inky fingers.

Stamp your image onto your card blank using any stamping ink and even embossing powder if you wish. Heat set the ink and apply your mask. Using a blending brush, sponge or dauber apply ink over the top - Distress Oxides were used in the sample below. Stamp any textural images you want to add using any inks; you could even stencil over the top.

Peel off your mask and allow to dry. Stamp and mount a sentiment to complete the card.


Negative masking

This is where we mask the background instead; this makes colouring your images a much quicker process. This time trim slightly outside the image to prevent an inner halo using a craft knife or scalpel using a cutting mat beneath your masking material.


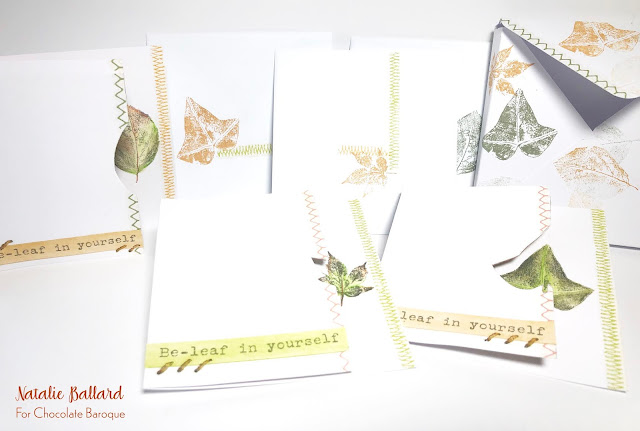
This process enables us to then apply colour to our stamped images quickly. Stamp your image onto your card, in the above sample this was inside a card blank. Apply the mask to your card carefully, working from the aperture outwards. Apply dye based inks over your image; this prevents your original stamped image looking faded.

In the sample above, I then used a light box to sketch the outline of the stamping trimmed the card about 1 inch shorter to the front and around the image. I then applied some rub on stitching designs as well as a sentiment border from the stamp set. Then use the same inks you coloured with to add leaf designs to your envelope.


Monday, 29 November 2021

Autumn Leaves (Tracy Thompson)

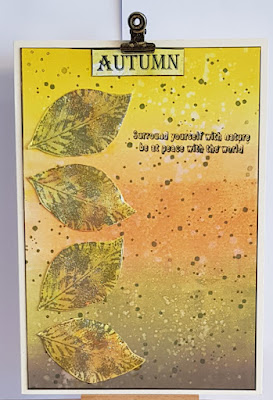
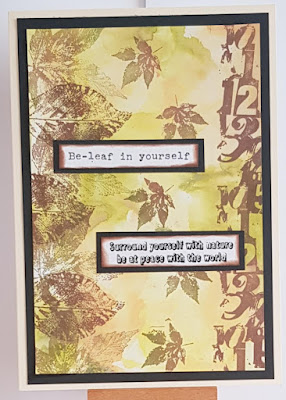
 I'm here with my third post for this month, using From Nature and Numerology from Octobers shows.

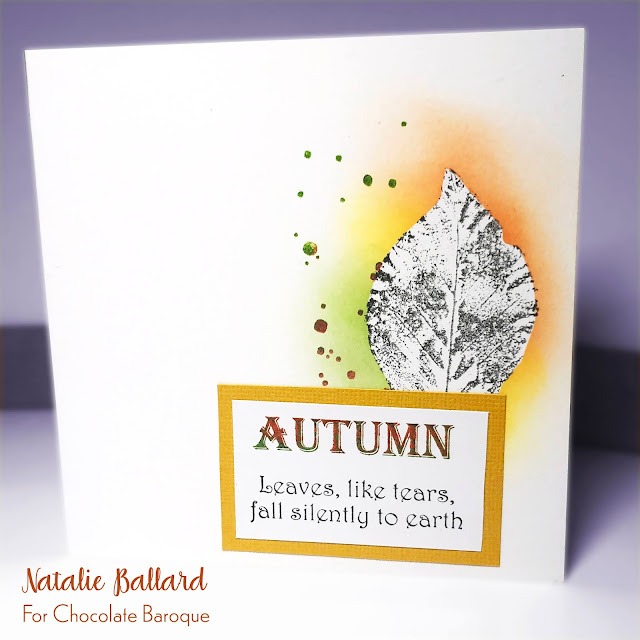
For the background on this I used four different coloured inks blended together.  I then used the splatter from Numerology to stamp over the inking.  The leaves were inked with sprays before being  fussy cut and adhered to look like falling leaves.  then all that was left to do was add a sentiment.  I stamped the word Autumn and a mini bulldog clip to the top.


Another inky background done in a couple of colours,  I then stamped leaves to one side of the card and the numerology stamp down the opposite side, then some smaller leaves floating down the centre.  I layered up a couple of sentiments from the same set and added to the card.

Happy crafting
Tracy x

Sunday, 28 November 2021

tagtastic (by Veronica)

 I have gone back to the From nature 1  stamp set, this time using tags.

I used the tagtastic  stamp on a spare piece of inked card to create the tag, then stamped the larger maple leaf down the centre in green. The fussycut leaves were left over from a wreath card , and were stamped onto a piece of card coloured with brusho powders, and the sentiment was also stamped onto a bit of leftover bit of card and cut up;  the 'ribbon'  was a scrap of fancy knitting yarn.


My second tag was stamped onto a distress oxide background again, but this time trimmed to fit onto a DL card blank cut from kraft card. The leafy spray stamp was inked with a multicolour inkpad  and stamped twice into the tag shape. The third stamping was with a terracotta ink pad. The sentiments were stamped in black ink, and I added shading round the tag shape with a charcoal pencil

Saturday, 27 November 2021

Pretty Grunge! by Sandra


Hello I'm sharing some cards from the October show on The Craft Store.
These feature Floral Grunge, a stamp that is great for different colouring techniques.

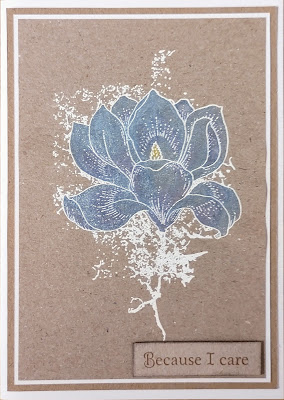
For my first card I stamped the flower onto Kraft paper and embossed in white powder. I coloured the flower using the Shimmer paints that Lesley had recently. This colour is an iridescent purple/blue....gorgeous! I added a sentiment from Pretty Poppies.

For my next card I stamped onto smooth cardstock with Memento ink and used my alcohol markers to colour. I added a layer of leafy paper to a 8x8 card, put a narrow band of card across the centre with a  sentiment from Pretty Poppies and then added my flower, raised on foam pads.

Thanks for looking

Sandra x

http://isthatthetime.blogspot.com/