Friday, 27 January 2012
Sunset with the Wisteria Lane..........
Hello there,
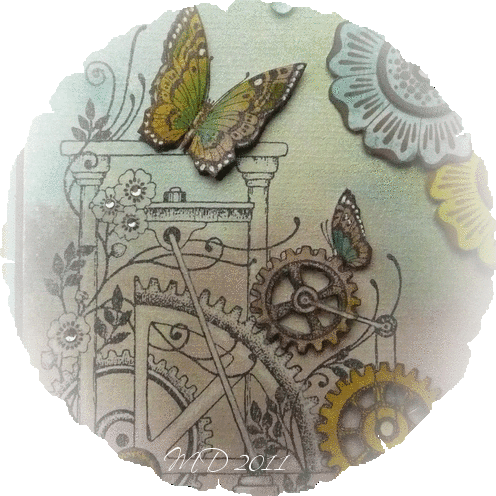
Today I want to show one of my creations made with the new 'Wisteria Lane' sheet. I have made this one using a circle template and sponged with Versa magic. Afterwards I rubbed some perfect pearls over it. You can see the shine in the photo above.
I've also added an acrylic tag , stamped on the tag and also used the same stamp on the orange paper and added perfect pearls. You can see the close up here.... On the background paper(it's from the Essence of Nature) I also stamped the Wisteria and added pearl ex powder glittery copper. Hope to have inspired for you!
Creative greetz and have a nice day,
Labels:
Wisteria Lane
Thursday, 26 January 2012
Art Nouveau Friendship Card (posted by Judith)
Hi folks, here's another sample that I've made using some of the fabulous new stamps recently released over at Chocolate Baroque
I have chosen a quite bold colour scheme for this project, in contrast to my last card. I wanted to create an Art Nouveau feel to the card, and used some of the stamps that suggested that era to me. I have used stamps from the 'Wisteria Lane' stamp plate. I also used one of the Crealie Doily element dies, which are also available on the website to create a border behind the main image.
For full details of how I made this card, please pop along to my blog to take a look. Keep checking back to see what the other Design Team members have been up to over the next few days, as they will be posting some more of their great samples, Judith xx
I have chosen a quite bold colour scheme for this project, in contrast to my last card. I wanted to create an Art Nouveau feel to the card, and used some of the stamps that suggested that era to me. I have used stamps from the 'Wisteria Lane' stamp plate. I also used one of the Crealie Doily element dies, which are also available on the website to create a border behind the main image.
For full details of how I made this card, please pop along to my blog to take a look. Keep checking back to see what the other Design Team members have been up to over the next few days, as they will be posting some more of their great samples, Judith xx
Tuesday, 24 January 2012
With Love by ikki
Hi, this is a card I made with the new stamp plates......
such a useful set of stamps for so many occasions!
I have listed the materials used to make this card over on my blog and would love you to drop by - you will find the link on the sidebar.
ikki
Rose trees
Hi there, I really enjoyed working with all the new stamps, and Rose Tree is such a beautiful stamp I couldn't resist using it 3 times on this card
I've created a brayered scene with the Rose trees in the foreground and a fairy castle in the background. Actually the castle is really a spooky Halloween stamp from 'Howling Moon' but I've wanted to transform it into a fairy castle for ages. The foliage along the top is from Wisteria Lane, another of the new stamp sheets, as is the delicate grass around the bottom of the trees. The scene is brayered with Memento inks and the Rose Trees are coloured with promarkers. I love memento inks for brayer work. The butterfly is also from Rose Tree, stamped on acetate and glittered. More details of how I created this card can be found on my blog.
I think you're going to love this months new releases, my talented team mates have come up with some stunning samples again this month so watch out for them over the next few days
Claire xx
Monday, 23 January 2012
Wisteria Doorway (posted by Judith)
When Glenda showed us these new stamps, I knew that I wanted to combine some of the flowers and butterflies with this lovely door from the 'Echoes of Italy' stamp plate. I have used stamps from the 'Wisteria Lane' and 'The Rose Tree' stamp plates to complete the scene.
I have chosen some of my favourite shades of purple and lilac to stamp the flowers. For full details on how I have made the card, please visit my blog
Please keep checking back over the next few days to see what the other Design Team members have been up to with these fabulous stamps. Thanks for stopping by, Judith xx
I have chosen some of my favourite shades of purple and lilac to stamp the flowers. For full details on how I have made the card, please visit my blog
Please keep checking back over the next few days to see what the other Design Team members have been up to with these fabulous stamps. Thanks for stopping by, Judith xx
Friday, 20 January 2012
Delightful New Spring Florals
I'm so excited to announce our new stamps for January. Three beautiful and very useable floral sets. I managed to get in some playtime with these over the Christmas holiday and found myself reaching for the inktense pencils and copic markers quite a bit.
Watch out for these cards and more appearing on the blog here or over on my own, glendawaterworth.com. The DT have done some wonderful cards too - stay tuned for lots of sunny warm Springtime inspiration!
Monday, 16 January 2012
Bees love flowers
Here are another two samples from the Honey Bee stamps. I decided to collect together a selection of flower stamps from CB and create small scenes. I cut Nestabilies shapes from copier paper and use them as masks. For the first card I used Mustard Seed Distressed Ink and the second used Milled Lavender around the edges. Leaving the mask in place stamp the flowers and leaves.

The thistles and ferns were coloured with various greens.
I coloured the lavender with pens so that the heads were purple and the stalks green.

Remove the masks and stamp the bees and sentiment.
I'm sure we all have flower stamps that these bees will go perfectly with.
Happy stamping and thanks for visiting
Debbie

The thistles and ferns were coloured with various greens.
I coloured the lavender with pens so that the heads were purple and the stalks green.

Remove the masks and stamp the bees and sentiment.
I'm sure we all have flower stamps that these bees will go perfectly with.
Happy stamping and thanks for visiting
Debbie
Friday, 13 January 2012
Punky Romance Winner
I am WAY behind here, but only because we had a rush of orders to deal with and that's a good reason to be busy so I'm not complaining. Things have settled down now, so I'm catching up with a very overdue job - picking a lucky winner of our latest stamp set, Punky Romance.
I have picked randomly from our followers and the lucky person is: Suzanne Czosek! Congratulations Suzanne, please can you get in touch and we'll get your stamp set sent out to you.
We have new stamps coming out soon, so watch this space for more glorious artwork coming up.
I have picked randomly from our followers and the lucky person is: Suzanne Czosek! Congratulations Suzanne, please can you get in touch and we'll get your stamp set sent out to you.
We have new stamps coming out soon, so watch this space for more glorious artwork coming up.
Labels:
Punky Romance,
Winners
Saturday, 7 January 2012
Bee Hive note card
Good Saturday morning.
I make a selection of cards in January for different occasions that can be used during the year. I tend not to add a sentiment until I need the card.
I used Memento Tuxedo Black ink to stamp the Bee Hive and coloured with a mix of Alcohol pens to colour.

This is a lovely image to colour with pens, pencils, paints and we all love to colour in.
Have a good weekend
Debbie
I make a selection of cards in January for different occasions that can be used during the year. I tend not to add a sentiment until I need the card.
I used Memento Tuxedo Black ink to stamp the Bee Hive and coloured with a mix of Alcohol pens to colour.

This is a lovely image to colour with pens, pencils, paints and we all love to colour in.
Have a good weekend
Debbie
Thursday, 5 January 2012
This is what's in the box
These are the cards that I made to go in the box I showed previously. The stamps are from the Honey Bee and Pretty Bird Cage stamp sets.

The cards are A5 size and are perfect quick makes. I love the spring feel to the stamps and I'm sure we are all looking forward to better weather. I'll post pictures of the individual cards over the next few days here and on my own blog.
Thanks for stopping by and stay warm
Debbie

The cards are A5 size and are perfect quick makes. I love the spring feel to the stamps and I'm sure we are all looking forward to better weather. I'll post pictures of the individual cards over the next few days here and on my own blog.
Thanks for stopping by and stay warm
Debbie
Wednesday, 4 January 2012
Gold watch
I don't need much of an excuse to use the fab perforated postage papers from Chocolate Baroque and had to use some with this elegant fob watch stamp from Punky Romance themeplate. Its so easy to create the faux postage effect, especially with the Ultra Fine Masking Tape
The watch is stamped and embossed with gold EP and distressed with Vintage Photo Distress ink before removing the masking tape. The postmark stamp is from the Mail Art stampsheet.
The background is made with the same watch stamp, using metallic gold ink on vellum. I've used gold mirri card to mat and layer and attached the vellum with eyelets and a scrap of gold ribbon
I think this stamp will be perfect for retirement cards
Thanks for visiting today,
Claire xx
Labels:
Punky Romance
Tuesday, 3 January 2012
Steampunk necklace
Hi there, my project today is a stampbord necklace made using stamps from Punky Romance and stampbord squares.
The stampbord is painted with metallic silver paint and I used the large Steampunk corner image with black StazOn ink. I found it easier to press the stampbord squares onto the inked stamp rather than stamp onto the small squares. The squares were all triple embossed with clear UTEE and while the UTEE was hot I added some tiny watch parts. Once the UTEE has cooled I attached glue on bails to the back of each square and joined them together with silver chain.
I hope you like my necklace, I think its a great way to use those stampbord inchies.
Thanks for visiting today
Claire xx
Labels:
Punky Romance
Sunday, 1 January 2012
Honey jar label (posted by Elaine)
This is my last project from the delicious new Honey Bee plate. I love making preserves and so wondered about combining stamps from the bee set and the flower from the Pretty Bird Cage plate to make a label for a jar and a cloth lid cover. Here are the results.
For the lid I cut a circle of natural calico with pinking shears to stop the edges fraying. I stamped the image with Versacraft ink which is especially designed to stamp onto fabric. I coloured the image with Inktense colouring pencils. Finally I edged the lid with honey coloured ric rac and tied the lid cover onto the jar with yellow and white baker's twine.
I hope you have enjoyed the variety of projects that my DT teamies have been posting with the newly launched stamps recently - aren't they great?
Happy New Year crafters!
Elaine
For the label I stamped in brown memento ink, before colouring with Coloursoft pencils. I pieced the beehive and flower images together, adding the word honey at the bottom. A friend has just given me a Xyron adhesive machine and I realised after I had finished this label, this would probably have been a great project to try it out on and stick it down more evenly.
For the lid I cut a circle of natural calico with pinking shears to stop the edges fraying. I stamped the image with Versacraft ink which is especially designed to stamp onto fabric. I coloured the image with Inktense colouring pencils. Finally I edged the lid with honey coloured ric rac and tied the lid cover onto the jar with yellow and white baker's twine.
I hope you have enjoyed the variety of projects that my DT teamies have been posting with the newly launched stamps recently - aren't they great?
Happy New Year crafters!
Elaine
Saturday, 31 December 2011
Dandelion Clocks (posted by Judith)
Hi folks, here's another project that I created from the Punky Romance stamp plate from Chocolate Baroque. I wanted to make a bright and cheery card, using the dandelion clock stamps on the stamp plate. I really like the style of these stamps, and the stems of the dandelion flowers feel a bit Art Nouveau to me. I chose to team them with the Shapeabilities: Ornate Artisan Tags & Accents die set, as the corners were an almost perfect match.
I created a watercolour background, using various orange and red Ecoline inks. I then placed a large cog mask over the top, and sponged Distress Inks through the mask. I also stamped the two single dandelion clocks randomly over the background. I used a spare piece of the background to stamp the main image, before die cutting it with the die. I chose to use black card as a striking contrast to the orange tones on my card, and added Glossy Accents to the centres of the dandelion clocks.
The Shapeabilities are available from Chocolate Baroque, they are a great set teamed with these fabulous stamps. This was a very bright card for me, but these stamps really pushed my boundaries, and I have loved using them.
Keep checking back for more samples from the other Design Team members using these new stamps, and a Happy New Year to you all, Judith xx
I created a watercolour background, using various orange and red Ecoline inks. I then placed a large cog mask over the top, and sponged Distress Inks through the mask. I also stamped the two single dandelion clocks randomly over the background. I used a spare piece of the background to stamp the main image, before die cutting it with the die. I chose to use black card as a striking contrast to the orange tones on my card, and added Glossy Accents to the centres of the dandelion clocks.
The Shapeabilities are available from Chocolate Baroque, they are a great set teamed with these fabulous stamps. This was a very bright card for me, but these stamps really pushed my boundaries, and I have loved using them.
Keep checking back for more samples from the other Design Team members using these new stamps, and a Happy New Year to you all, Judith xx
Friday, 30 December 2011
Harlequin Gift book and Necklace (posted by Judith)
Hi Folks, well as the big day draws near, and we start to think of the New Year ahead, I'd like to wish you health, happiness and lots of great crafting in 2012!
I'd like to show you a project that I made with the fabulous Punky Romance stamp set from Chocolate Baroque. I wanted to create a card and gift in one with these fabulous stamps, using a softer colour palette than I did for my last project. I created a book card, using sections of card folded and glued, to make the insert, and then created a cover, using kraft card. I stamped the harlequin butterfly image onto white card with a creamy white embossing powder, which acted as a resist, over which I applied some ink in different shades of plum and lilac.
I overstamped the cog stamp with a deep burgundy, added some cream lace, and a velum butterfly, again embossed with the creamy white embossing powder. A sentiment from the Butterfly Dreams stamp set completes the cover.
I added some lace to the inside of the book card, matching he lace on the front, and made a necklace to pop inside the niche. I chose some lovely deep purple pearls as the base of the necklace. I used a domino sized piece of Stampbord, which I stamped with Stazon, to pick out part of the harlequin butterfly image. I coloured the Stampbord with the lilac and plum inks again, and then etched details of the butterfly wings using a Stampbord tool, to add highlights.
So that completes my gift set, I hope that you like it! Keep checking back to see what my other team mates have made with this fabulous stamp set, and I'll be back with something else that I have made later. Judith xx
I'd like to show you a project that I made with the fabulous Punky Romance stamp set from Chocolate Baroque. I wanted to create a card and gift in one with these fabulous stamps, using a softer colour palette than I did for my last project. I created a book card, using sections of card folded and glued, to make the insert, and then created a cover, using kraft card. I stamped the harlequin butterfly image onto white card with a creamy white embossing powder, which acted as a resist, over which I applied some ink in different shades of plum and lilac.
I overstamped the cog stamp with a deep burgundy, added some cream lace, and a velum butterfly, again embossed with the creamy white embossing powder. A sentiment from the Butterfly Dreams stamp set completes the cover.
I added some lace to the inside of the book card, matching he lace on the front, and made a necklace to pop inside the niche. I chose some lovely deep purple pearls as the base of the necklace. I used a domino sized piece of Stampbord, which I stamped with Stazon, to pick out part of the harlequin butterfly image. I coloured the Stampbord with the lilac and plum inks again, and then etched details of the butterfly wings using a Stampbord tool, to add highlights.
So that completes my gift set, I hope that you like it! Keep checking back to see what my other team mates have made with this fabulous stamp set, and I'll be back with something else that I have made later. Judith xx
Thursday, 29 December 2011
Dandelion Clock pendant
I love to make jewellery and I thought this gorgeous dandelion clock stamp from Punky Romance would be perfect for a pendant. These stamps are so clever with the clock face in the centre.
These pendants are so easy to make, stamp the image on some white card, colour with markers or pencils and attach a flat backed glass with glossy accents. Once its dry trim off the excess card and seal (I just use satin varnish but I'm sure you'll have something in your stash). To finish off add a glue on bale with some glossy accents and once dry add a chain or as I've done string some tiny seed beads on beading thread and attach a clasp.
The tag is made with memento inks (London Fog and Angel Pink) and the same stamps. The sentiment is from Art Nouveau Birthday , stamped on vellum and wrapped around the tag.
These new stamps are perfect for jewelley and I'll be back later in the week with a Punky Romance necklace made with stampbord inchies
Claire xx
Labels:
Punky Romance
Wednesday, 28 December 2011
Shabby Steampunk
Hi, I hope you've had a lovely Christmas and the big chap in the red suit has been kind to you. If you're anything like me you'll be ready for a change after all those Christmas cards. The new Punky Romance stamps were a real breath of fresh air when postie popped them through the letterbox. I've used a tissue paper background stamped with the harlequin stamp for this card.
The large focal image is a really stunning stamp and I've triple embossed it adding some holographic EP to the final layer for some sparkle. I've also made a backing paper by clear embossing the rose stamp from Punky Romance and inking with Dusty Concorde distress ink. Die cut cogs and vellum flowers made with Crealies 18 finish the card off.
Keep checking back as my teamies have some truly beautiful projects with all the new stamps
Claire xx
Labels:
Punky Romance
Tuesday, 27 December 2011
punky Romance butterflies.....
Hello there,
And today my last creation with the punky Romance sheet......for me a very unusual colour combination.....Pumice stone, Crushed Olive and some Tumbled glass. Again with the acrylic bloc technique. I did decoupage some of the elements and used the flowers from the Bold blooms sheet.As you can see I have used the embossing folder 'bricks' on the background behind the image. Added some water drops and gemstones. Also gave some accents with a white pencil.......
And again hope to have inspired you, it's a great sheet to work with!
Probably for now till next year! Enjoy the last days of 2011 and wish you a inspirational, creative and the most important part, a healthy 2012!
Labels:
Punky Romance
Monday, 26 December 2011
Bee-ing organized
Well the big day has been and gone. I hope everyone had a lovely day and that everything on Santas long wish lists was delivered. Looking to the New Year I'm going to try and be more organized.
I made this box that holds a selection of cards made from the Honey Bee stamps.

The hexagons which are coloured with dried marigold and wild honey. The bees etc are stamped using Versafine Vintage Sepia.
Inside are a selection of quick make cards which I will post photos on here and my own blog.
I tried to write the instructions to make the box and when I read them back they were a little confusing. You could make your own box and fill with cards as a gift or just to help you be more organized.
Enjoy Boxing Day and pop back for more inspiration from the Design Team.
Debbie
I made this box that holds a selection of cards made from the Honey Bee stamps.

The hexagons which are coloured with dried marigold and wild honey. The bees etc are stamped using Versafine Vintage Sepia.
Inside are a selection of quick make cards which I will post photos on here and my own blog.
I tried to write the instructions to make the box and when I read them back they were a little confusing. You could make your own box and fill with cards as a gift or just to help you be more organized.
Enjoy Boxing Day and pop back for more inspiration from the Design Team.
Debbie
Labels:
Honey Bee
Sunday, 25 December 2011
another punky Romance creation......
Hi there,
Hope you enjoy these Christmas days and today I want to show you some other creation with the 'punky Romance sheet. I've made this one with Distress inks Victorian Velvet and also the new 'greens' from the Christmas Distress set. On the background I stamped the two solid roses using silver pearl EP. I decoupaged the heart and wings and used some Glossy accents and Rock candy on the wings as you can see on the detailed photo above. The ribbon was white and coloured with copic markers. Some embellishments were added at last. And... oops.... again used the textured fragments sheets shimmering through on the background.......can't get enough of this one......
Till next time, creative greetz
Hope you enjoy these Christmas days and today I want to show you some other creation with the 'punky Romance sheet. I've made this one with Distress inks Victorian Velvet and also the new 'greens' from the Christmas Distress set. On the background I stamped the two solid roses using silver pearl EP. I decoupaged the heart and wings and used some Glossy accents and Rock candy on the wings as you can see on the detailed photo above. The ribbon was white and coloured with copic markers. Some embellishments were added at last. And... oops.... again used the textured fragments sheets shimmering through on the background.......can't get enough of this one......
Till next time, creative greetz
Labels:
Punky Romance
Saturday, 24 December 2011
Blue Butterflies (posted by Judith)
When Glenda sent me the Punky Romance stamp sheet, I was very happy. There are so many different stamps on the sheet, and I could see that there were so many different uses for this set. I love the big corner stamp, and that was what I wanted to use for this project.
I painted a canvas with stone coloured acrylic paint, blending a couple of colours to get the effect that I wanted. I added molding paste through a brick stencil on one side to give the effect of a wall, echoing the bricks on the stamp image. I stamped the image onto tissue paper for the base layer, and added this to the canvas. I then stamped the image three times, colouring it in with Polychromos pencils. I cut the image out, and decoupaged it over the tissue paper layer. I stamped some extra butterflies and flowers from Ruby Tuesday and Patchwork Butterfly, to name just two sets, and coloured those to match. I die cut some black leaves to echo those on the stamp image, and stuck them up the textured brick area of the canvas, and added the extra flowers and butterflies. To finish, I added some metal cogs.
Keep checking back to see what the other Design Team members have been up to over the holidays. Have a great Christmas, and I hope that you get some lovely crafty presents this year! Judith xx
I painted a canvas with stone coloured acrylic paint, blending a couple of colours to get the effect that I wanted. I added molding paste through a brick stencil on one side to give the effect of a wall, echoing the bricks on the stamp image. I stamped the image onto tissue paper for the base layer, and added this to the canvas. I then stamped the image three times, colouring it in with Polychromos pencils. I cut the image out, and decoupaged it over the tissue paper layer. I stamped some extra butterflies and flowers from Ruby Tuesday and Patchwork Butterfly, to name just two sets, and coloured those to match. I die cut some black leaves to echo those on the stamp image, and stuck them up the textured brick area of the canvas, and added the extra flowers and butterflies. To finish, I added some metal cogs.
The finished piece is quite striking in its colour scheme, very unusual for me! This stamp set really inspired me to push the boundaries with my colour choices, as you will see with some of my other projects! The layers in this one were time consuming, but worth it for the finished effect.
Friday, 23 December 2011
'Punky Romance' creation.........and Christmas wishes
Hello there,
Hope to inspire you this time with some creations made with the new gorgeous sheet: Punky Romance from Chocolate Baroque. I must say this sheet was very inspiring to work with.......I really love that steam punk style with that elegant touch of CB!
I've made this card using the new Distress winter colours, great cool colours! I've used lots of water, shimmer and maybe you recognize the texture fragments sheet which I've used for the Crealies flowers.( Petal no.4 and flower no.20) Def one of my favourite sheets at the moment. I've embossed the textures with gold EP on the flowers. I have used clear embossing powder on aquarel paper to stamp the clocks and gears and used the acrylic bloc technique. Then again clear embossing and some extra sponging to create more depth.
For this moment I want to wish you all a beautiful and peaceful Christmas time, enjoy being with family and dear ones! Hope to see you soon again with some other punky romance creations! Hope that Santa likes 'Chocolate' and brings you lot of them!
Labels:
Punky Romance
Thursday, 22 December 2011
Birdcage and Honey Bee winners plus another chance to win!
Thanks to everyone for your lovely comments on the Pretty Birdcage and Honey Bee stamps. I have picked two winners completely at random from the comments and come up with:
Honey Bee goes to Shirls's Cards
and
Pretty Birdcage goes to Gini
Congratulations ladies, please can you get in touch and we'll get your stamps sent out. Gini, I have your details already, so I'll put yours in the post today.
Now, if you're feeling like you never win anything, we have our final stamp set of 2011 just out. It's called Punky Romance and it looks like this:
Perfect for Valentine's Day, anniversaries and weddings, but of course it has lots of versatility for Steampunk fans and is by no means limited to purely romantic kind of cards.
So I am giving you all another chance to be a winner, but this time I am going to pick a winner from our followers. If you are not already a follower of this blog, you have two ways to become one. If you look on the right hand side of the page you will see lots of tiny photos of people with a blue button above that says 'Join this site'. Click on that button and follow the instructions to become a follower. There are various accounts that you may already have that you can use, or simply create a new Google account and use that.
The second way of following is for Facebook users. You can use Networked Blogs which you will find right at the bottom of the side bar on the right.
I will add together the followers from both widgets and pick a winner at random. You have until January 4th 2012 as we are taking a break over the holidays.
Over the holidays, the girls will be blogging some artwork with this set and there's more to come with Honey Bee and Pretty Birdcage too.
So all that remains is for me to thank you all for your support this year and wish you all the very best for Christmas and a Happy New Year. Hope Santa brings you lots of crafting goodies!
Honey Bee goes to Shirls's Cards
and
Pretty Birdcage goes to Gini
Congratulations ladies, please can you get in touch and we'll get your stamps sent out. Gini, I have your details already, so I'll put yours in the post today.
Now, if you're feeling like you never win anything, we have our final stamp set of 2011 just out. It's called Punky Romance and it looks like this:
Perfect for Valentine's Day, anniversaries and weddings, but of course it has lots of versatility for Steampunk fans and is by no means limited to purely romantic kind of cards.
So I am giving you all another chance to be a winner, but this time I am going to pick a winner from our followers. If you are not already a follower of this blog, you have two ways to become one. If you look on the right hand side of the page you will see lots of tiny photos of people with a blue button above that says 'Join this site'. Click on that button and follow the instructions to become a follower. There are various accounts that you may already have that you can use, or simply create a new Google account and use that.
The second way of following is for Facebook users. You can use Networked Blogs which you will find right at the bottom of the side bar on the right.
I will add together the followers from both widgets and pick a winner at random. You have until January 4th 2012 as we are taking a break over the holidays.
Over the holidays, the girls will be blogging some artwork with this set and there's more to come with Honey Bee and Pretty Birdcage too.
So all that remains is for me to thank you all for your support this year and wish you all the very best for Christmas and a Happy New Year. Hope Santa brings you lots of crafting goodies!
Labels:
Punky Romance,
Winners
Tuesday, 20 December 2011
Bee Happy! (Posted by Elaine)
When I saw these lovely Honey Bee stamps I was buzzing with ideas! (Sorry couldn't resist!). I have quite a few samples to share with you, because I love bees so really enjoyed a good play when we had our DT delivery of these stamps.
Here is my first - a fairly simple card.
I started with a 6 x 6 black card blank as I wanted good contrast as a border. I cut a slightly smaller square of white card and used the honeycomb stamp to cover the card using black achival ink. I needed to use the stamp positioner and some masking to add little parts of the stamp to the gaps. I added shading with Sunshine Yellow Adirondack and Wild Honey Distress Inks. I used a white pen and a white glittery gel pen to add highlighting to the small bee wings. I then cut a strip of card for the sentiment and used the Words of Wisdom happy word stamp and positioned the larger bee instead of the word. I coloured the bee's body with a honey coloured marker, added white glittery pen to the wings and glossy accents to finish the body.
I have posted another of my projects - a bee canvas - on my blog today here please pop over and have a look.
Elaine
Here is my first - a fairly simple card.
I started with a 6 x 6 black card blank as I wanted good contrast as a border. I cut a slightly smaller square of white card and used the honeycomb stamp to cover the card using black achival ink. I needed to use the stamp positioner and some masking to add little parts of the stamp to the gaps. I added shading with Sunshine Yellow Adirondack and Wild Honey Distress Inks. I used a white pen and a white glittery gel pen to add highlighting to the small bee wings. I then cut a strip of card for the sentiment and used the Words of Wisdom happy word stamp and positioned the larger bee instead of the word. I coloured the bee's body with a honey coloured marker, added white glittery pen to the wings and glossy accents to finish the body.
I have posted another of my projects - a bee canvas - on my blog today here please pop over and have a look.
Elaine
Labels:
Honey Bee
Thursday, 15 December 2011
Springtime Stamps
I know, I know, Christmas isn't even here and we're already releasing stamps with a definite springtime theme.
Well I wanted to get these on the website before our Christmas break, so here they are, two new A5 stamp sets:
The team have come up with some really lovely ideas for these stamps and over the Christmas break we'll be scheduling some posts featuring their gorgeous artwork.
In the meantime I have one of each set to give away so leave a comment to be in with a chance of winning. I'll pick winners in a week (Wednesday 21st December) so I can get the prizes sent out before Christmas.
Well I wanted to get these on the website before our Christmas break, so here they are, two new A5 stamp sets:
| Pretty Birdcage |
| Honey Bee |
![]() |
| Main image coloured with prismacolour pencils |
In the meantime I have one of each set to give away so leave a comment to be in with a chance of winning. I'll pick winners in a week (Wednesday 21st December) so I can get the prizes sent out before Christmas.
PS - if you think these stamps would make an ideal addition to your Christmas stocking, check out this article on my blog about the Amazon Universal Wish List button - it's such a neat idea!
Tuesday, 13 December 2011
Green and Copper Squares
This is one of my samples from the fascinating Texture Fragments plate. This stamp set really encourages play. I started by using my stamp positioner to help me get an overall background pattern by piecing the small stamp together. Working on green pearlescent card, I used black perfect medium to help me see where I had stamped before I embossed. I find this a really useful ink to have. I embossed in copper powder.
I used small and one larger square of Stampbord, inked with green ink. I edged the tiles with a black marker pen. When fully dry I then embossed in more copper powder. I positioned all the tiles onto the background, added large square brads to the layout and matted the whole thing on a black 6 x 6 card.
Hope you are enjoying the amazing artwork from the team.
Elaine
Saturday, 10 December 2011
Faux kraft resist tag
Hi there, I really enjoyed making this tag with the Texture Fragment stamps. I love creating backgrounds and these stamps are perfect for so many styles. I decided to have a go at making a kraft resist effect by layering up some of the stamps from this themeplate but it doesn't show up too well in the pic
I stamped the filigree panel stamp in pumice stone and then overstamped with the same stamp in tea dye distress ink, using a brick effect to overlap the stamps. The gorgeous border was stamped with black versafine and embossed with clear EP. Next I stamped the texture stamp around the edges with versamark and embossed with clear EP before adding lots of vintage photo and a little black soot distress ink.
I stamped the sentiment from 'Home Sweet Home' and again embossed with clear EP. The main image is also from 'Home Sweet Home', painted with distress inks and framed with a diecut frame that I embossed with black soot distress embossing powder. To finish off I've added some ribbon from my stash, coloured with vintage photo distress ink and a little brass effect brad.
I hope you are enjoying all the inspiration from the DT this week
hugs
Claire xx
Subscribe to:
Posts (Atom)